Gluten-Free Scones (without xanthan gum)
This post contains affiliate links. Please read my disclosures.

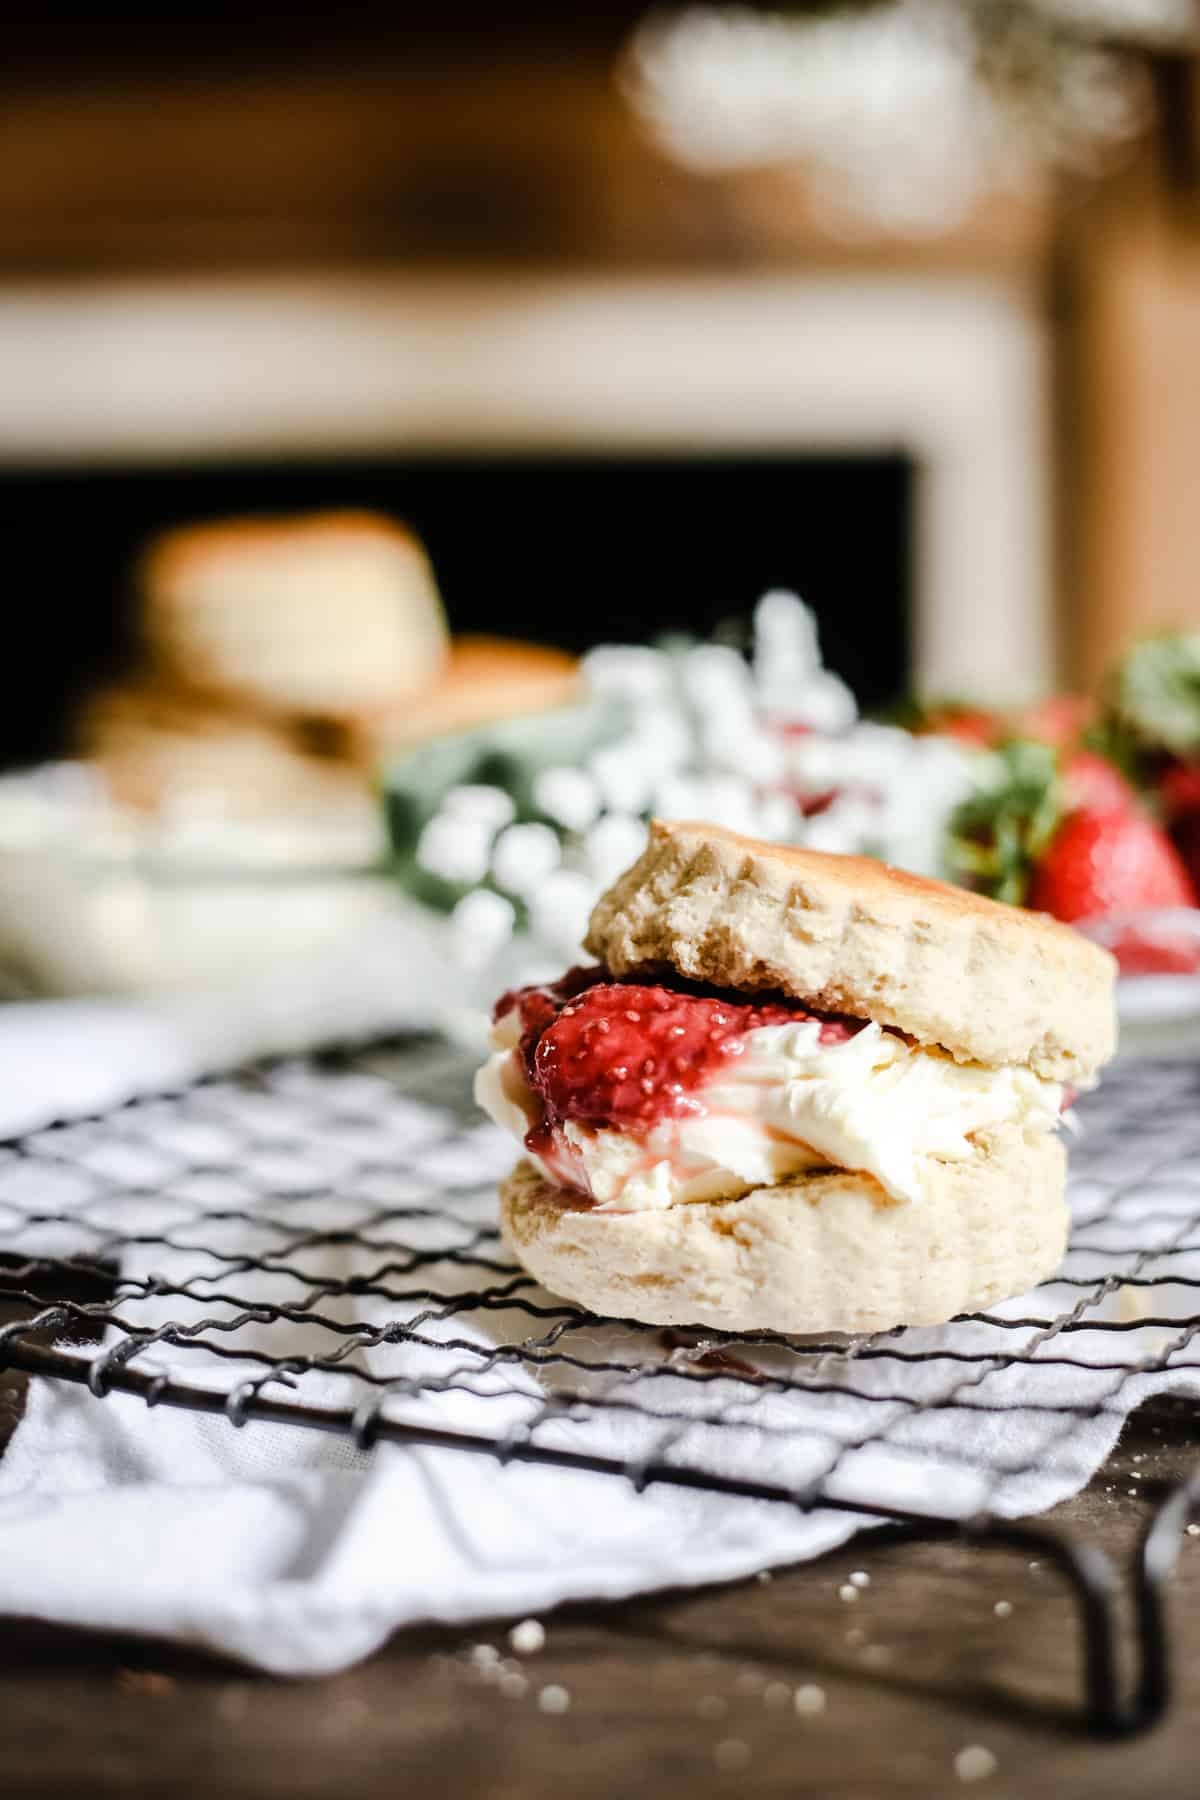
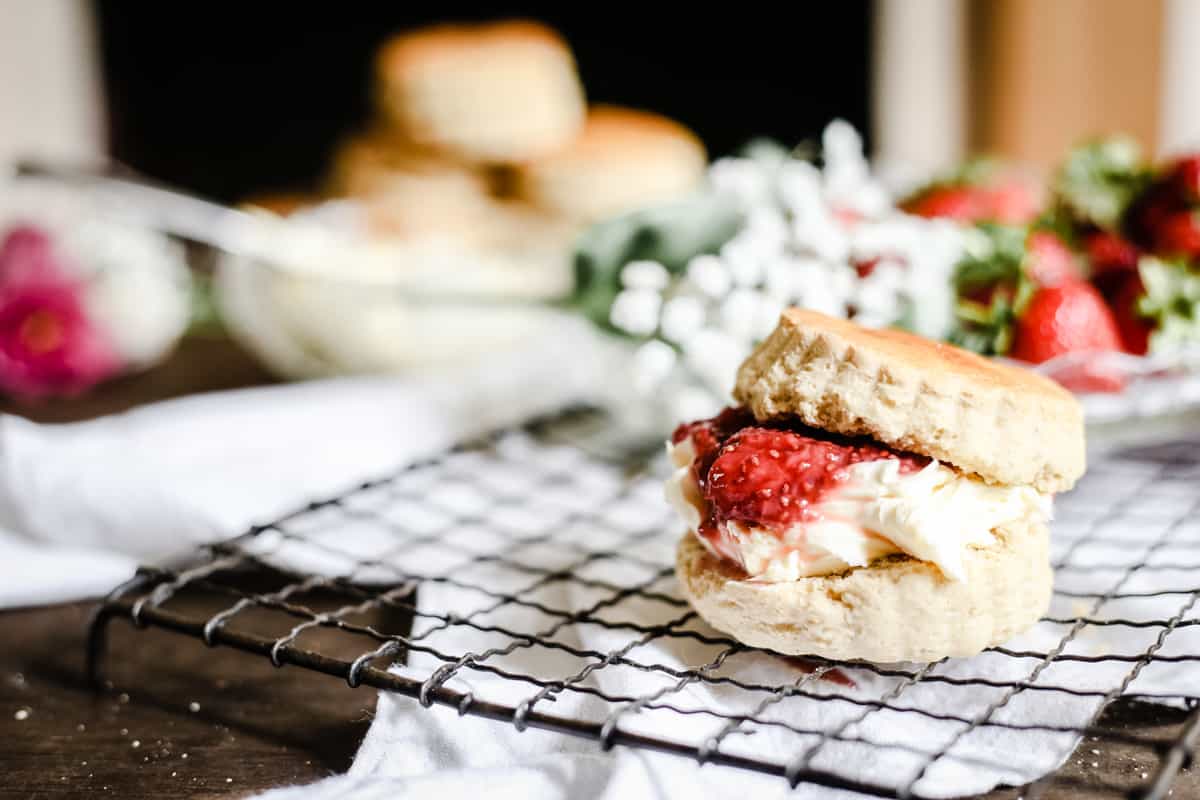
These Gluten-Free Scones, made without xanthan gum, are tall and fluffy with a tender buttermilk crumb. Wonderful as part of your afternoon tea spread, especially filled with a fruity homemade jam and luscious clotted cream.
There is nothing more indulgent than going for a proper afternoon tea. The kind you have in a fancy hotel with a proper tea menu, huge fluffy white scones, delicate cucumber sandwiches and mile high slices of sponge cake.
It’s the proper presentation of the scones which is so alluring, perched atop the tier of sandwiches and patisserie, wrapped in clean white linen, waiting to be discovered. If it’s a first class establishment then these scones will be warm, fresh from the oven and that is when they are at their absolute best. They must then be layered high with thick golden Cornish clotted cream and a vibrant fruity jam.
Whether you slather your scone with the clotted cream or jam first will betray whether you are of the Cornish or Devonshire persuasion.
Joy of homemade scones
Yet scones are such a homely bake to make in your own kitchen. Definitely a comfort bake. You don’t need an expensive food mixer or a specific kind of cake tin. Just a cheap mixing bowl, a wooden spoon and a standard round cookie cutter. You can dive your hands in, rubbing the butter with the flour in your fingertips, feeling the texture of the dough in between your hands as you bring it all together. It’s so satisfying and they don’t take long at all from start to finish.

Why you'll love this recipe
- Made with buttermilk for a soft tender crumb.
- No xanthan gum, instead we use the right blend of gluten-free flours.
- Tall, golden, light and fluffy.
- Buttery flavour.
- Quick bake. Within 45 minutes you can go from a faint craving to taking your first bite out of your homemade scone without any fluster.
Gluten-Free Flours
To make the best gluten-free scones with wonderful texture and flavour and without the need for xanthan gum, we use a blend of flours, each one with their own specific role:
1. Sweet rice flour
This starchy flour is what gives the scones a great texture. It's a soft bouncy flour which holds together very well with a delicate flavour.
READ MORE >>> Ultimate Guide to Sweet Rice Flour
2. Oat flour
A soft fluffy wholegrain flour with a gorgeous slightly toasty flavour which is a great backdrop for any way you wish to serve your scones.
READ MORE >>> Ultimate Guide to Oat Flour
Substitution. You can swap the oat flour for sorghum flour.
3. Millet flour
Millet is a wholegrain flour with a light flavour which is here to balance out the other flours. By spreading the flour love across our blend we get a good even bake with the right texture you expect from a delicious scone.
Substitution. You can swap out for buckwheat flour for a delicious tasting scone.
4. Tapioca flour (Tapioca starch)
This starchy flour is great at binding but it also browns very well so we get beautifully golden scones.
READ MORE >>> Ultimate Guide to Tapioca Starch
5. Potato starch
This starchy flour gives our scones a real lightness with excellent lift. As soon as potato starch is mixed with liquid and hits the heat it expands quickly so we get lovely tall scones.
Gluten-Free Scones without xanthan gum
This gluten-free scone recipe is also without xanthan gum, a regular presence in a lot of gluten-free baking. It’s often used as a thickening agent or stabiliser to help prevent crumbly and dry gluten-free goods. However I never bake with xanthan gum as it can be an irritant to those with sensitive digestions. Instead all you need is the right blend of flours to achieve the texture and consistency you need in a gluten-free bake.
READ MORE >>> Why I don't bake with xanthan gum

Ingredients needed
- Gluten-Free Flours. As listed above: sweet rice flour, oat flour, millet flour, potato starch, tapioca starch.
- Unsalted butter. Cold, straight from the fridge.
- Caster sugar. Very fine white sugar.
- Baking powder. We need a fair amount for a great lift.
- Salt. to balance out the flavour.
- Eggs. We use organic medium sized eggs, about 60g each. You need 1 extra egg for the egg wash.
- Buttermilk. If you can't get hold of buttermilk then you can use whole milk + 3 teaspoons vinegar stirred together and allowed to sit for 5 minutes. (apple cider vinegar or white wine vinegar is fine)
Step-by-step instructions
For full recipe instructions go to the recipe card at the end of this post.
- Whisk flours together, then add the butter, rubbing together to make breadcrumbs.
- Add sugar, baking powder and salt and mix well.
- Make a well in the centre of the dry ingredients and pour in the buttermilk and eggs.
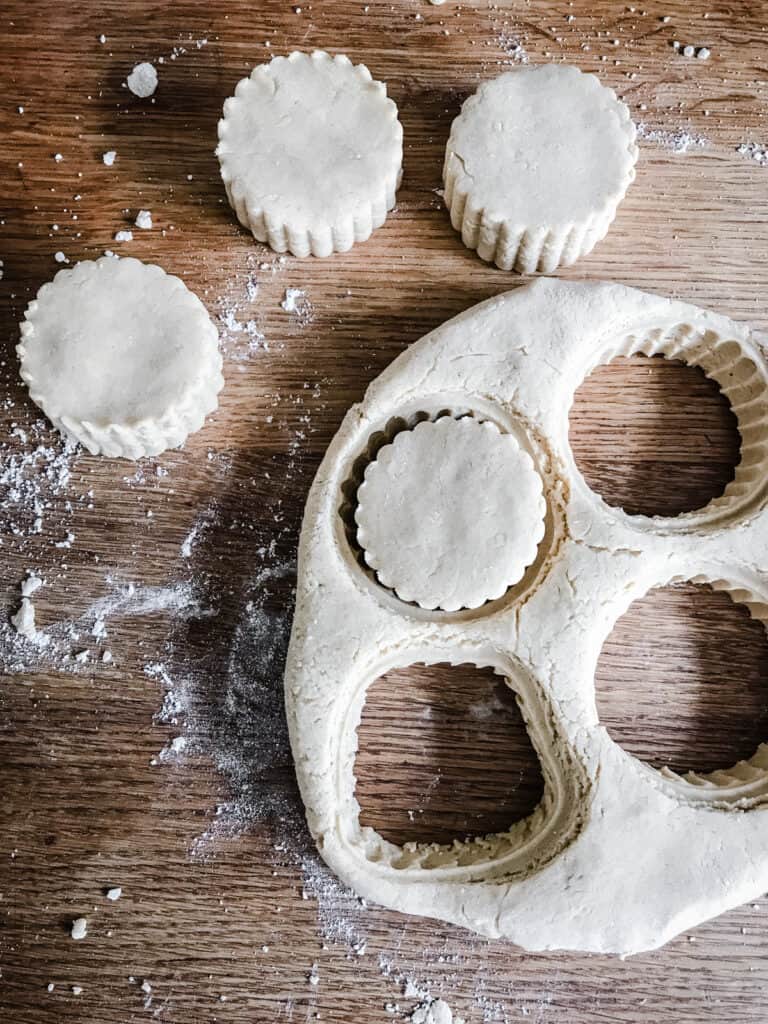
- Bring the dough together, turning out on a clean work surface, and patting together until no longer sticky, into a thick circle, about 1 inch thick.
- Cut out 9 scones using a fluted cutter.
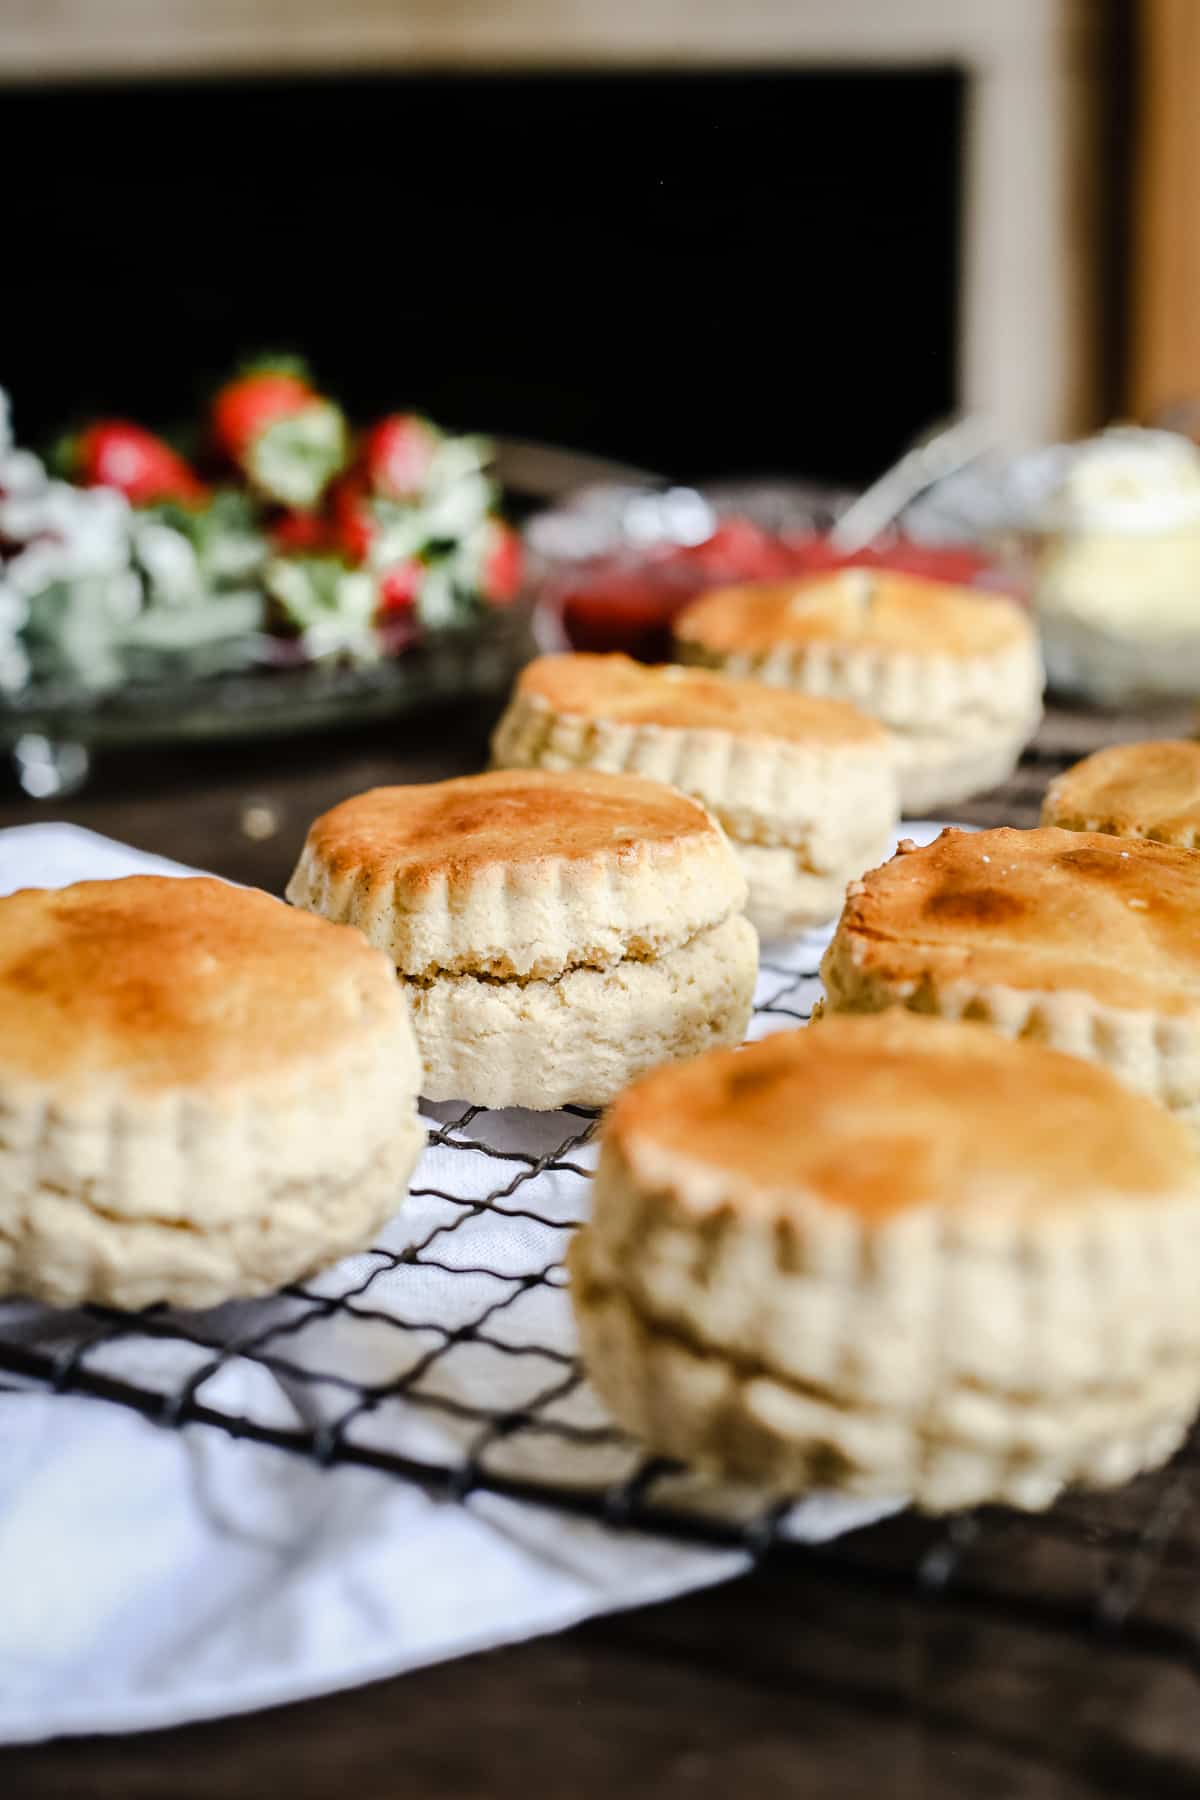
- Place onto a baking tray and brush the surface with an egg wash.
- Bake for 18 minutes.
Pro tips
Cold butter. It is essential that the butter is used directly from the fridge. You need to cut into ultra thin slices and add to the flours. I recommend peeling the butter to achieve this.
Egg wash. This is key in achieving a beautiful golden hue to the top of your scones. How you apply it though is very important. You must brush only the very top surface of the scone, making sure not to drip as otherwise it creates a wonky scone. A silicone pastry brush is the best tool for the job.
Serve immediately. To enjoy the scones at their best they really need to be eaten fresh warm from the oven or at least within the day as they get stale very quickly.
Shop the recipe
- Biscuit/Pastry Cutters
- Large Baking Sheet
- Silicone Pastry Brush
- Gluten-Free Sweet Rice Flour
- Gluten-Free-Oat Flour
- Gluten-Free Millet Flour
- Gluten-Free Tapioca Flour
How to freeze
As soon as your scones have cooled to room temperature you can freeze in a ziplock bag. You can store for up to 2 months in the freezer. Allow to defrost thoroughly before re-heating for 5 minutes in an oven pre-heated to 180°C/160°C fan/gas mark 4.
What to serve with your scones
Jam
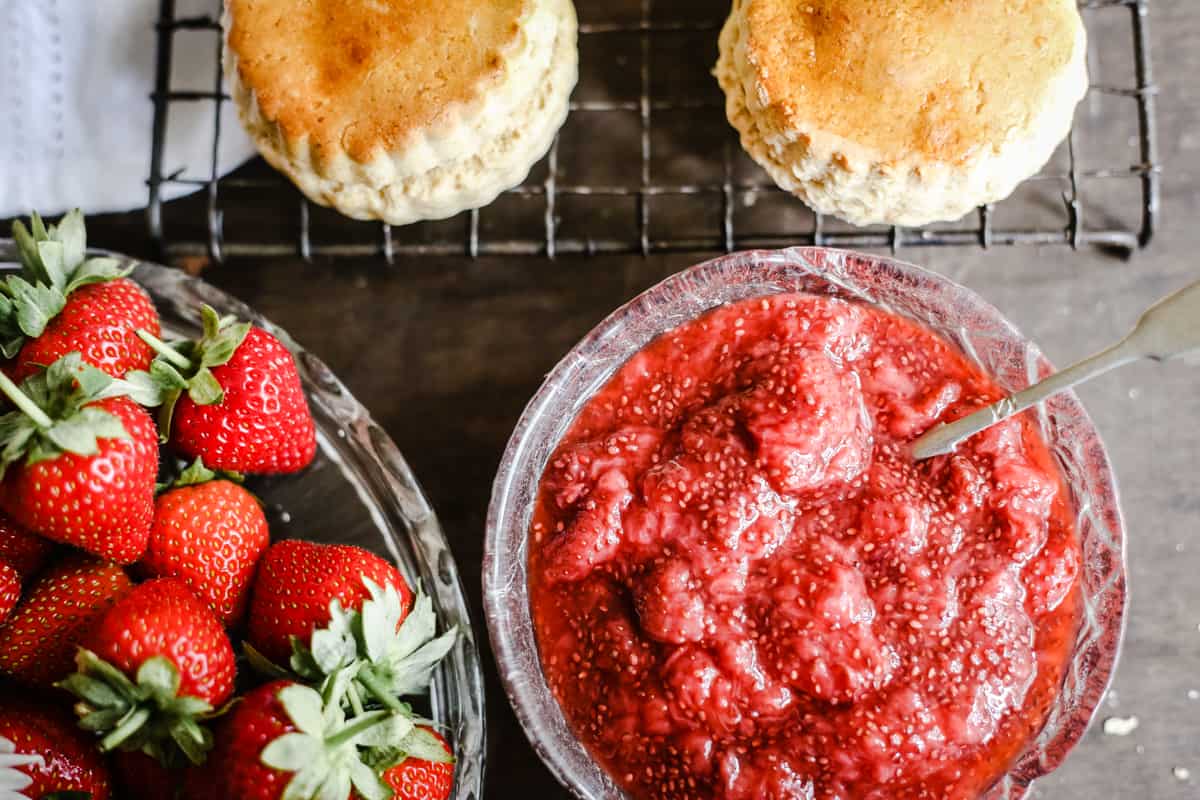
A homemade jam or a really good quality shop bought version will take your scones to another level. If you need some lovely jam recipes then check these out:
- Gooseberry Thyme Jam
- Raspberry Coconut Jam
- Strawberry Redcurrant Jam
- Wild Blackberry & Lime Jam
- Green Plum Jam
- Pear Cobnut Jam
- Damson Orange Cinnamon Jam
Clotted Cream
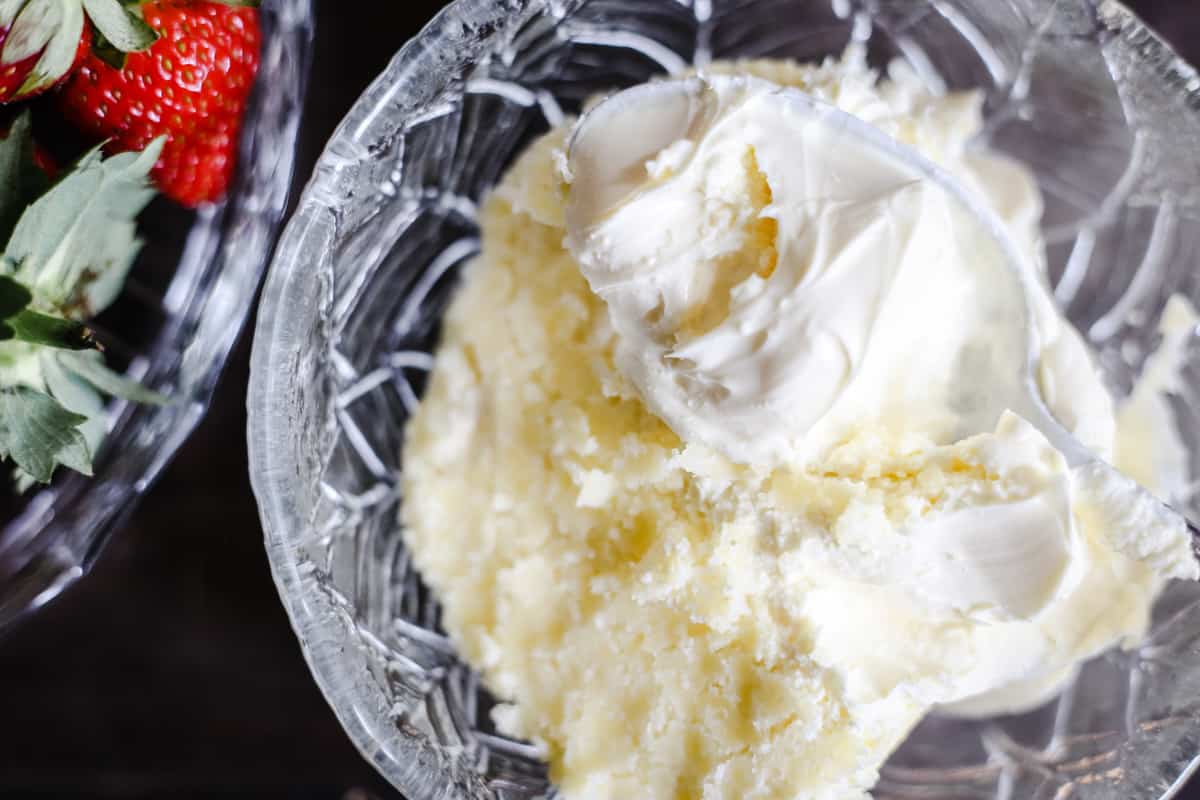
Clotted cream is a fabulous ingredient, I could easily eat it with a spoon but the golden hued crust that you have to break through to get there is the real chef’s delight. Clotted cream is the only choice for a proper afternoon tea. I remember being served the most delicious homemade scones once in Brighton, utterly ruined by the airy canned whipped cream served with them. It’s the clotted cream that really achieves the high end cream team that we all hope for whilst enjoying our fresh homemade scones warm from the oven.
More gluten-free scone recipes
Enter your email below to get this recipe sent to your inbox plus get new recipes, baking tips, and updates.

Gluten-Free Scones (without xanthan gum)
Ingredients
- 175 g sweet rice flour
- 125 g oat flour
- 100 g millet flour
- 50 g potato starch
- 50 g tapioca flour
- 100 g cold unsalted butter sliced thinly
- 115 g caster sugar
- 1 tablespoon + 2 teaspoons baking powder
- ½ teaspoon salt
- 2 eggs + 1 extra yolk for glazing - medium size
- 200 ml buttermilk - + 2 teaspoons extra for egg wash
Instructions
- Preheat oven to 190°C/ 170°C fan / gas mark 5 / 375°F.
- Whisk the flours together in a large mixing bowl then add the butter, rubbing together with your fingertips to create breadcrumbs.
- Add the sugar, baking powder and salt and mix well.
- Pour the milk into a jug and whisk in the eggs until just combined then pour into the centre of the scone mixture.
- At first stir the liquid ingredients in with a wooden spoon then tip out onto a clean work surface and using your hands bring the dough together, turning and folding, until it is no longer sticky. Use a bit of extra gluten-free flour on the work surface if it is starting to stick.
- Once you have brought the dough together into a ball, press it down into an even circle 1 inch thick.
- Cut out the scones using 7cm cutter.
- Place the scones onto a clean baking tray. Whisk the extra egg yolk with a couple of teaspoons of buttermilk (or regular milk) and brush onto the surface of each scone, making sure not to let it drip down the sides, else your scones will not rise evenly.
- Bake the scones for 18-20 minutes. Let the scones rest on the baking tray for 5 minutes then remove and let cool on a wire rack.
Notes
- Oat flour. Swap for sorghum flour.
- Millet flour. Swap for buckwheat flour
- Tapioca starch. Swap for arrowroot powder

Hi Georgina, I haven't tried this recipe yet, but I'd like to know what is the best substitute for potato starch as I have a sensitivity to potato. I also have sensitivity to tapioca, so could I use more arrowroot, or is there something else?
Yes, perhaps arrowroot but you need to be careful with labelling as I've seen tapioca starch packaged up as arrowroot before now. I have only tried potato starch and tapioca starch in this recipe. However, the other flour I might reach for would be almond flour if you can have nuts. Then it means you aren't leaning on the arrowroot too much. Or you could try with almond flour swapping for both the potato starch and tapioca starch. I haven't tried this swap though so it would be experimentation. Let me know what you choose.
Hi, I just tried a half batch of the scone recipe. They are very tasty. I replaced the buttermilk with milk and lemon juice and the millet flour with buckwheat flour.The only issue was that the top of the scones had cracks all over. Do you have any suggestions
I don't have any suggestions for this - as mine also have cracks all over!
THANK YOU! Wow, are these delicious and so like what I remember as the gluten-filled originals! Despite my adding too much liquid (had to fake buttermilk with whole milk +lemon juice) and using the food processor (which made the butter disappear into the mix), they still came out beautiful and the most authentic scones I've made in 12 years. So long, Pamela's Mix. Tremendous job for creating a delicious recipe without xanthan gum. Pretty sure in time we will be told it was worse for our digestive tract than gluten ever was.
I'm so happy you enjoy these scones. I really appreciate you leaving your feedback!
Hi Georgina I made the scones today substituting buckwheat for sorghum and they tasted just great but they were very crumbly. Any suggestions please as I would really like to crack this!!
Hi Marni, this may seem like an obvious question but can I just double check that you used sweet rice flour and not regular rice flour as that is usually the number one culprit.
Delicious! Thank you!
I did it. I managed to get 13 scones. Followed the recipe to the T. Most delicious gluten free scones i have ever made and tasted. I use your gluten free flour mix and absolutely thr best gf flour mix. Will try to make another batch next time and see the results. Shoutout all the way from Malaysia
I'm so happy to hear you enjoyed the scones!! Thank you for your lovely feedback!
Tried the scones today, they were tasty , however mine didn't hold the shape as nicely as yours Georgina. I did add a T of lemon juice to the milk to sour it so maybe that softened the dough. I may try to refrigerate before baking next time. I will definitely try again. Thanks for the great recipes
Thank you very much for the wonderful xantham gum-free recipes. I tried the muffin recipe and it turned out wonderfully, but I tried this scone recipe and it came out sandy/gritty. I did substitute sorghum for millet, but otherwise followed the recipe as-is. I think it may have been underbaked, but didn't want to rely on my "normal scone intuition" for doneness (when I touched it, it sprang back). Do you have any tips for checking for doneness on gluten-free baked goods like this? Probe thermometer?
Hi Ryan, I just first need to check whether you definitely used sweet rice flour (as per the recipe) or regular rice flour. That is always my go-to question when a bake has turned out sandy/gritty. None of the flours in this recipe should produce that result.
I believe I discussed this with you on Facebook, so I hope I'm not repeating myself. What can I replace the rice flour with? I can't eat anything made of rice at all. Scones are more delicate, so I don't have a clue how to change this recipe, if I even can. Thank you so much for your help.
Hi Alene, this is a tricky recipe to replace the sweet rice flour as it's a very unique starch and provides a certain role that other flours cannot exactly replicate. Plus sweet rice flour is the main flour used in the blend. That said I do encourage you to experiment and I would either choose almond flour (which has a lot of protein so will give a great structure) or cassava flour (which is a starchy flour but it isn't as light as sweet rice flour). I haven't tried either of those replacements in the recipe so I can't guarantee results but that is where I would start.
Excellent recipe, really enjoy reading your blog
Thank you - I'm happy you like the scones!
These were lovely. I did reduce the sugar to 50g to have more of a traditional American-style biscuit and it worked well. I love the mix of flours as well. I have frozen part of the dough and look forward to seeing how they turn out.
That's lovely to hear - I'm happy you liked the recipe!
Hello, these look so good! Wondering if I could freeze these unbaked? Would love to make a batch and freeze, to have them on hand when a scone is needed!
Yes you can. Freeze them without the egg wash. They can go straight from the freezer onto the baking tray and then brush with the egg wash before you place them into the oven. They will bake for a little longer than the unfrozen scone dough.