Homemade Glacé Cherries
This post contains affiliate links. Please read my disclosures.

If you have only ever had shop bought bright red glacé cherries before then you are in for such a treat with these gloriously fruity Homemade Glacé Cherries made with fresh seasonal cherries. Lusciously juicy, full of sweet cherry flavour these glacé cherries will level up your fruit cakes, fridge cakes, rocky roads, Christmas cakes and cocktails! They are not an overnight recipe and require a little bit of time but I guarantee the results will mean you never go back to shop bought again!
Are glacé cherries real cherries?
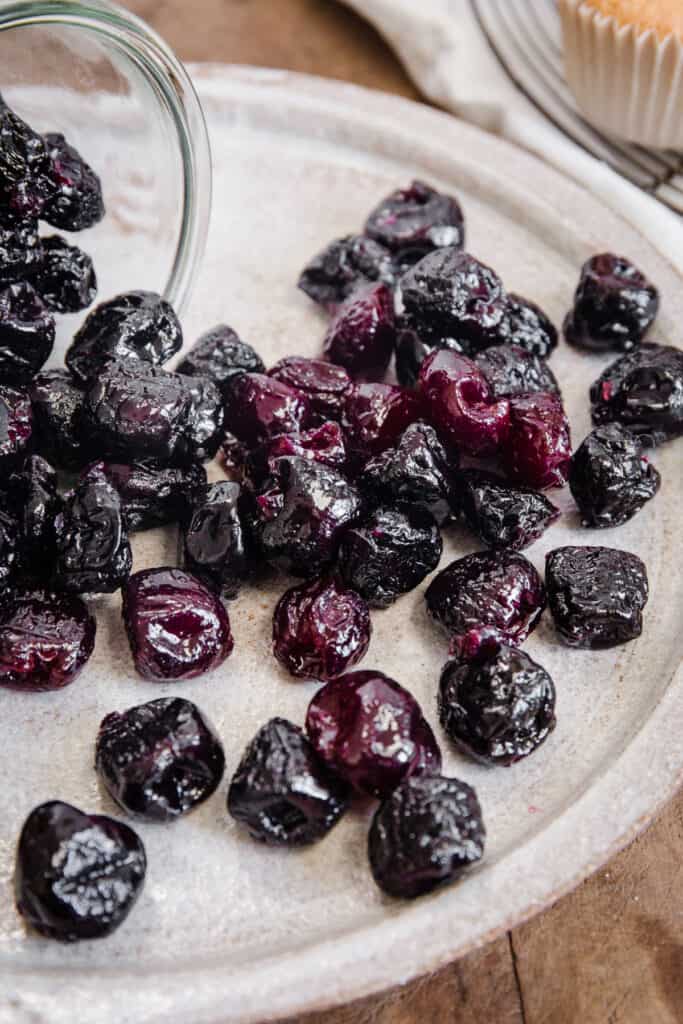
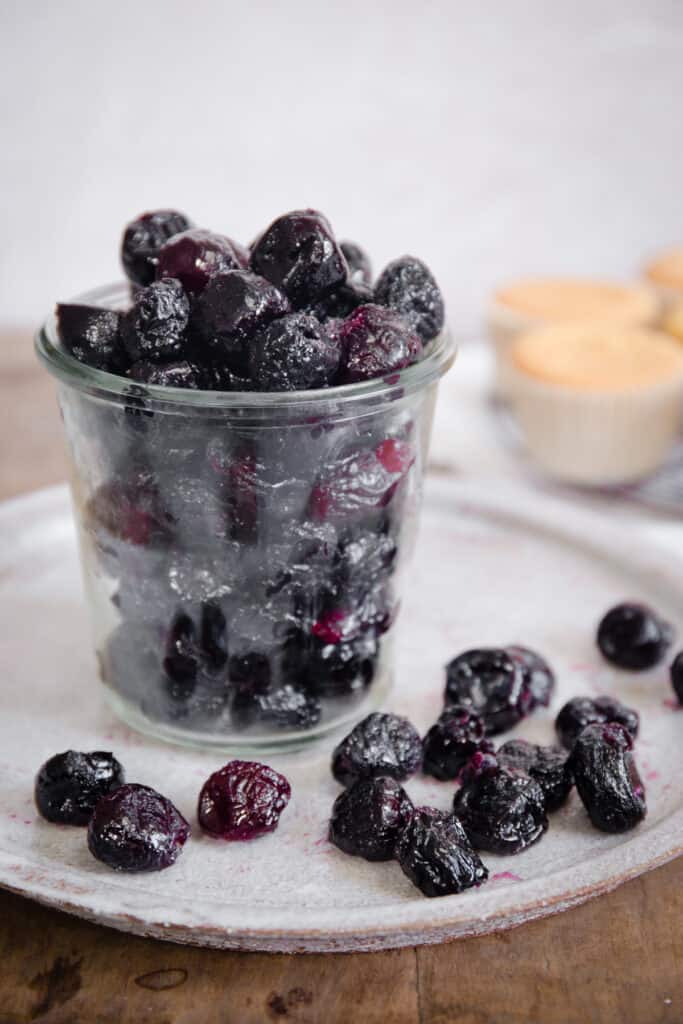
Yes, glacé cherries are made from real cherries. Homemade Glacé Cherries are the real deal and are a world away from the lurid preservative driven red cherries you can find in the supermarket. They don’t have the brilliant postbox red colour but instead command an alluring burgundy. Their texture is also much more dense and fudgey and will pay dividends into your baking all year round.
What are glacé cherries?
They are the most common candied fruit, made from real cherries. Made from preserving real cherries in a sugar syrup so they can be stored for various uses long beyond cherry season.
These candied cherries capture the gorgeous sweet and fruity flavour of your favourite summer stone fruit and can be used for so many different baking recipes.
How to make glacé cherries
Fresh cherries are pitted then cooked in water until tender. The cherries are removed with a slotted spoon then sugar is added to the cooking water to make a sugar syrup. This sugar syrup is then used to pour over the cherries to soak and preserve overnight.
The process of re-heating the sugar syrup and then re-soaking the cherries is repeated several times over following days. This is not a quick recipe that you can complete in one afternoon. It takes 10 days in total (more if you’re feeling a bit lazy – this recipe can be a very relaxed affair) but apart from the first and last day you only need to spend a maximum of 10 minutes tending to your cherries each day.
The reason for this lengthy and sustained soaking and re-heating in the sugar syrup is to ensure the cherries will keep well in your larder or pantry without getting mouldy.
✨At the end of the recipe you will not need to store your glacé cherries in the sugar syrup (unlike other recipes). You can dry the cherries and then store in your larder / pantry or in the fridge for extra long shelf life. This means your cherries will not add excess liquid to your baking recipes and can be used exactly the same as the supermarket bought ones.✨
Quick summary of the recipe
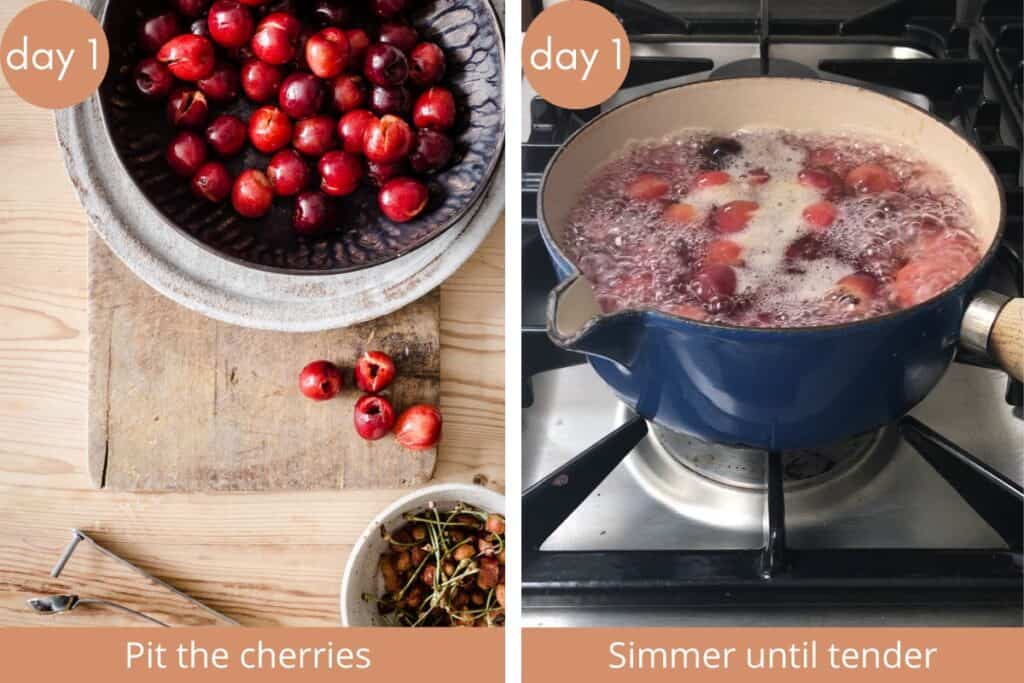
- Day 1. Pit the cherries. Simmer until tender. Create a syrup from the cooking liquid and sugar and pour over your cherries to soak.
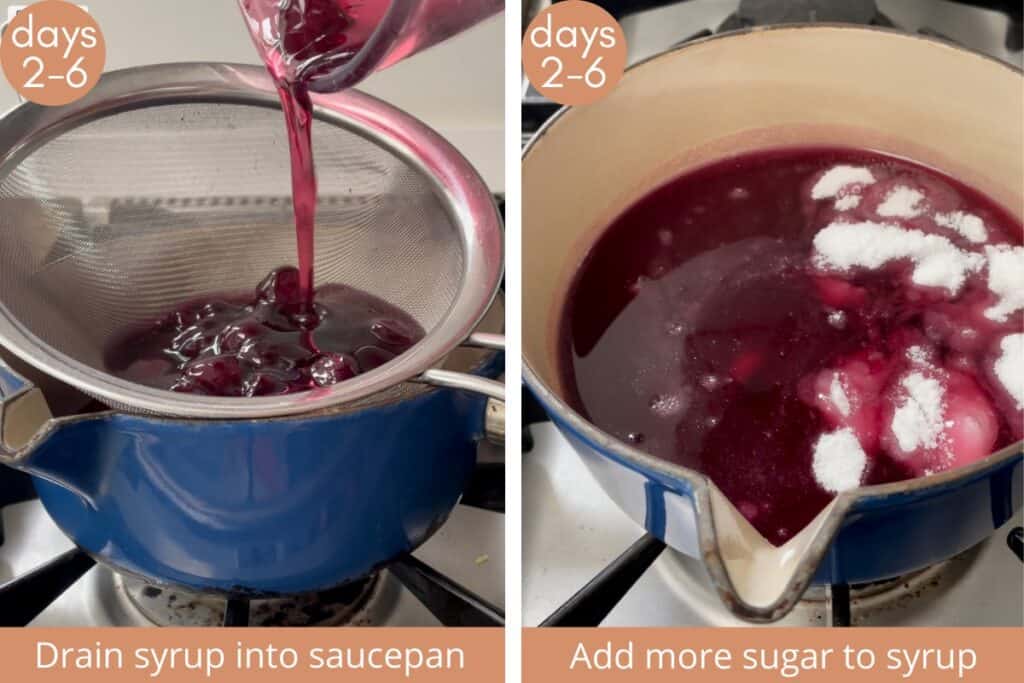
- Day 2-5. Drain cherries. Add more sugar to the syrup, heat until melted and pour back over your cherries to soak.
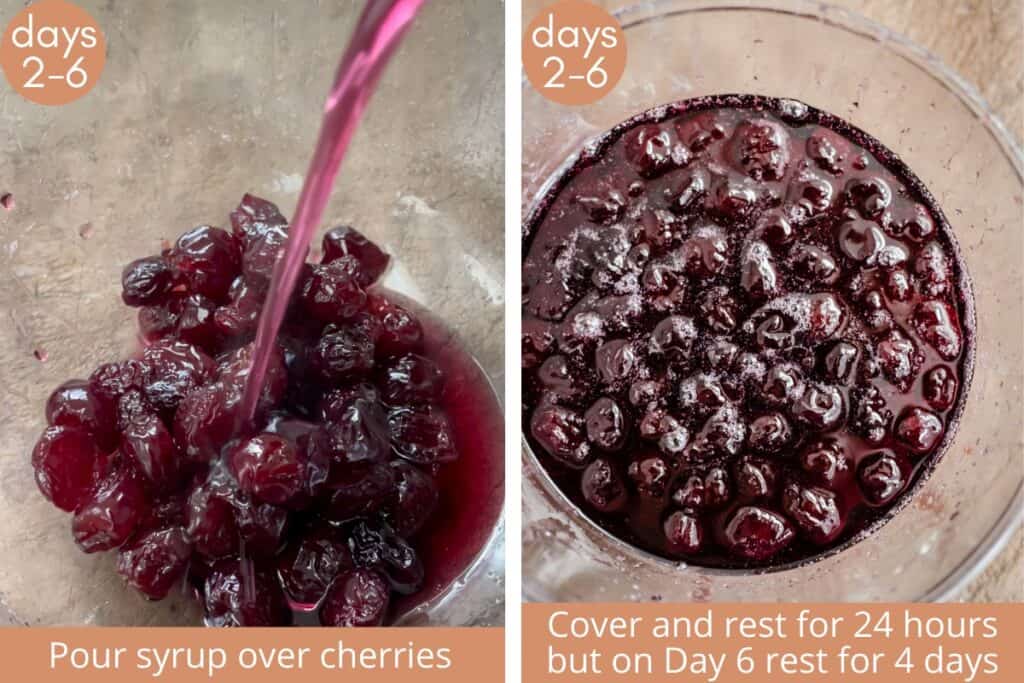
- Day 6. Repeat Day 5 but leave your cherries for at least 4 days to soak.
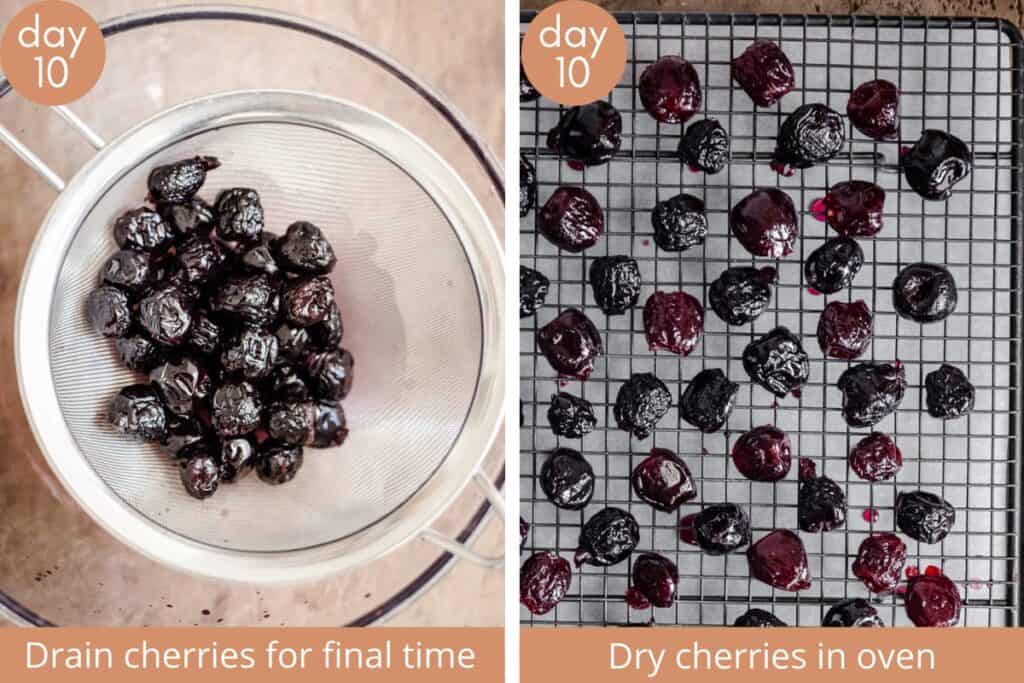
- Day 10. Drain your cherries and dry in a low oven for at least 2 hours. Store until needed.
Why You’ll Love This Glacé Cherries recipe
- Made with fresh seasonal sweet cherries.
- If your cherry trees are bursting with fruit then this recipe is a great way for making sure they don't go to waste.
- They are rich and sweet, with a fresh cherry flavour and slightly chewy texture.
- They knock the socks of shop bought glacé cherries with more natural moisture.
- Natural colouring. A beautiful deep rich red that shine like beautifully expensive rubies, vastly different from different colours you see in the supermarket.
- The recipe isn’t rigid, you can leave your cherries for longer to soak during each stage of the recipe if you can’t afford time to tend to them each day.
- No corn syrup. The cherries are candied through sugar syrup.
Glacé cherries vs. maraschino cherries
Glacé cherries are the best choice for baking, while you might open a jar of maraschino cherries to use as decoration in cocktails and desserts.
- Glacé cherries are made by cooking cherries in a sugar syrup until they become candied and chewy. They have a natural sweet cherry flavour.
- Maraschino cherries, on the other hand, are made with food dye producing their jolly red colour during the preservation process and often flavoured with almond extract. They have a more artificial flavour.
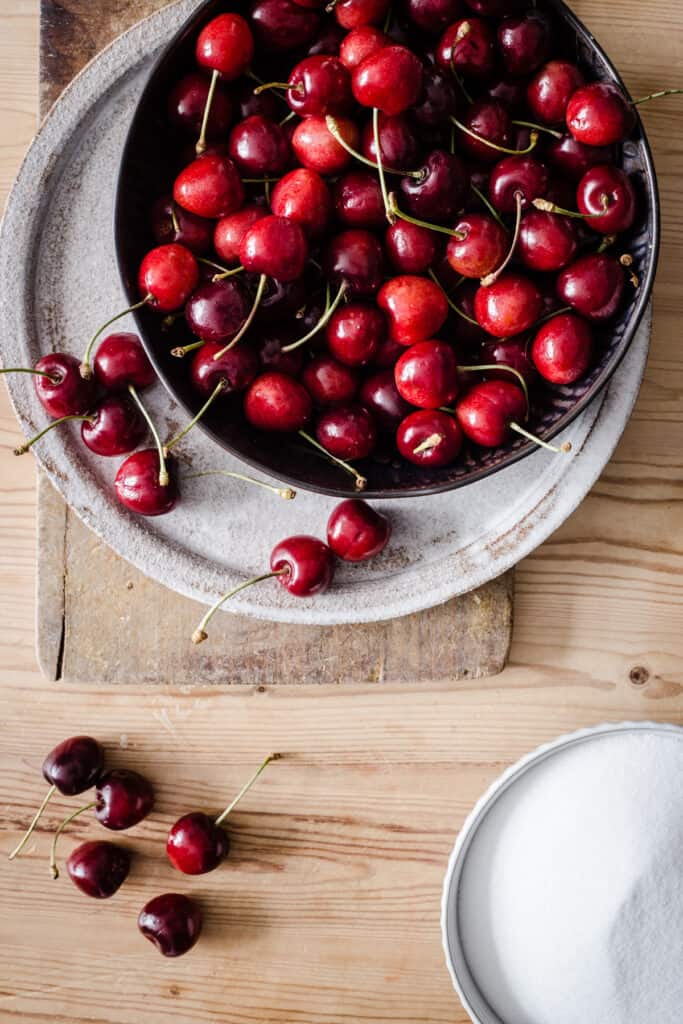
Ingredients needed
- Fresh seasonal cherries. I know some people have achieved success with frozen cherries but I myself haven’t tried it. You can use any type of cherry.
- Sugar. White granulated sugar is the best choice here for even melting.
- Water. From the tap is absolutely fine.
Step by step instructions
For full recipe instructions go to the recipe card at the end of this post.
DAY 1
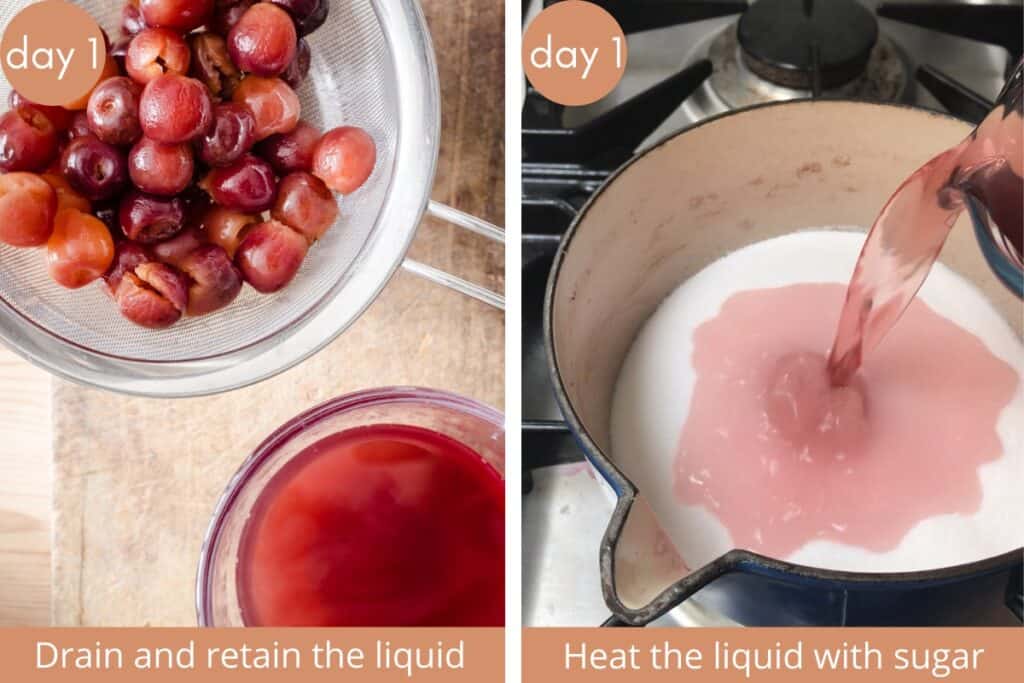
- Prepare your cherries. Pit the cherries then heat them in simmering water until tender. Drain and reserve the liquid.
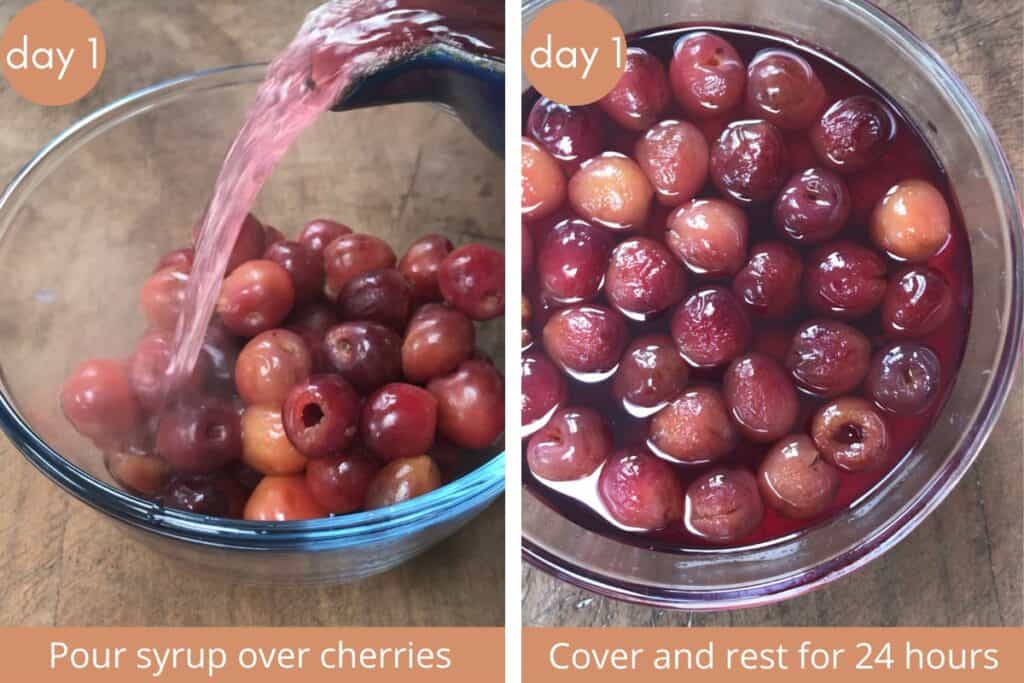
- Make the syrup. Heat the cherry cooking liquid with sugar until the sugar has melted then pour over the cherries. Cover and leave for 24 hours.
DAY 2-5
Drain the cherries and re-heat the syrup with more sugar. Once the sugar has melted pour back over the cherries, cover and leave for another 24 hours.
DAY 6
Repeat Day 5 but this time leave the cherries for at least 4 days for their final soaking.
DAY 10
Drain the cherries. Reserve the syrup for a future use (although you’ll no longer be needing it for this recipe) and place your cherries on a wire rack. Once they have drip dried as much as they are going to then you place the rack in a very low heated oven and dry out the cherries for 2 hours until they only a little tacky. Store in a sterilised jar.
Expert Tips
Use a proper cherry pitter for preparing the cherries so you only get minimal damage to the fruit and a nice clean hole.
You can save the cherry pits for making Homemade Kirsch or Cherry Vodka.
The initial boiling of the cherries takes about 10-15 minutes until they are tender.
Don’t stir the sugar into the liquid (or the syrup after Day 1), let it dissolve naturally – otherwise it could crystallise.
Bring to a gentle boil. As soon as the syrup begins to bubble check the sugar has completely dissolved then immediately remove from heat. It is important the sugar does not reach caramelisation temperature 160°C (320°F). Using a candy thermometer can help ensure precise temperature control.
Don’t put the lid on the cherries right away – allow to cool to room temperature before covering.
You can keep your soaking cherries either at room temperature or in the fridge, it depends on how humid your kitchen is.
How to store
- Don't store your cherries in direct sunlight. Your finished candied cherries will fare well in a cool dark place in a sterilised jar (like a larder or pantry). They keep well for up to 2 months. Although the longevity of the cherries depends on how well they have been dried and that the jar is totally sterilised and isn’t opened. To that end, I mostly keep mine in the fridge as I don’t want to tempt fate after all the hard work I put in.
- If stored in the fridge your glacé cherries will last easily up to 2 months.
How to sterilise the jar/s
Place your jar in an oven pre-heated to 200ºC / 180ºC / gas mark 6 for 15 minutes to fully sterilise. If the lid is glass then place in the oven along with the jar. If the lid is metal then it is best sterilised in boiling water for 10 minutes so it doesn’t spoil.
Equipment I love for this recipe
- This multi cherry pitter which pits 6 cherries at a time is such a time saver and is highly recommended.
- For soaking your cherries I strongly recommend using these Pyrex bowls with lids for this recipe.
- To store your glacé cherries these Glass Weck Jars 580ml are ideal.
Glacé cherries uses
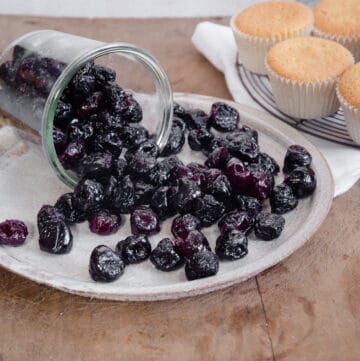
Baking: Add chopped glacé cherries to your favourite baked goods. They are the main ingredient in this Gluten-Free Cherry Cake and can also be included in rocky road, chocolate tiffin, pineapple upside down cake, cookies or quickbreads. They can add a burst of sweetness and a pop of colour to your creations.
Fruit Cake: Candied cherries are a classic ingredient in fruit cakes. Use in a lovely farmhouse fruit cake or a more traditional Christmas Cake or Christmas Pudding. Also perfect for the Easter Simnel Cake fruit cake. You can incorporate them into the cake batter or use them to decorate the top of the cake.
Ice cream and desserts: Sprinkle candied cherries over ice cream sundaes, parfaits, cheesecakes or other chilled desserts. They provide a lovely contrast in texture and flavour.
Trail mix and granola bars: Mix glacé cherries with nuts, dried fruits, and chocolate chips to create a flavourful trail mix or incorporate them into homemade granola bars.
Cocktails: Use glacé cherries as a garnish for cocktails like Manhattans or Shirley Temples.

How to use the leftover syrup
With this recipe you will be left with the most deliciously fruity cherry syrup which will really come into its own in your kitchen.
This is an amazing ingredient which can be used in a variety of ways in its own right, from from drizzling over ice cream to creating deliciously moist and flavourful cakes to buttercream to salad dressings and marinades.
More ‘from scratch’ baking ingredient recipes
- Mixed Spice Recipe
- Homemade Stem Ginger in Syrup
- Homemade Crystallised Ginger
- Homemade Marzipan
- Homemade Mixed Peel
Enter your email below to get this recipe sent to your inbox plus get new recipes, baking tips, and updates.
Homemade Glacé Cherries
Ingredients
- 600 g fresh cherries
- 700 ml boiling water
- 1 kg granulated sugar
Instructions
Day 1
- Pit the cherries using a cherry pitter so that the cherry remains intact and the hole where the pit came out is as neat as possible.
- Place the cherries in a large pan with the boiling water (you want the water to just cover the cherries), turn the heat down to a gentle simmer and cook for about 15 minutes until the cherries are just tender.
- Drain the cherries but reserve the liquid. Place the cherries into a heatproof bowl (if it has a lid all the better!) and set aside for a moment.
- Weigh the cooking liquid. You want it to weigh 500g. If there is not enough liquid then make up the difference with more boiling water.
- Pour the reserved liquid back into the saucepan with 500g of the sugar and bring to a gentle boil. As soon as the syrup begins to bubble then turn off the heat and pour the syrup over the cherries.
- Cover the bowl and leave to soak for 24 hours.
Day 2
- Strain the syrup into a large saucepan and return the cherries to the bowl.
- Add 100g of sugar to the saucepan. Heat gently until the sugar dissolves. As soon as the syrup reaches boiling point again then remove from the heat.
- Pour the syrup back over the cherries, cover and leave for another 24 hours.
Day 3-5
- Repeat Day 2
Day 6
- Repeat the process again with the remaining 100g sugar but this time leave the cherries for at least 4 days (you can leave for up to a week if you like).
Day 10
- The syrup should have now turned very thick and heavy. Drain the cherries. Place the cherries on an ovenproof wire rack, set onto a large baking sheet lined with baking parchment. Don’t let the cherries touch each other and allow the syrup to drip off for a couple of hours.
- Pre-heat oven to 90ºC / 70ºC fan / Gas mark ¼ and place the cherries in the middle of the oven. Dry your cherries in the oven for 1 -2 hours until dry but still slightly tacky.
- Store your cherries in a sterilised jar and keep either in a cool dark place or the fridge for up to 2 months.
Notes
- Recipe adapted from The Cook’s Scrapbook by Reader’s Digest
- This recipe was updated in October 2021 with new images, a much clearer method and lots of tips. Although the general process of the recipe has remained the same, the quantities were amended for a slightly higher amount of cherries so you get more cherries for the amount of effort put in. Plus the method was made slightly easier and quicker and ready in 10 days instead of 2 weeks.
- The initial boiling of the cherries takes about 10-15 minutes until they are tender.
Don’t stir the sugar into the liquid (or the syrup after Day 1), let it dissolve naturally – otherwise it could crystallise. - Bring to a gentle boil. As soon as the syrup begins to bubble check the sugar has completely dissolved then immediately remove from heat. It is important the sugar does not reach caramelisation temperature.
- Don’t put the lid on the cherries right away – allow to cool to room temperature before covering.
- You can keep your soaking cherries either at room temperature or in the fridge, it depends on how humid your kitchen is.
- It is possible to dry your cherries in a dehydrator if you have one.
- The cherries usually take 1-2 hours to dry in the oven depending on the cherry and how much syrup they have retained in their middle. Touch and squeeze the cherry just to check. They should be slightly tacky with no syrup coming out when you squeeze.
- It’s imperative to store the cherries in sterilised jars in order to prolong the life of your glace cherries.
It is possible to store in a pantry or larder for up to 2 months. However, to be extra cautious I usually store in the fridge where they will keep happily for up to 2 months.

Can the cherries be stored IN the soaking liquid when finished?
Yes they can if you don't want them dried. They will need to be stored in the fridge.
Make these every year and they are jewels!
I also save the syrup to add to pavlova or cocktails (think: and Old Fashioned, but with cherry syrup instead of sugar.)
This year, I used frozen cherries, since I got a late start (after cherry season). They worked really well, but had to be completely defrosted and at room temperature before cooking.
I keep them in jars in the refrigerator and they last for months.
Thank you so much for sharing your experience with this recipe. You are right that the syrup is such a useful ingredients too. That cocktail sounds delicious!
I love the candied peel and glace cherries. In the past I used non GMO cherries I purchased at the supermarket because it was close to Christmas and there were no fresh cherries to be found. They came in the liquid used to cook them so I simply measured out the liquid and weighed the drained cherries and calculated how much sugar to add. They were quite good but the market stopped carrying them. So, I bought a dwarf cherry tree that was producing lots of cherries. But this year, as they were ripening, the squirrels made off with them all. So, I am trying organic frozen pitted cherries. I've cooked the cherries and put them in their first sugar bath. Most of the cherries remained whole and look quite serviceable for baking and decorating cookies and topping chelsea buns. I don't have celiac's diseases but both of my daughters do so I have put them on to your website now that they have to bake for themselves. Your website has amazing recipes and my youngest one loves to bake.
That's great to hear how you are getting on with the glace cherries and I hope your daughters find some recipes here that they can enjoy.
I'm on day 4 with the frozen cherries. They look really good. The syrup is already thickening quite a bit. As I read further down the posts on day 1 I saw that someone else tried frozen cherries. I saw your advice to thaw the cherries. Well, I didn't do that however I had the sense to bring the liquid back to a boil before starting the 15 minute timer. The cherries remained well formed, not at all a mushy mess.
I make my Chelsea buns the night before Christmas so my cherries will be ready just in time!
I'm happy to hear all is going well. Chelsea buns at Christmas sound wonderful!!
I made this a couple of years ago. Well worth the effort. I stored them in their syrup in sterilized jars in the cellar, just like jam. No problems with deterioration. ALSO followed the same process with cumquats... amazing! Glad I found the recipe again as I have loads of cumquats.
Ooh, I love the idea of using cumquats. I'm so happy the recipe is working well for you.
Hello there, this sounds perfect, will try!
I'm wondering if dried sour cherries would work. Might give it a try at least!
I'm not sure - I haven't tried dried fruit with this method!
Hi! Can you pour the syrup back over the finished cherries and store them in the liquid, you know, like Luxardo cherries? Or will that wreck the texture?
Yes, you can store the cherries in the liquid but they will then have a lot more moisture than store-bought glace cherries so you will need to bear this in mind when using them in recipes.
I haven't tried the recipe yet. I can't think of any reason not to use home-canned or canned cherries, since the cherries are cooked at the start of the process anyway. Has anyone tried this?
I just posted a comment about using canned cherries and it worked beautifully. I am currently trying whole frozen cherries.
Hi! Haven't tried this yet - waiting until I can get cherries - but I'm wondering if the finished glacé cherries can be frozen if I want to keep them longer than a couple of months? How long will they keep in the freezer? Thanks!
Hi Nicola, if you keep them in the fridge then they keep pretty much indefinitely. I still have some in the fridge for a batch I made in early summer.
What kind of cherries do you start with?
This will work with any kind of fresh cherry (not tinned / canned). I haven't tried it with frozen but I think some of the commentators on this thread have.
This is a wonderful recipe! And thank you for the helpful answer to my question. I did end up gently stirring the sugar into the syrup from day three through day six and managed to avoid crystallization, perhaps by the fact that I did squirt in a bit of lemon juice on a couple of days. The cherries look wonderful and I am amazed to taste a glacé cherry that tastes like a cherry! A sugar bomb cherry, but still, a real cherry! So much better than what I remember from childhood in Canada with an English mother. I will be putting them on traditional shortbread cookies and recapturing my Christmas childhood. But at a much higher quality standard 🙂 And in January, when the Christmas cake is done, I will make an old-fashioned English cherry cake!! As for the syrup! Two beautiful ruby jars of it. Can it be stored in the fridge or will it sugarize? Last time I made candied orange peel the syrup completely sugarized, But I had taken no precautions then and used a very different process with a lot of boiling. This stuff may not recreate childhood memories but go straight into cocktails!! I almost want to get a cough so I can suck it down as cough syrup 🙂 Thanks for the wonderful detail and care in the recipe!
I'm on day two of this and when I poured the syrup back over the cherries I found a bunch of undissolved sugar at the bottom. I'm feeling paranoid about stirring the sugar to get it to dissolve, so that it doesn't crystallize, but is there no kind of stirring or anything one can do to help it along? Now I'm not quite sure how short of sugar I am for tomorrow! I did try switching the pan around a bit but cautiously and obviously not enough. The bubbles had only started to reach the surface but there had been bubbles on the bottom for a long time before that. I'm surprised the sugar had not dissolved. Any advice?
Hi Kate, don't worry there is some room for discrepancy in the amount of sugar. When you pour the syrup back over the cherries, strain it so no undissolved sugar is included. To avoid this cook the syrup on a low heat so the sugar has a chance to melt evenly. If you feel it does need a stir then do it once or twice gently and slowly, one commentator above mentions that she always adds a bit of lemon juice to the syrup which helps to avoid crystallisation. I haven't tried it but it sounds like a great tip to try.
I made these cherries with great success a couple of years back, and it led to my fruitcake being "in demand." I am a big procrastinator, however, and did not buy my fresh cherries when they were available this year. There is not a fresh cherry to be found in NYC at the moment. I just bought some frozen cherries, that have held up very well when thawing in the past. I am going to attempt this with frozen cherries. I am afeared, but I will forge ahead and let you all know how it goes. Lesson of the day: "when the days are hotter, fill your larder." JR
I'd love to know how it goes. I think it should work out just fine!!
This is something I'd like to try.
Your recipe sounds very similar to one I have previously tried from a book. Sadly the outcome last time was a lovely cherry syrup that I hardly found a use for but some hard dry cherries that tasted of sugar and not of cherry at all. Total waste of good cherries, that was.
Although the cherries did crystalise, the main problem was that each time I took the cherries out of the syrup they seemed a little smaller as if, instead of absorbing the syrup, they were losing juice into the syrup.
My thought was that perhaps I should not have added the syrup to the cherries hot... but I see that is what you do. Any idea what may have caused the shrunken and dry flavourless cherries before I try your recipe and risk further failure? Please.
It's difficult to comment on another recipe as I'm not sure of the other differences. The trick I have found though is to not overboil the cherries in the syrup which leads to the crystallisation. Bring the syrup to a gentle simmer then take off the heat immediately and cover over the cherries.
These turned out really well and taste great. I made two batches and in one I put a good glut of Orgeat syrup and I think the ones with the almond edge taste better ! The others are great too. Thank you for sharing this recipe. I will be making again.
That's great to hear - thank you!
I am on day 10 and anticipating success. Once I dry them, any suggestions on what to do with the syrup?
Hi Stacy, You can drizzle the syrup over ice cream, porridge or into hot cocoa. You can brush over just baked cakes for added flavour and a yummy texture or even to the buttercream. Also use a tablespoon at the bottom of a glass of prosecco for an amazing cocktail. Or use in salad dressings in place of honey. There are so many uses.
The cherry season this year has been particularly good, and I'm wanting to take advantage by making an enormous batch of these for my signature cherry almond scones. I was wondering how you store them once they're done? Is a steralised jar in a cool dark place acceptable or do you store these in the fridge?
Looking forward to tasting them!
Although technically if they are fully dried out then they are fine to store in the cupboard. I was burned by this one year though as I obviously hadn't dried them out enough so now I always store them in the fridge where they last for a long long time.
I made this recipe for two years in a row, and it turned out great - bright red rubies. Perfect for my annual Nova Scotia Black Fruitcake. However, last year, and this year, the sugar crystallized. Reheating and cooling didn't help, they just did it again. The cherries are still usable, but not quite what I'm after. Any ideas what went wrong?
Hi Spence, at what point did the sugar crystallise? Were you keeping the cherries in a warm or cool environment. This happened to me once before when I left the cherries for too long in the sugar syrup in the fridge.
Hi there. I've been makung jams and preserves for years. At the cooking or heating process, I always add a little bit of lemon juice. That usualkt prevents the crystallization. Another tip. When cooking jam and preserves, as soon as the foaming starts, add a little butter. About a rmteaspiin of butter. That stops the foaming process and the laborious scooping off of the foam.
I love these tips Annie- the lemon juice one sounds like a winner. Thank you!
I look forward to making these next summer here in Australia from local cherries. To use in my Christmas cake they will need to last nearly a year. Would you leave in the syrup and then dry closer to when I need them?
Yes you can, also store in the fridge as they last simply ages then. I usually use mine within the year - I haven't tried storing them that long.
These are a revelation! They taste divine and look utterly stunning - I can't wait to taste the difference they will make to fruitcakes and the Christmas pudding. It was also fascinating to see the gradual transformation across the 2 weeks 🙂
Hi Nessie - that's great to hear. It's such a fun process too isn't it!!
I wandered the internet a few years ago looking for instructions on candying cherries and stumbled upon this site. The cherries instructions were very good and the outcome excellent. We are all gluten tolerant and at least occasional meat eaters here, but our repertoire has been happily broadened by other recipes I’ve found while nosing around the site. The tone, the anecdotes, the recipes, the lot, all very enjoyable.
Can I use frozen cherries by chance?
I haven't tried it with frozen cherries. I would think so but the cherries should be thawed completely before attempting. Once thawed if they have not gone to mush then they should be fine.
Hi Jenni
Did you use the frozen cherries
And if so how were they?
I am thinking of doing the same
Thank you
I don’t suppose these would work well in a dehydrator for the final drying phase? I’m looking at getting one to cut down on wastes fruit & veg.
Hi Matt, yes the dehydrator is perfect for the final drying phase.
I just started these... one question. Am I supposed to refrigerate these during the process or leave them on the counter?
Hi Mimi - you can leave them on the counter if you wash the bowl and lid that you are using every day after you drain the cherries out and you make sure that the cherries and syrup have completely cooled before re-covering. Your kitchen should also not be too warm. For safety, I usually refrigerate.