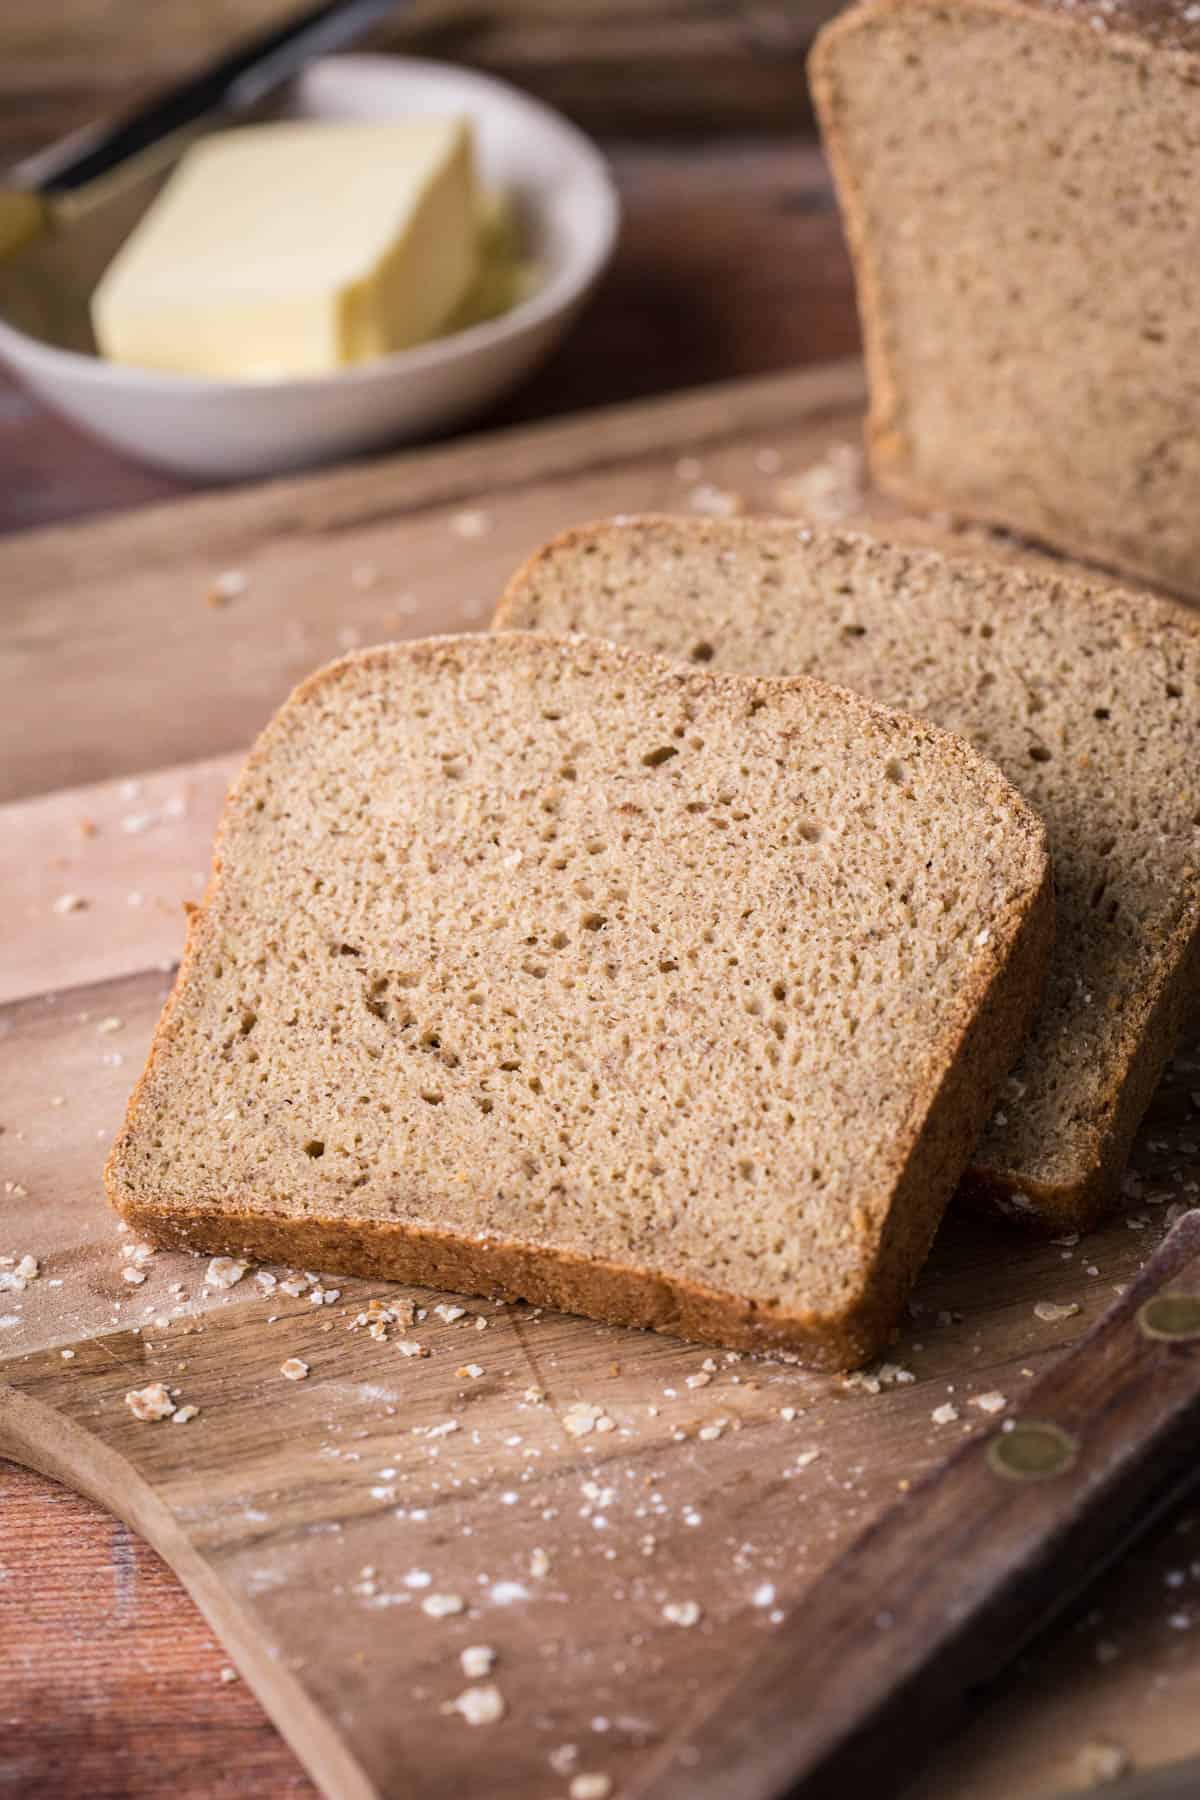
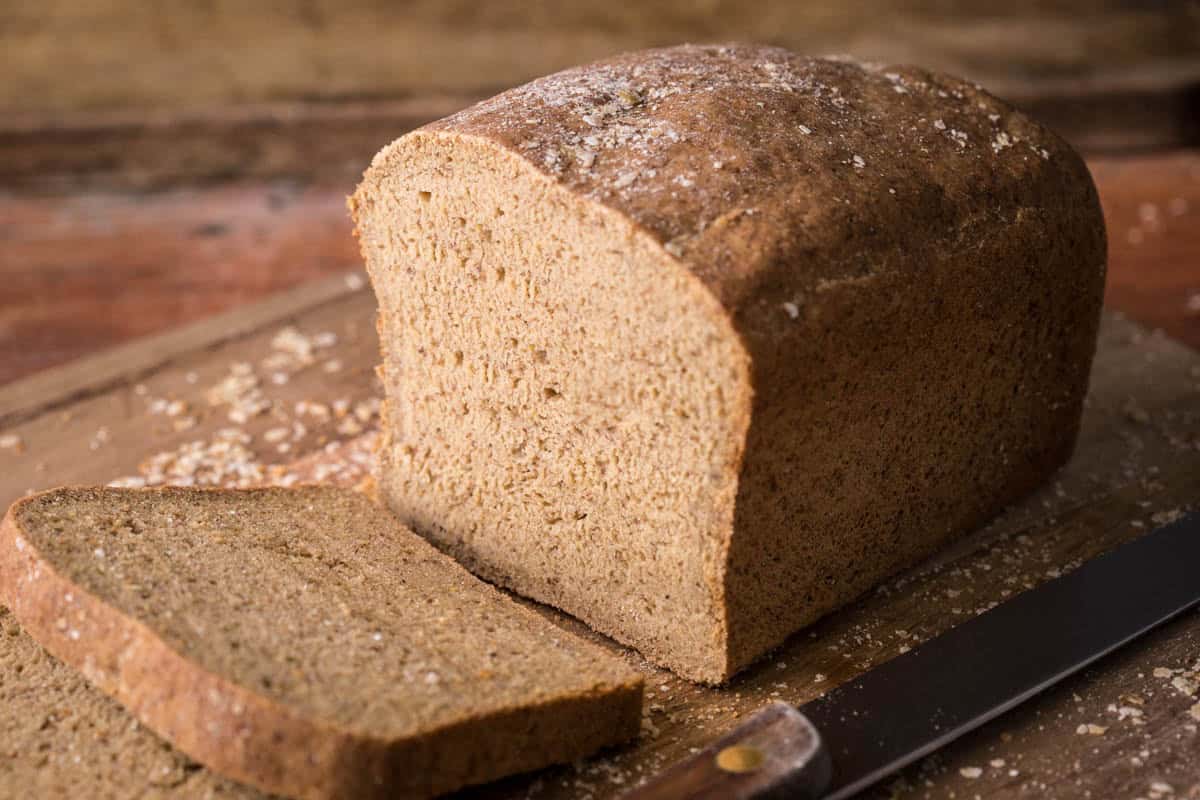
Perfect Gluten-Free Brown Bread (Wholemeal Style)
This post contains affiliate links. Please read my disclosures.
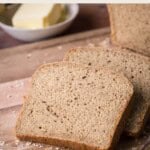
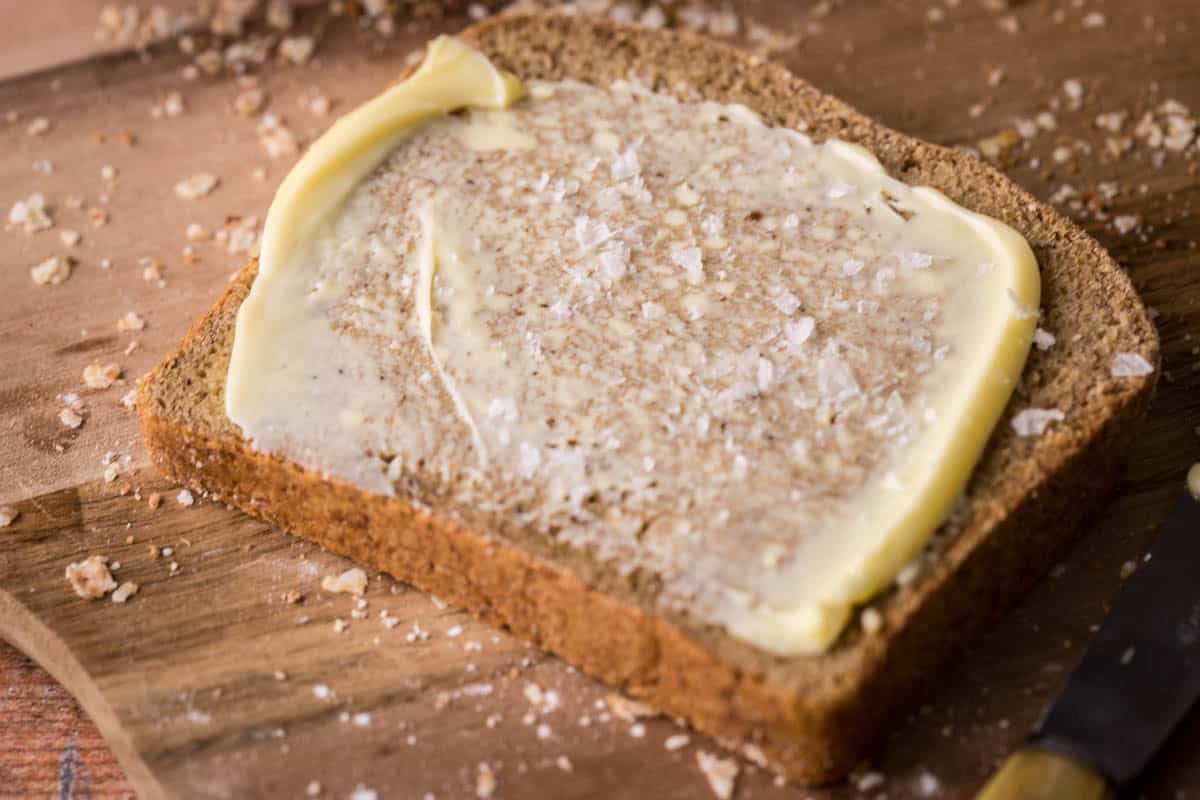
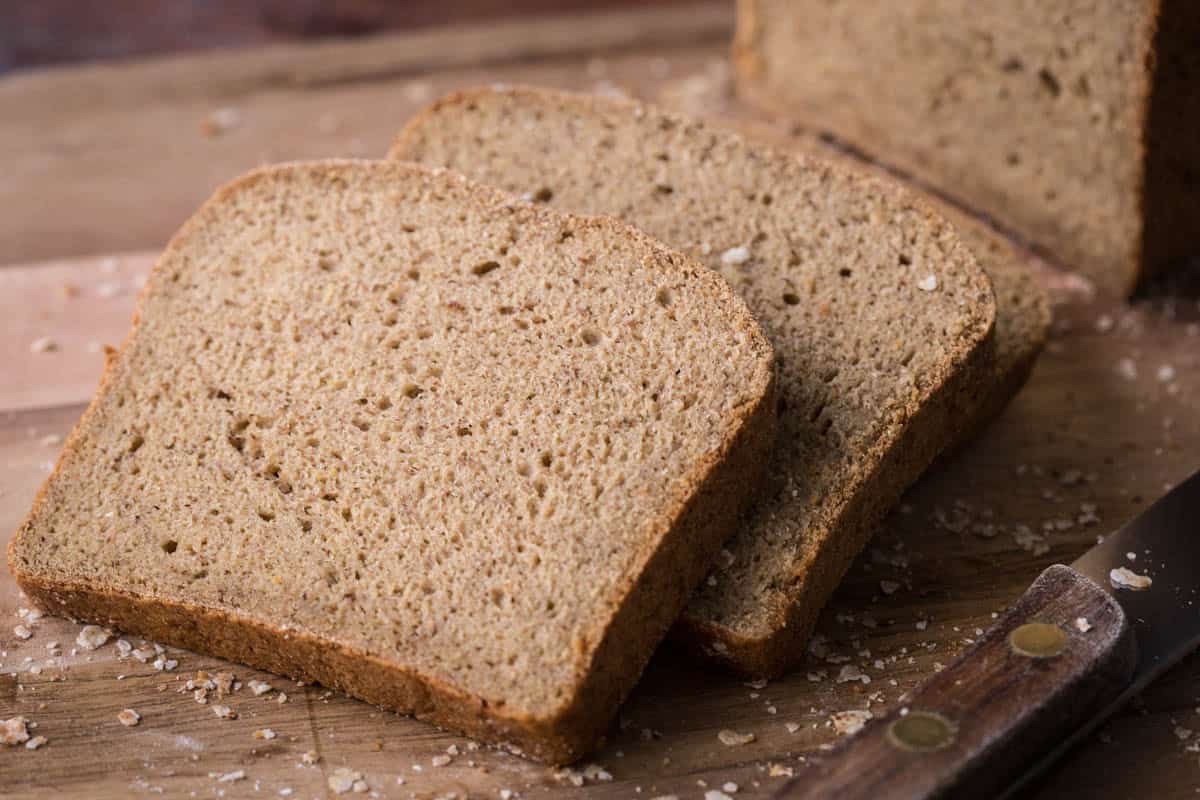
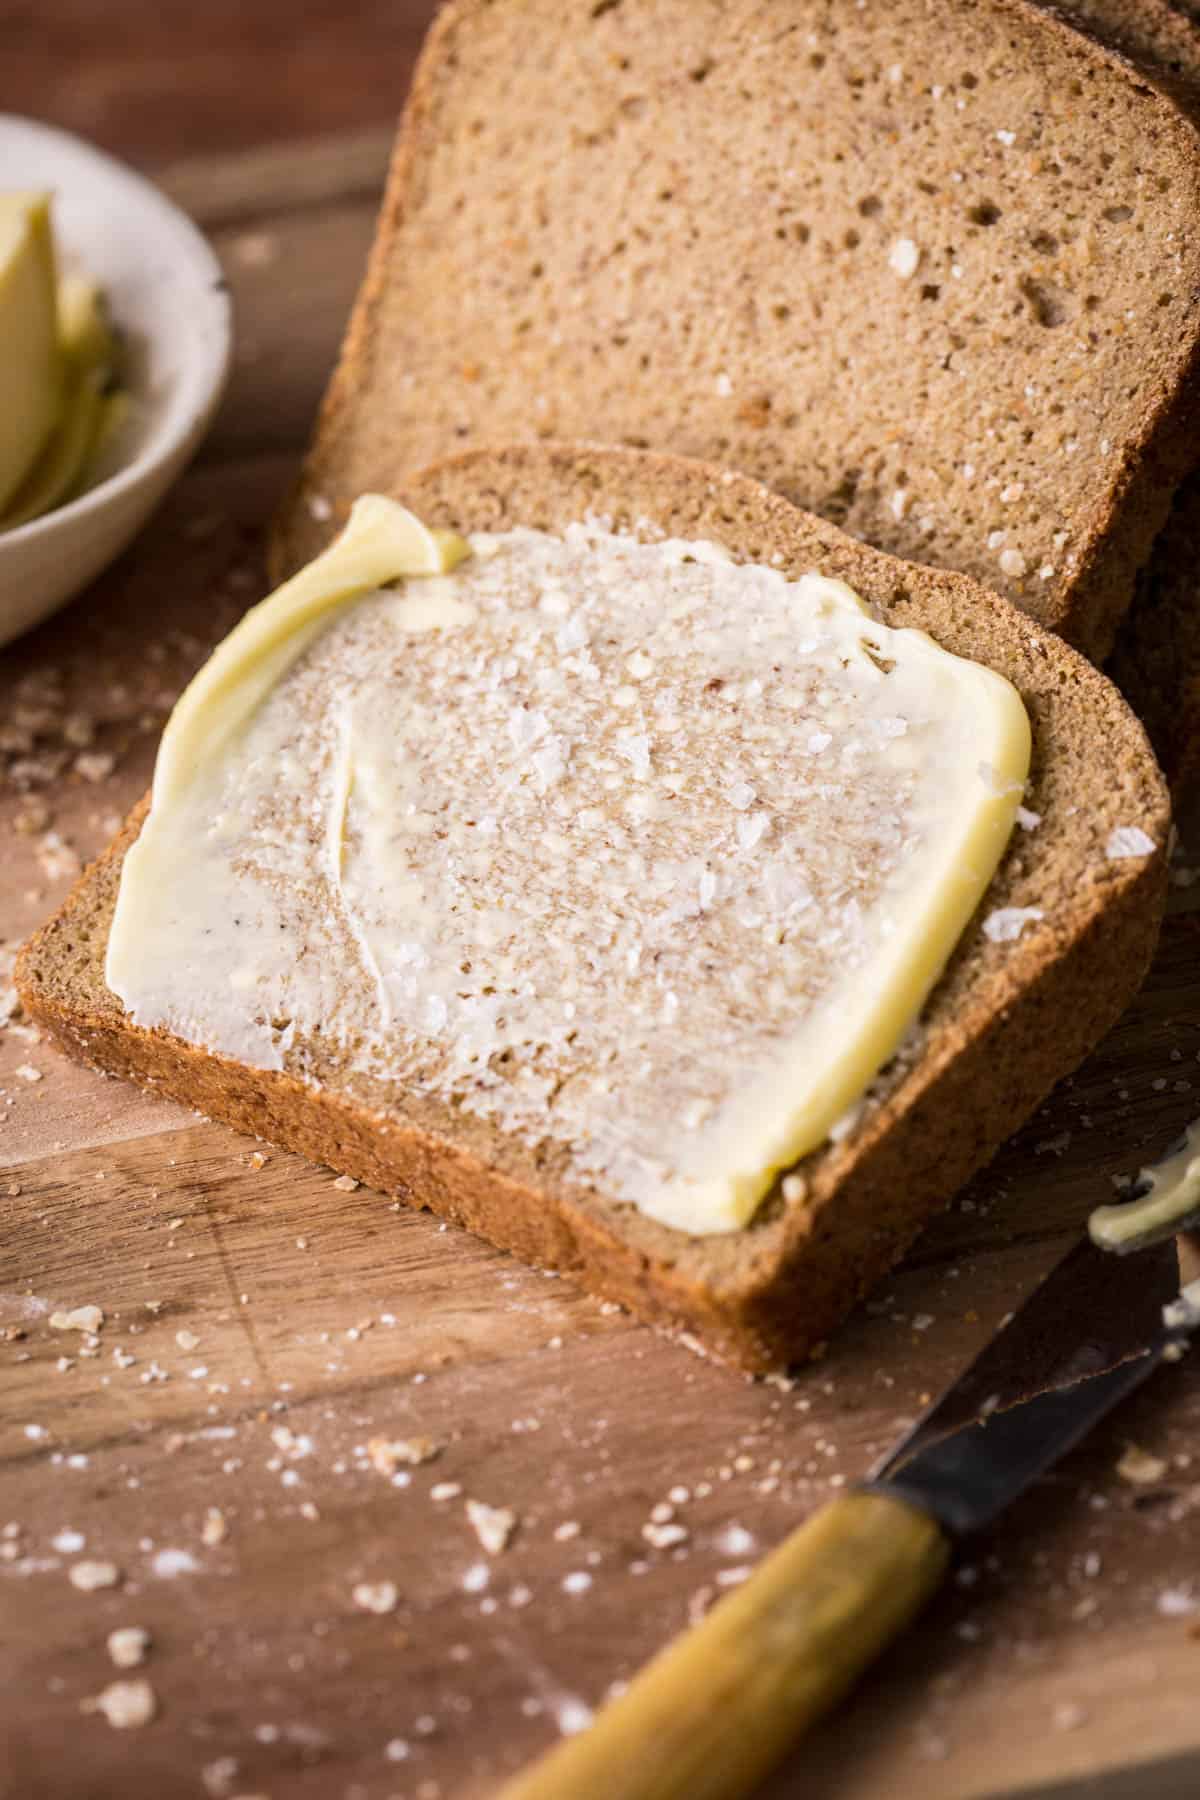
You can call of the search for a wholesome brown bread recipe that’s truly gluten-free. This wholemeal style loaf uses nutritious gluten-free flours that gives soft and rustic results. It’s egg-free, dairy-free and nut free with a delicious flavour which is simply glorious with a salted slather of your favourite spread.
If you are put off by the long and unfamiliar ingredients in gluten-free bread you buy in the supermarket then this brown bread recipe is a much more wholesome choice. You’ll blend the gluten-free flours yourself for the perfect structure, texture and flavour.
We’re using carefully chosen wholegrain flours like buckwheat, teff and chickpea for their nutritious qualities and delicious flavour. We also include tapioca starch which gives the bread its soft texture and helps it retain moisture and give a great structure.
The brown colour of the bread is achieved though our choice of flours – buckwheat and teff help with that, but also a small helping of black treacle so the bread looks the part and gives a little sweetness.
To help the bread bind together we’re not using xanthan gum but a mix of psyllium husk and flaxseed which gives a bouncier texture which is more structurally sound and helps retain moisture.
Gluten-free bread is actually quicker and easier to make than you think. The results are so much more delicious and nutritious than supermarket bread and I’ll take you through the incredibly straightforward process using step-by-step photos and a helpful recipe video so you achieve truly foolproof results.
Why You’ll Love This Gluten-Free Brown Bread
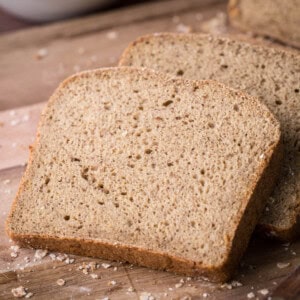
- Soft texture. It has a lovely tender crumb.
- Tastes great the next day. This isn’t one of those gluten-free loaves which goes stale 24 hours after baking. It is still good 48 hours after. If you store it in the fridge it even lasts 3-4 days (but by then you are better off toasting it).
- Delicious flavour. Some gluten-free flours can make your bakes taste weird but here we use a good balance so that there is no dominating flour flavour. It just tastes lovely and wholesome.
- Dairy-Free / Egg-Free / Nut-Free / Rice-Free / Vegan. This gluten-free bread is pretty allergen friendly!!
- Gluten-free flours. We choose starchy flours that are that will give great structure to our bread.
- Psyllium husk. This is an ingredient which you might not be as familiar with but it’s hugely popular in gluten-free baking as it creates a strong elastic gel when mixed with water which will give softness and bounce to you bread. It’s incredibly simple to use, easy to source and is an invaluable ingredient in this bread.
- No xanthan gum needed.
Watch the Video
Sometimes it helps to see a visual of what I'm talking about. So watch the video to see what it looks like to make your Gluten-Free Brown Bread.
Ingredients Needed
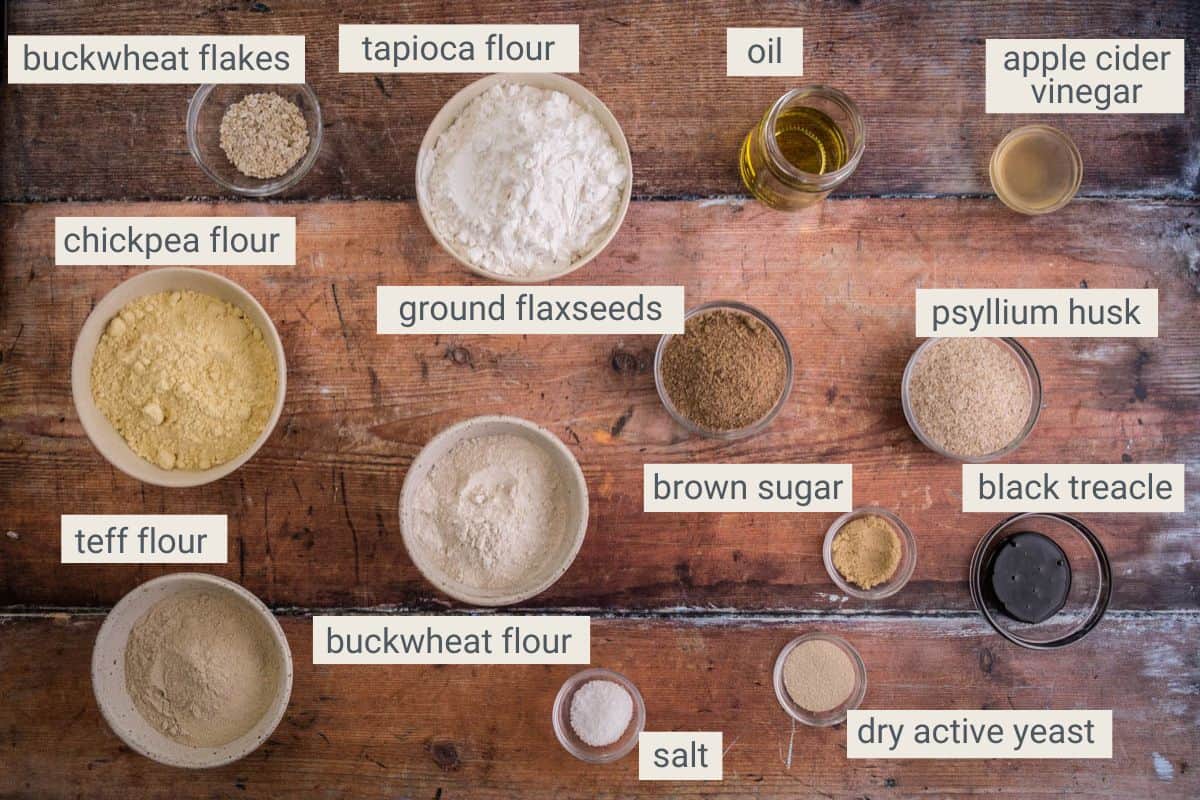
Dry active yeast. This recipe uses a quick dry active yeast. Make sure it is gluten-free though, it’s surprising how many brands are not. I use Doves Farm Quick Yeast. Also, check the expiry date. The yeast should be from a freshly opened packet (or at least one that hasn’t been hanging around for a couple of months in your cupboard).
Brown sugar. Sugar is mixed with the dry yeast to feed and activate it when you are initially adding it to the milk. It also keeps the bread soft and helps it to brown. Brown sugar is chosen for flavour.
Psyllium husk. This ingredient is high in fibre which you can source from health food shops. It works as an excellent binding agent in this recipe and gives the finished loaf a softness and elasticity. Do note, you want to buy the whole husk, not ground.
Ground flaxseed. This helps with the binding of the loaf alongside the psyllium husk and adds extra protein to our loaf. You can buy milled flaxseed at most large supermarkets in the UK.
Buckwheat flour. We choose this gluten-free flour for its hearty texture whilst giving a distinct nutty and earthy flavour. Plus it’s high in fibre and has a good amount of protein.
Teff flour. This is a wholegrain flour which has a lovely flavour and is also high in fibre with a good amount of protein.
Chickpea flour. Chickpeas are very high in protein so this flour gives great structure to our bread. If you are worried about the potentially overpowering flavour then don’t be as I find it really gets lost in the mix here.
Tapioca starch. This is a great starchy flour which will add a lightness to your bread and will help to bind the ingredients and aid in the softness of the loaf.
Black treacle. We’re using it here for a little sweetness but also it helps aid in the brown colour of our loaf.
Olive oil. Fat is needed in the recipe to soften the loaf. I prefer olive oil in my baking recipes but you can substitute for a vegetable oil or coconut oil.
Apple cider vinegar. The acidity of the vinegar helps to keep the bread soft and to preserve the loaf. Use a good brand of apple cider vinegar that includes the mother for delicious flavour complexity.
Buckwheat flakes. These are optional for sprinkling over the top of your loaf but they do make it look rather nice.
Salt. Essential for a tasty bread. Don’t underestimate the amount the recipe requires, without it you could have a bland loaf.
Water. (not pictured). Tepid water is used to activate the yeast and also to create the psyllium husk/flaxseed gel.
Equipment Needed
Digital kitchen scales. I really recommend you weigh your ingredients for this recipe as accurate flour and liquid measurements are a must here.
Small mixing bowl. To mix and activate the yeast.
Digital thermometer. You can get by without it but it does help to ensure the exact right temperature of the water to successfully activate the yeast
Stand mixer. I think you really need a stand mixer here as it ensures good mixing of the dough which is very sticky.
Dough scraper / silicone spatula. To scrape the dough out of the mixer or bowl.
3lb loaf tin. This may be a larger sized tin than you typically have but I find it's very useful for bread baking and I use it for my Sandwich Loaf too. It's 21.5 x 13 cm.
Proving space. Okay this isn’t equipment but you do need a warm, draft-free spot for proving your bread, like a switched off oven and baking tray filled with hot water (see notes on proofing below) to create a steamy enviroment.
Silicone pastry brush. This is to brush the oil over the loaf, but you can use your hands.
Wire cooling rack. For even cooling and helps prevent a soggy bottom!
Bake Gluten-Free Bread with Confidence
Discover easy, reliable recipes for soft, wholesome gluten-free breads. No complicated techniques, just great results every time. Tips, techniques, comprehensive ingredients and equipment info.
How To Make Gluten-Free Brown Bread
For full recipe instructions go to the recipe card at the end of this post.
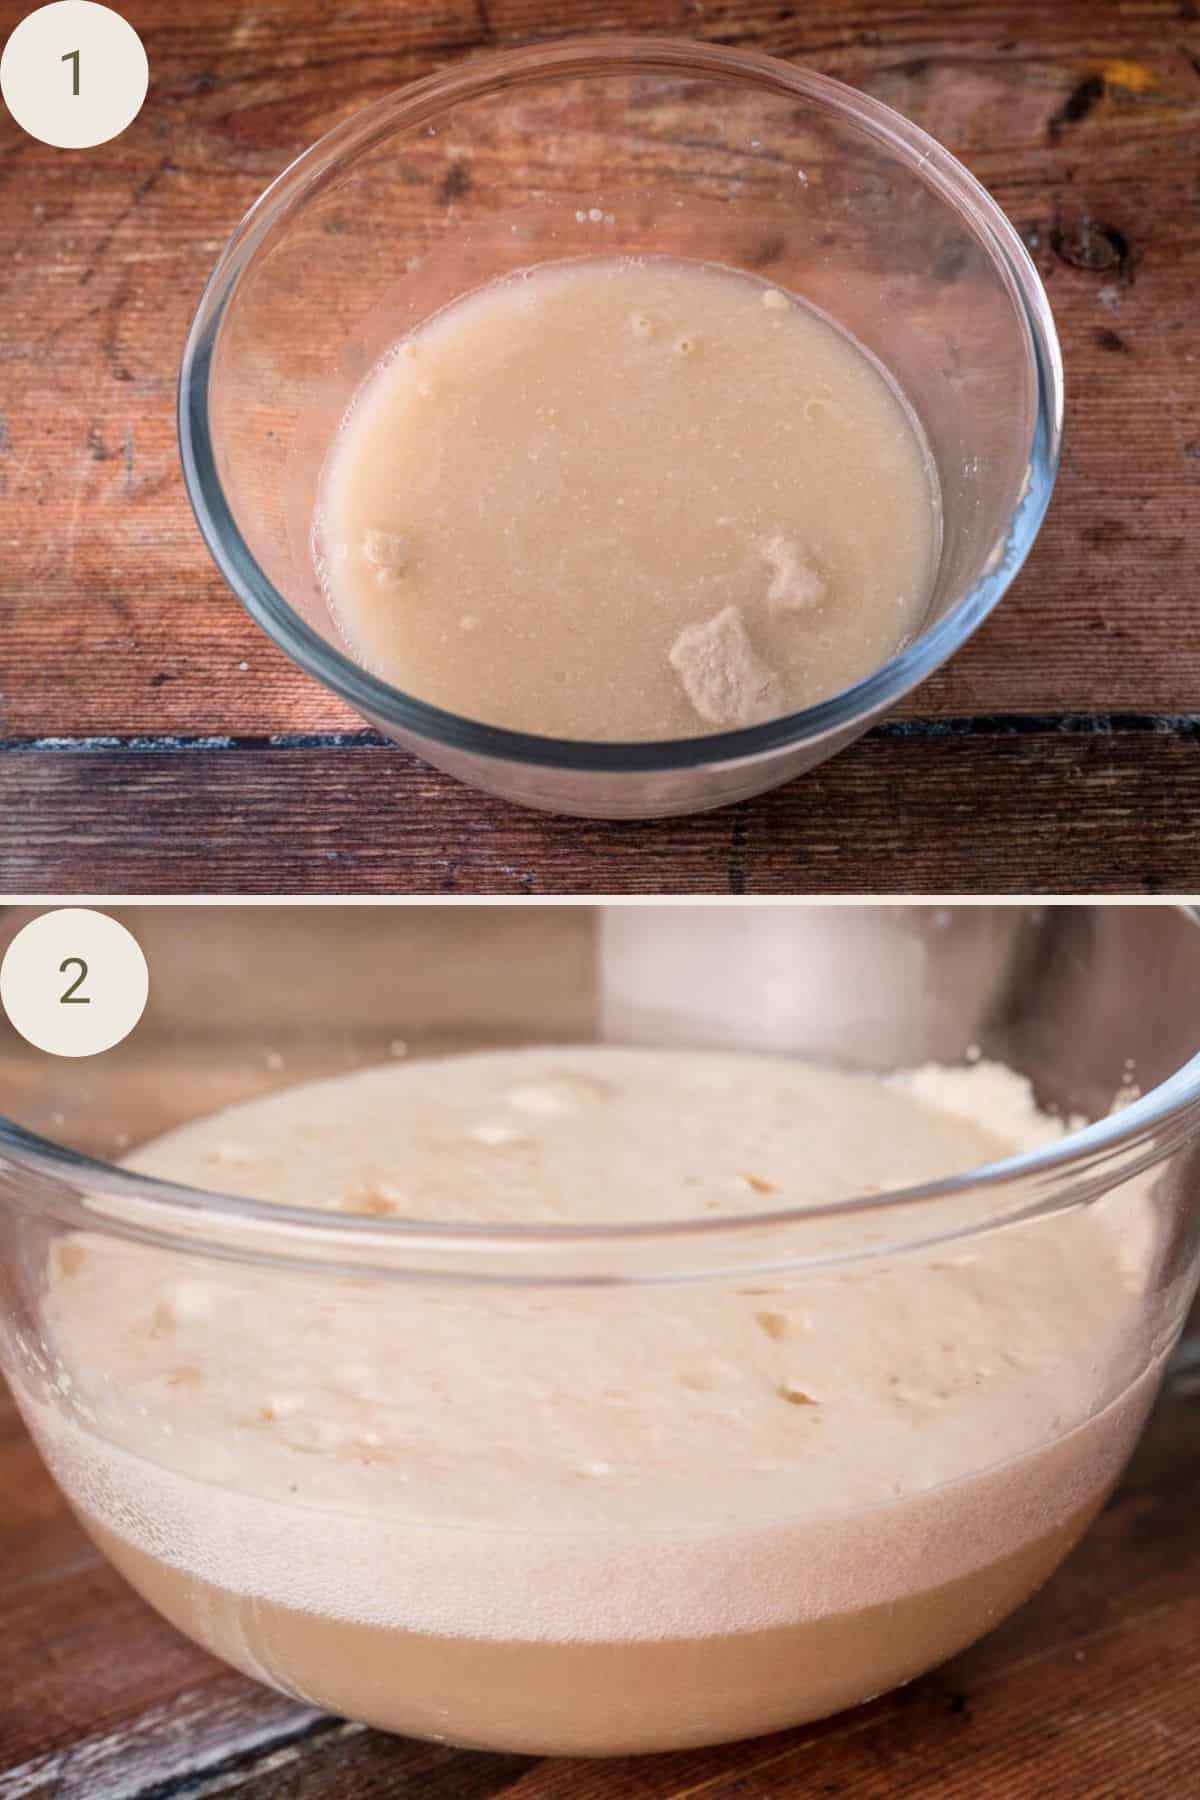
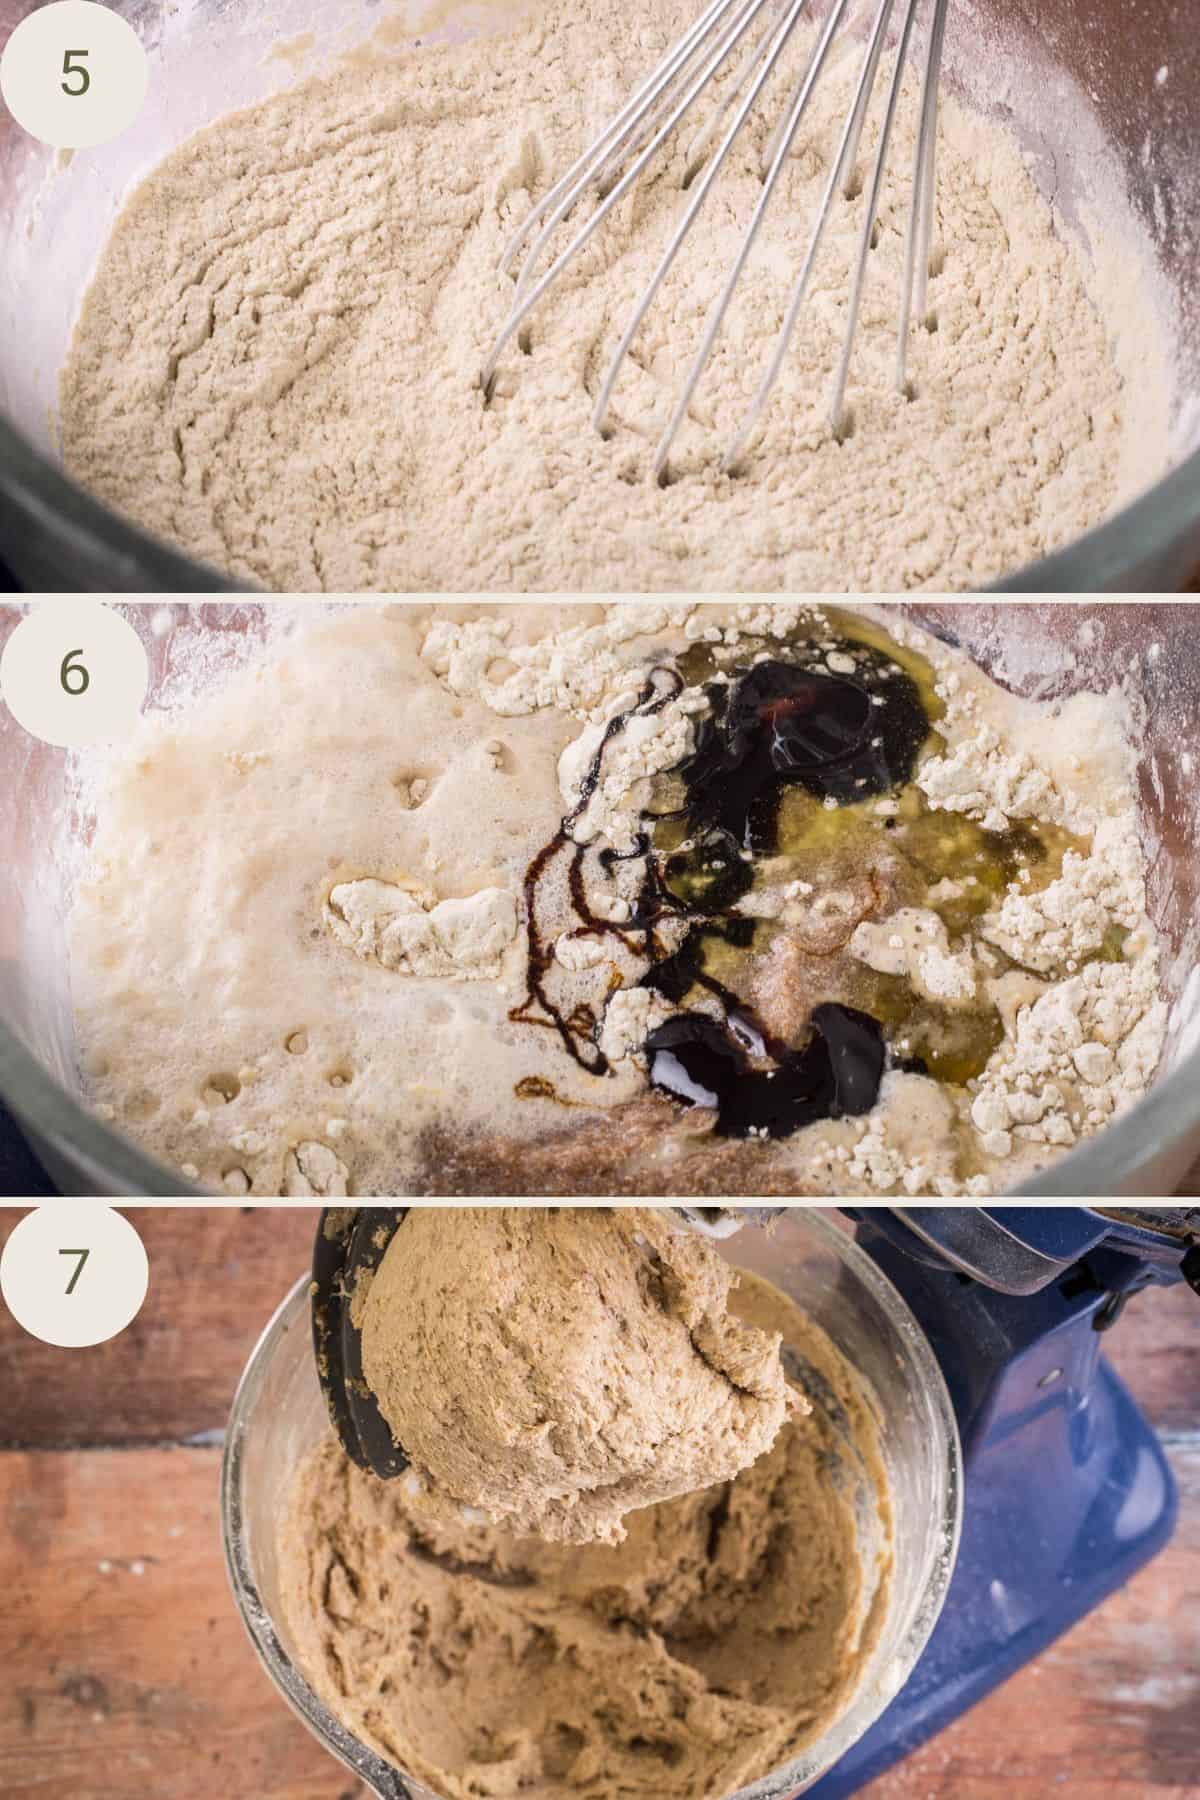
Heat water to 38–46°C (100–115°F) in a small saucepan. Pour into a small glass bowl, stir in yeast and brown sugar, and let sit for 10–20 mins until bubbly.
In a medium bowl, whisk psyllium husk and flaxseed, with 320g water, and rest for 5 mins until gel forms.
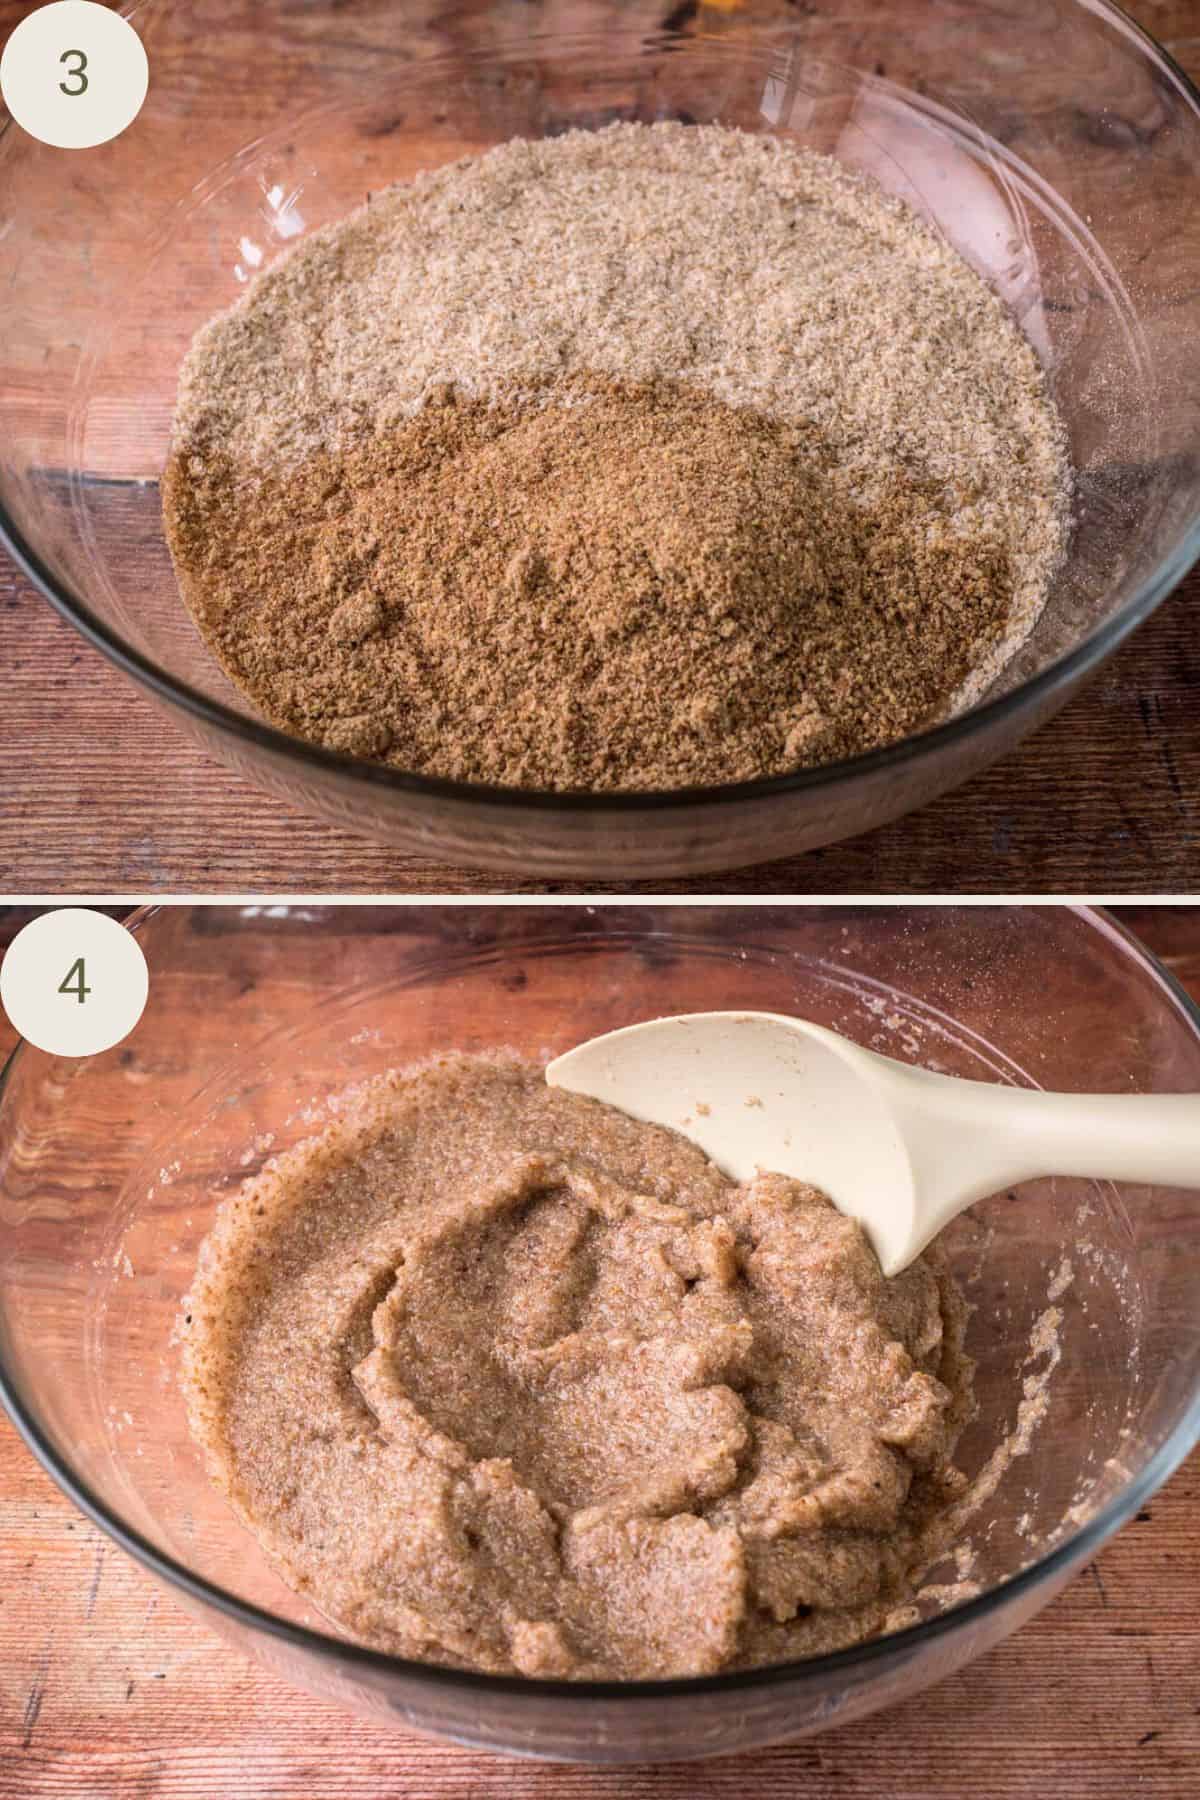
In a large bowl (or stand mixer), mix buckwheat, teff, chickpea flour, tapioca starch, and salt. Add yeast mix, psyllium flaxseed gel, black treacle, vinegar, and olive oil to the dry ingredients. Mix thoroughly for 5 mins until sticky but cohesive and well mixed.
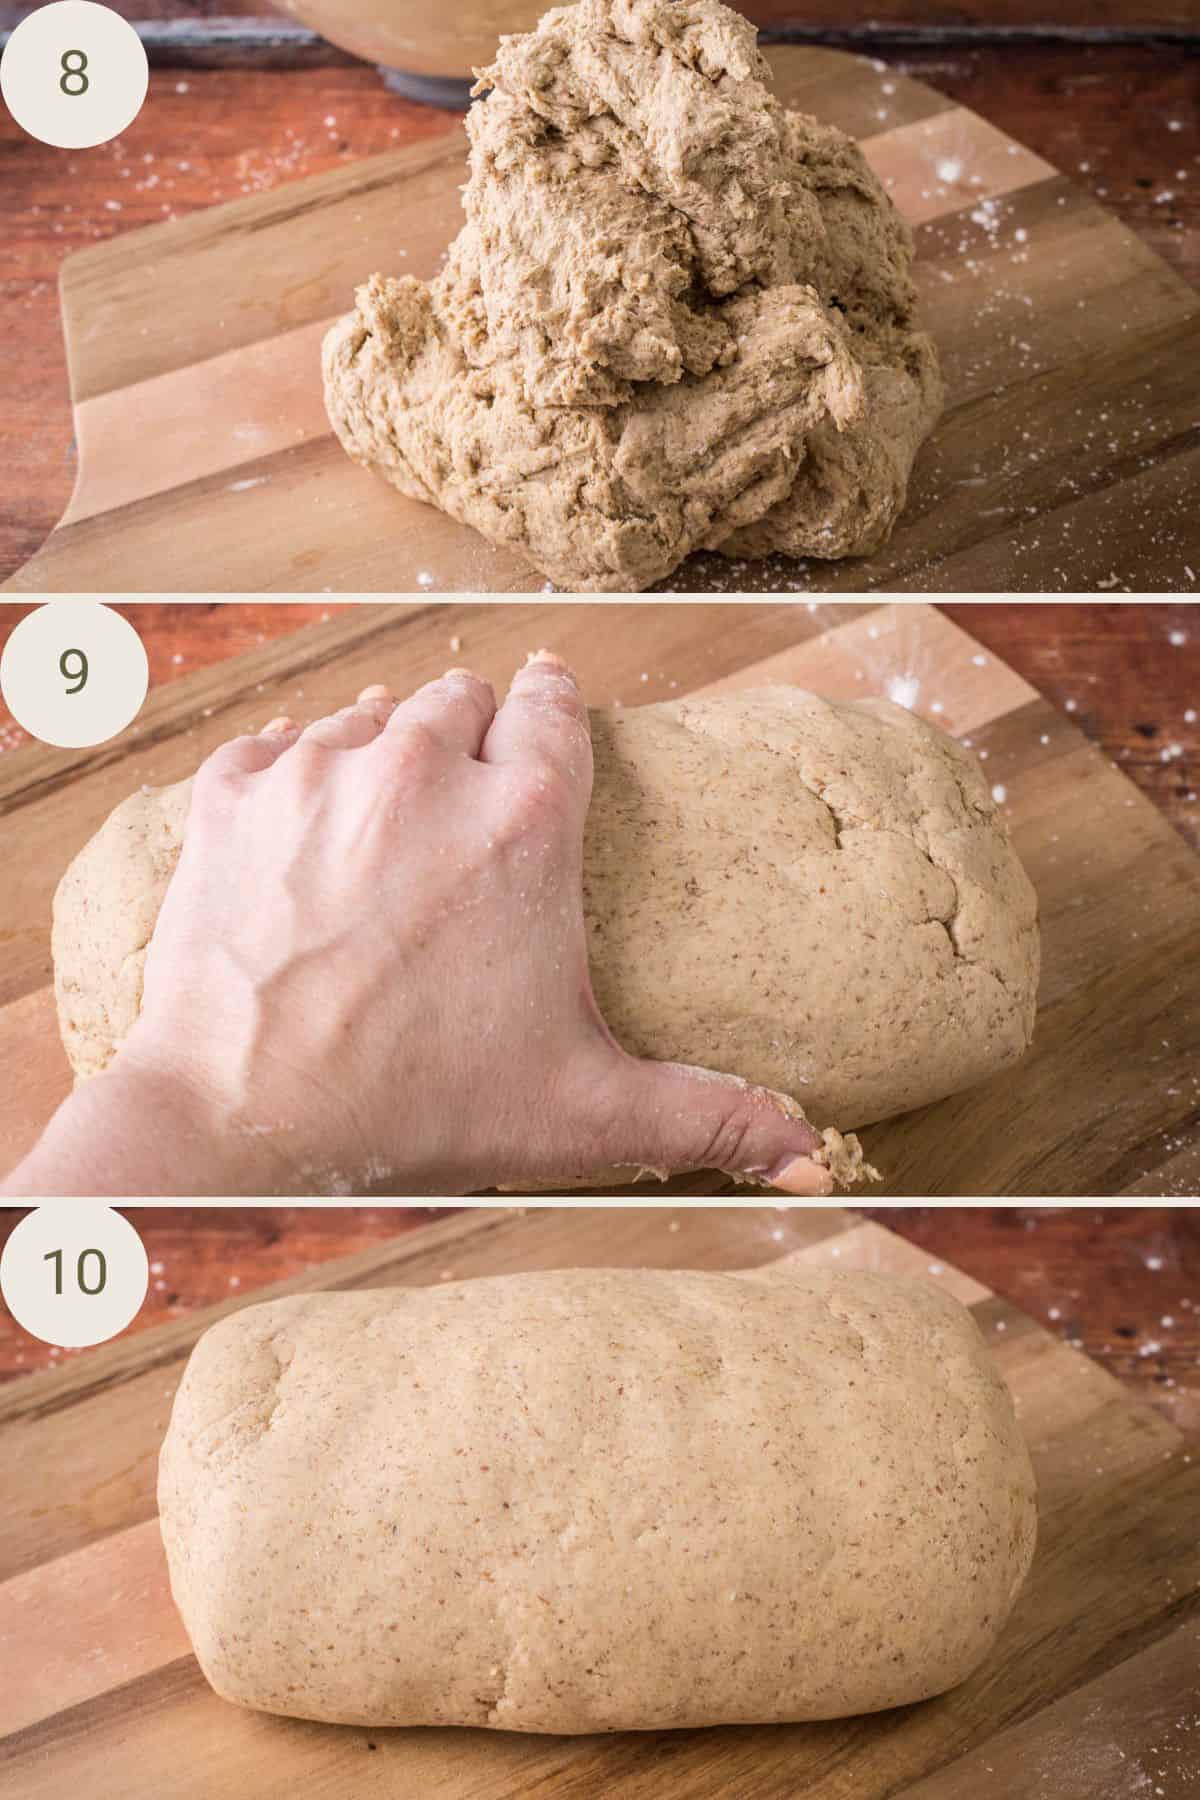
Dust hands with tapioca, shape dough into a smooth log.
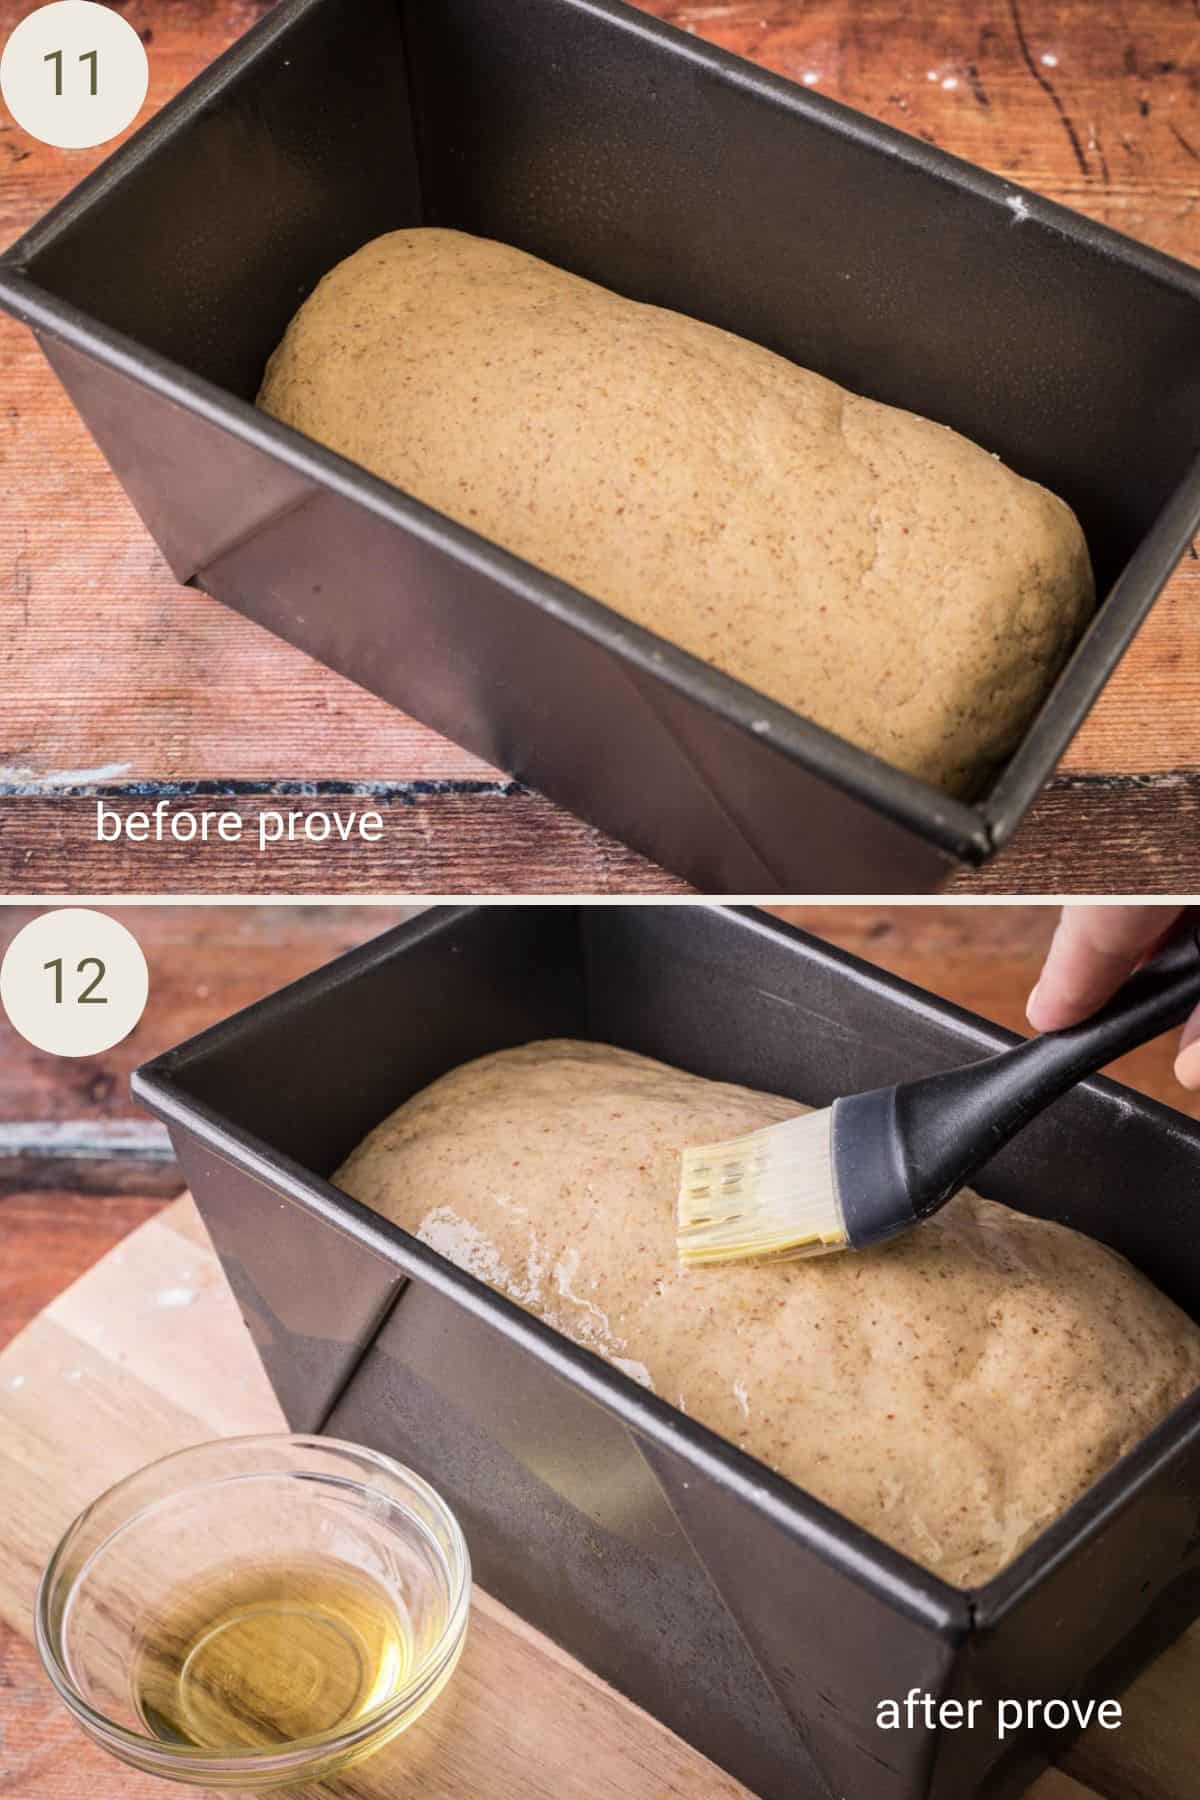
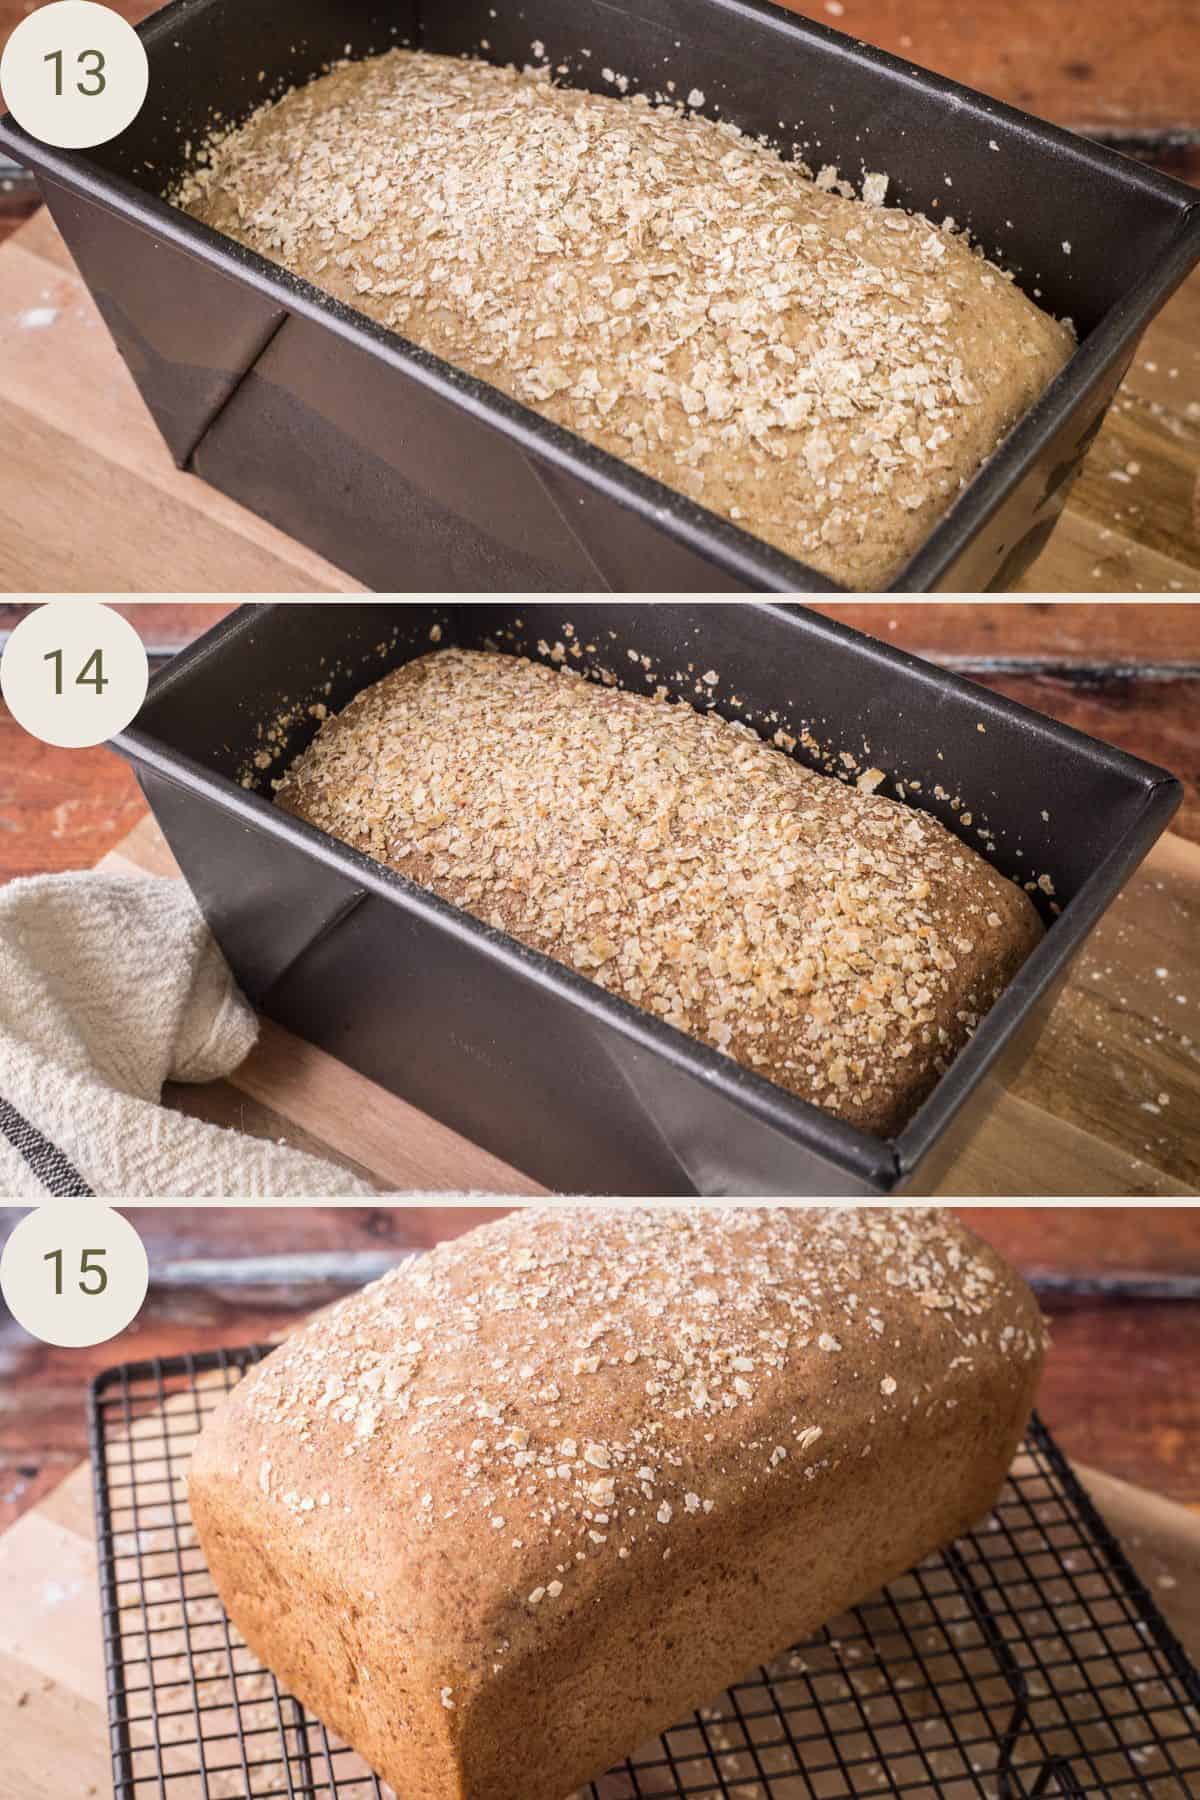
Transfer to a greased 3lb loaf tin, smooth the surface, and cover. Prove for 1 hour in a warm, damp place until risen by about ⅓. Brush top with oil and scatter buckwheat flakes, pressing gently.
Bake for 15 mins at 200°C / 180°C fan assisted / gas mark 6 / 400°F, then reduce to 180°C / 160°C fan / gas 4 / 350°F and bake for 45 mins more. Remove from oven, take loaf out of tin, and cool completely on a wire rack before slicing.
Expert Tips
Try and use a fresh packet of yeast if you can. I have found that yeast that was only open the week before may not be as powerful. The older the yeast the longer it takes to activate though. If it’s not doing much after 20 minutes then your yeast won’t be good enough to use.
When heating the water for the yeast I usually heat a small saucepan of water and weigh it after it has reached the correct temperature. That way if your water gets too hot you can temper it down with some cold tap water and adjust to achieve the right temperature in the saucepan rather than having to start again or wait for it to cool.
Shaping the loaf. Make sure the surface of the dough is lovely and smooth as you place it in the tin with any seams underneath. Any lumps, bumps or cracks on the top of the dough will show up in the baked bread. Now is the time to make it look good.
Gently tip the freshly baked bread out of the tin straightaway and allow to cool completely on a wire rack to avoid a gummy loaf.
Troubleshooting: My bread isn’t rising
There are a couple of factors which may affect the rise of your loaf:
1. Yeast. The first thing to do is to check expiry of your yeast. However, even if it is within its expiry it still could be dead.
You will know your yeast is alive and well if once it has been added to the water and sugar the surface is thick, frothy and bubbly. It’s active and ready to use. If the yeast just floats on top of the water without any change to its appearance then you will need to open a new packet of yeast.
2. The Prove. The other issue which might be preventing your bread from rising is how you are proving it.
How to prove your bread
Your yeast might be good and strong but it will only reach its full potential if your bread is given the right environment for proving. And this is:
Warm and slightly damp.
Great places to prove your bread are:
- Utility room – with the tumble dryer on.
- Kitchen counter – on a warm summer’s day with a damp cloth draped over the top of the bowl.
- Bread proving drawer of the oven.
- Boiler room.
Ultimate Proving Tip
If you can’t find a decent place in your house then the following method gives consistent results every time.
Place your bread in the middle shelf of the oven (switched off). Slide a roasting dish filled with just boiled water onto the bottom of the oven, then shut the door. The steam of the water will help activate the yeast in the bread and the oven will provide a warm yet damp environment for a successful prove.
FAQs
This bread is really best eaten within 48 hours at room temperature in a cool dark place.
You can store your bread in a bread tin with the cut side of the loaf facing down. The crust acts as a shield to the outside environment. Or you can store in aluminium foil or wrapped in baking parchment.
Or I recommend keeping in the fridge (up to 5 days) but then it is better for toast.
I would usually leave the bread at room temperature for 24 hours then if I haven’t eaten the whole loaf (which I usually haven’t) I then freeze the rest in slices.
Allow the bread to cool completely. You can freeze the bread whole but I prefer to freeze in slices. Double wrap well in cling film and aluminium foil to avoid freezer burn. The bread is best within 1 month of freezing.
You can use the frozen slices straight from the freezer into the toaster, or you can leave to defrost overnight on the kitchen counter.
Yes, you can include seeds in the recipe. Add them into the dough as you are rolling it ready for the baking tin and before the rise. You can use a mixture of sunflower seeds, pumpkin seeds, hemp seeds for added texture. If you sprinkle them on the top then do it after the rise and you have brushed the oil on (instead of the buckwheat flakes), press lightly into the surface so they stick.
This brown bread recipe has not been tested in a bread machine. Don’t worry, I’m working on a specific bread machine recipe and once I’ve conquered that then I will be able to give specific advice on adapting this recipe too.
Where can you buy the gluten-free flours in the UK?
Big name supermarkets. Large Tescos or Sainsburys will stock Doves Farm buckwheat flour and chickpea flour in their gluten-free aisle. Doves Freee range also sell tapioca flour but it comes in very small quantities so you might be best choosing another brand for larger bags.
Specialist brick and mortar shops. Health food shops like Planet Organic, Whole Foods or Holland and Barrett should stock all of these flours.
Amazon. This is where you’ll get the widest range and cheapest selection of these flours.
Specialist online stores. Healthy Supplies or Shipton Mill are great stockists.
Direct from flour producer. Lovegrass Ethiopia sells excellent teff flour. And Doves Farm stocks all these flours.
More Gluten-Free Bread Recipes You’ll Love
This Gluten-Free Soda Bread is an easy gluten-free bread recipe which needs no xanthan gum and is yeast-free so is incredibly quick to make. This version also contains no buttermilk so it's dairy-free and vegan making it a recipe which can be enjoyed by all.
This Gluten-Free White Sandwich Bread is an easy everyday white bread needs no kneading and only requires one prove. The results are a deliciously tasty and soft loaf with a lovely golden crust.
If you think that baking a loaf of gluten-free sourdough sounds like an impossible dream then this recipe will definitely change your mind. This incredible Gluten-Free Artisan Sourdough Bread has a cracking crust, soft and airy interior and tasty flavour. This recipe is vegan, no knead and made without any commercial yeast.
Enter your email below to get this recipe sent to your inbox plus get new recipes, baking tips, and updates.
Perfect Gluten-Free Brown Bread (Wholemeal Style)
Ingredients
- 7 g active dried yeast
- 180 g water
- 1 teaspoon light brown sugar
- 25 g black treacle
- 30 g psyllium husk - not ground
- 40 g ground flaxseed
- 320 g water
- 1 tablespoon apple cider vinegar
- 120 g buckwheat flour
- 120 g teff flour
- 120 g chickpea flour - gram flour
- 220 g tapioca flour + a little extra for dusting
- 1 teaspoon kosher salt
- 65 g olive oil + 1 tablespoon extra - for brushing over the top
- 1 tablespoon buckwheat flakes - optional
Instructions
- Heat 180g water to between 38-46°C (100-115°F) in a small saucepan.
- Pour the warm water into a small-sized glass bowl. Stir in the yeast and brown sugar. Let the mixture rest for 10-20 minutes until the surface becomes thick and bubbly.
- Whisk the psyllium husk and flaxseed together in a medium sized bowl. Stir in 320g of water (straight from the tap is fine), then allow the mixture to stand for 5 minutes until a thick gel forms.
- In a large mixing bowl or the bowl of a stand mixer, whisk together the buckwheat flour, teff flour, chickpea flour, tapioca starch, and salt.
- Add the yeast mixture, psyllium and flaxseed gel, black treacle, apple cider vinegar and olive oil to the flour mix.
- Mix all these ingredients together for about 5 minutes until the dough is well combined but still slightly sticky to the touch.
- Dust your hands with extra tapioca starch and scrape the dough out of the mixer and place it on a clean work surface. Roll and shape the dough into a smooth log shape.
- Carefully place the shaped dough into a lightly greased 3lb loaf tin, making sure the surface is nice and smooth and has an even shape in the tin. Cover the tin with cling film (plastic wrap) or a clean cloth.
- Place the tin somewhere warm and damp to prove for 1 hour (see notes on proving).
- After 50 minutes of proving, preheat the oven to 200°C / 180°C fan assisted / gas mark 6 / 400°F.
- Once the dough has been proving for an hour and has risen by about ⅓ (just reaching the top of the tin) then it’s ready to bake.
- Before placing in the oven, brush the top of the loaf with the olive oil and scatter with buckwheat flakes, pressing them slightly as otherwise they don’t stick.
- Place the loaf on the centre shelf of the oven and bake for 15 minutes at 200°C / 180°C fan assisted / gas mark 6 / 400°F.
- After 15 minutes turn the temperature down to 180°C / 160°C fan assisted / gas mark 4 / 350°F and bake for 45 minutes.
- Take the bread out of the oven and immediately remove it from the tin. Turn it out onto a wire rack to cool completely before cutting.
Video
Notes
Chickpea flour. You can substitute for defatted almond flour (not regular almond flour).
Buckwheat and teff flour. I also liked this flavour balance of this particular recipe. When I swapped around the buckwheat and the teff I didn’t find the flavour as nice. But if you have to, you could swap either with another wholegrain flour – brown rice flour, oat flour or millet flour do work.
Psyllium husk / ground flaxseed. This recipe has not been tested with any alternative binders. Baking Tips & Troubleshooting Yeast. If your yeast does not look frothy or bubbly after its 10 minute activation time then check the expiry date. It is best to use a freshly opened packet of yeast, it can have perished even if it is within expiry. Make sure your water is not too cool or not too hot – between 100-115 F / 38-46C. Shaping the loaf. Make sure the surface of the dough is lovely and smooth as you place it in the tin with any seams underneath. Any lumps, bumps or cracks on the top of the dough will show up in the baked bread. Now is the time to make it look good. Proving the bread. Place your bread somewhere warm and slightly damp for the prove. An excellent place is in a switched off oven on the middle shelf. Place a roasting tray of just boiled water on the bottom of the oven and shut the door. This warm and steamy environment is perfect for a good bread rise. Cooling. Turn the bread out of the tin straight after the bake and allow to cool completely on a wire rack before cutting. Otherwise the bread might be a little gummy. How to store This bread is really best eaten within 48 hours and should be stored in a cool dark place at room temperature. You can store in a bread bin with the cut side of the loaf face down. Or keep in an airtight tin. You could store this bread in the fridge for up to 5 days but then it’s best used for toast. How to freeze Allow the bread to cool completely. You can freeze the bread whole but I prefer to freeze in slices. Double wrap well in cling film and aluminium foil to avoid freezer burn. You can use the frozen slices straight from the freezer into the toaster, or you can leave to defrost overnight on the kitchen counter. Ingredient measurements: Please note when you see ‘grams’ listed as opposed to ‘millilitres,’ or any other term of measurement, that is not incorrect. I weigh all of my ingredients, including liquids, for accuracy. US customary measurements: These US measurements for the ingredients provided are based on a conversion calculator. This recipe was tested with metric measurements and I recommend using a digital scale to weigh ingredients for the most accurate results. READ MORE >>> Why you should always weigh vs measuring with cups Nutrition information: Please note that the nutrition information provided below is an estimate based on an online nutrition calculator. It will vary based on the specific ingredients you use. Please seek a professional nutritionist’s advice for further clarification. The nutrition serving is for 1 slice of bread.

This bread was amazing!! It reminded me of my grandmother's Swedish Limpa bread that I have missed so much since having to go GF. I will make it again and add orange zest to replicate the taste of Swedish Limpa. I did increase the yeast to 9 grams and added 15 minutes to the rise time and it turned out perfect. Thanks for another great recipe can't wait to try more.
That's lovely that it brought back those food memories - thank you for sharing your experiences with your brown bread.
I am so excited to try this bread! Could be perfect for my family. I want to avoid chickpea flour & defatted almond is too hard to find. (Teff & buckwheat are fine). Can I use any of the following flours (or combo of) as a substitute for the chickpea: regular almond, cassava, sorghum, millet, coconut, tigernut ? Would I also then need to adjust the moisture?
The best substitute would be regular almond flour - but it would be an experiment as I haven't tested this substitution before. It will increase the amount of fat in the recipe so you might like to reduce the amount of olive oil in the recipe, maybe by about 20-25g. Let me know if you try this.
I did try this and it worked perfectly. Looked just like your picture. I substituted the chickpea flour for regular almond flour and reduced the olive oil to 40g total. All else was the same. Thanks so much. sorry for delay.
That's lovely - I'm so happy your bread was a success! Thank you for sharing.
I must try this, looks great! Could I sub molasses for the Black Treacle. I'm in Canada and am not sure where I would find it (and at a price I could afford :))
Yes you can!
Hi Georgina, so excited to receive a whole grain bread recipe. Tried it today....All went well, so wonderful to handle, easy to shape. I must say I was surprised that there wasn't any oven spring and in my case resulted in a very dense loaf. It did rise as indicated but I think next time I will let it rise to the preferred height knowing it won't rise more in the oven. Thanks again, I'll try again to see if I can get your great rise.
Yes there isn't as much oven spring in this recipe as it doesn't include eggs (like in my sandwich loaf). You can try swapping out a bit of the tapoica starch for potato starch as well as that helps with oven spring.
I have just made this brown bread. Whilst it definitely has that 'healthy brown bread' flavour !!, the structure definitely isn't as open as yours. I wonder what I did wrong ? It certainly needs slicing thinly, a couple of slices and I will need to lie down, it's substantial
If the structure came out a bit denser and you made the recipe as per the original then the only thing I can think of would be the yeast or the prove. Feel free to email a photo and I can help troubleshoot—I'd love to help get it a bit lighter next time with more of the open structure that mine has.
Will definitely try this, but for some reason there seems to be a dearth of tapioca flour in Italy at the moment....not been able to find any for the last4/5 months. Not sure if there are the same issues in Denmark since I last purchased some there back in April
Oh gosh, I didn't know there were issues with tapioca flour supplies. I haven't tried a substitute but you could try switching it with arrowroot or potato starch if you wanted to experiment.