Gluten-Free Apple Pie
This post contains affiliate links. Please read my disclosures.

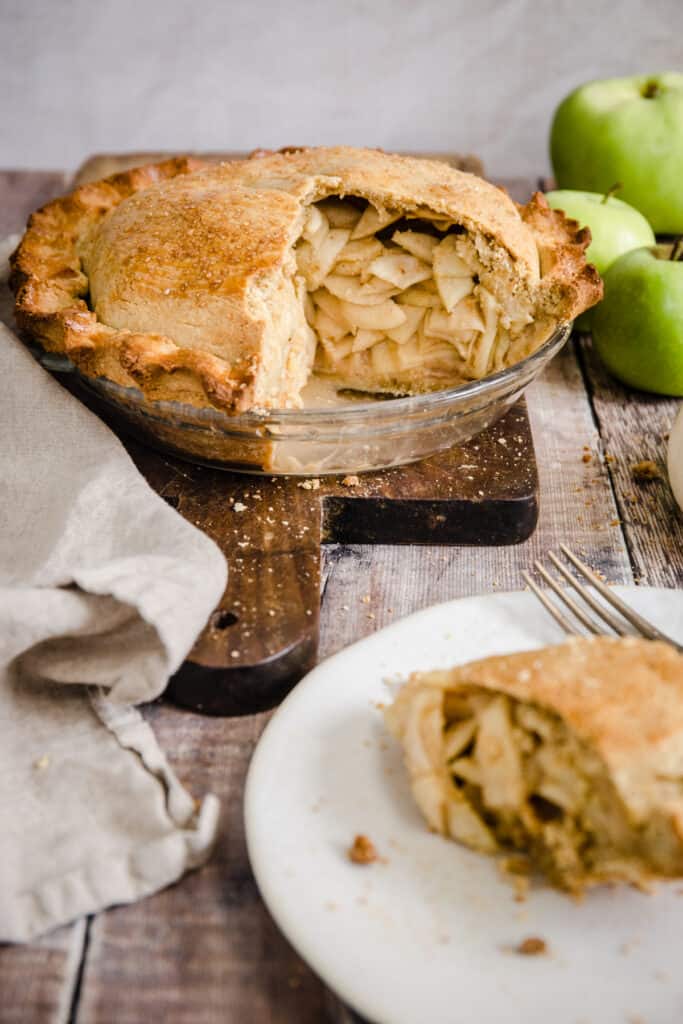
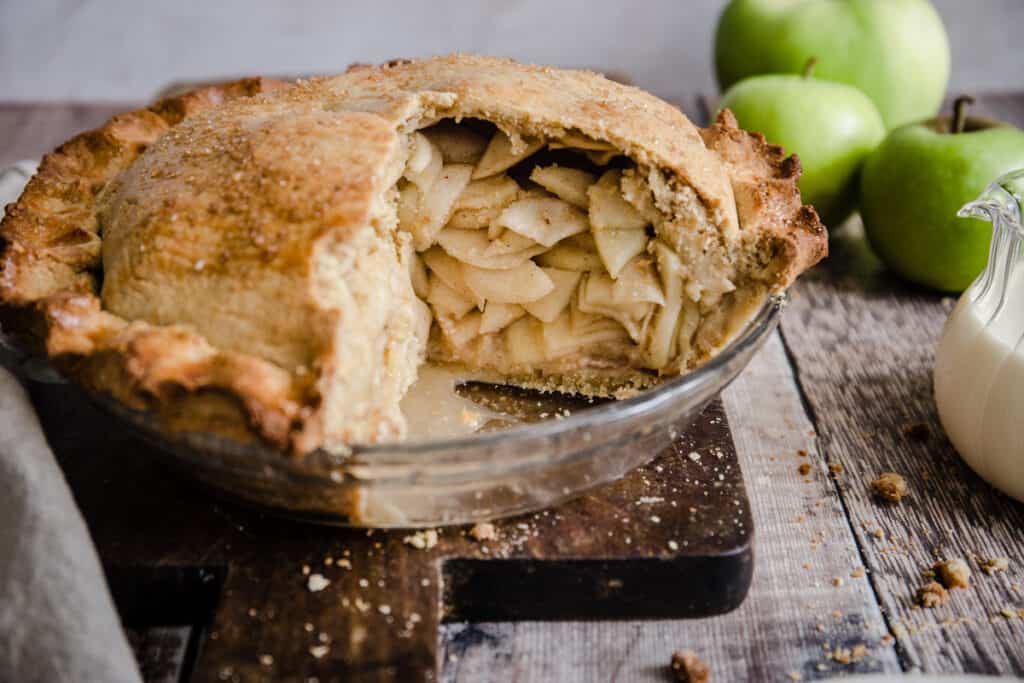
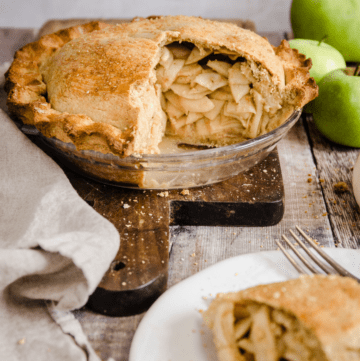
This deep dish double crusted Gluten-Free Apple Pie is crammed full of the best seasonal apples. Perfectly seasoned with a touch of cosy spice. I’ll give you all the tips on how to make beautifully flaky gluten-free homemade pastry with no xanthan gum. Plus how to bake the Apple Pie to perfection with a crisp and golden pastry crust and a sweet juicy filling.
What can be more comforting and homely than a gorgeously baked Gluten-Free Apple Pie with homemade pastry. There weren’t many homemade desserts that I grew up with. My father was a chef but was not a great dessert lover and my mum rarely ventured into the kitchen (my baking obsession is not hereditary). The memory though of my grandmother’s simple home baked apple pie is steeped in nostalgia.
At this point you might think I would wax lyrical about how this recipe I’m sharing with you was passed down from my grandmother on a handwritten scroll, but actually things are a little different here.
Now the idea of a gluten-free apple pie with no xanthan gum would completely mystify my Nan, I’m not sure she was ever clear what gluten-free was (let alone xanthan gum!). However, once we have our gluten-free flours aligned the process of making this more modern apple pie isn’t totally different from hers. It’s simple and straightforward with plenty of deep apple flavour, beautifully seasoned and with a crisp buttery pastry.
Watch to see how to make it
Why You’ll Love This Gluten-Free Apple Pie
- Deep dish apple pie. A great pile of seasonal apples are crammed into this pie ensuring a plentiful serving of fruit with the right amount of pastry.
- The right kind of apples. We use a mix here of Bramley Apples with their lovely tang and soft flesh plus some Granny Smiths which hold their shape slightly better and have a touch more sweetness.
- Apple pie seasoning. Our apples our seasoned with a light touch with cinnamon, ginger and nutmeg, a touch of lemon juice, vanilla and caramelly brown sugar.
- Homemade pastry. This pastry isa great all round sweet all-butter pastry which is perfect for making gluten-free double crusted pies.
- No xanthan gum needed.We don’t need xanthan gum in our pastry as we rely on starchy flours, ground flaxseed and eggs to bind and create stretch.
- No soggy bottom. We use a couple of tricks to make sure this pie is as crisp underneath as it is on top.
✨If you love family friendly apple desserts then have you tried this incredibly Easy Gluten-Free Apple Crumble yet?✨
How to avoid a soggy bottom
Ah, the bane of the pie maker’s existence. Soggy bottoms are considered very bad news, however in my experience it doesn’t make or break a pie. Still if we can avoid it for our gluten-free apple pie with homemade pastry we shall. But how?
- Macerating the apples in the sugar seasoning is important so they retain their moisture and it doesn’t leak out during the bake.
- Chill your pie crust. When you have fitted the pastry crust on the base of your pie dish then place back in the fridge for 15–30 minutes to chill before adding the apples. Starting with a solid base will help to avoid the apple juices immediately soaking in.
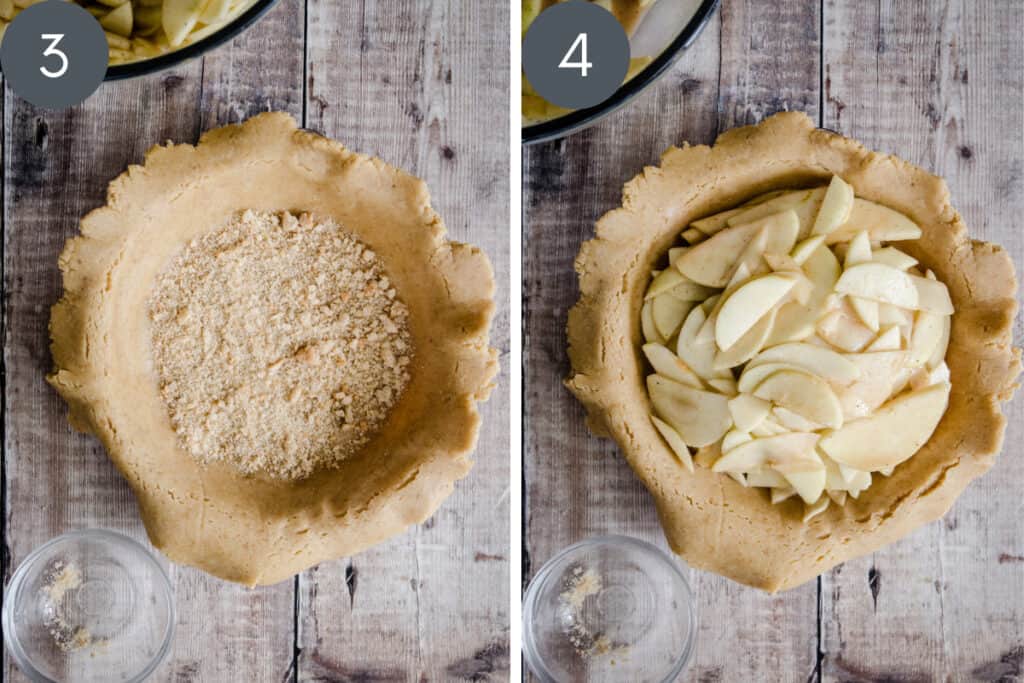
- Breadcrumbs. Scatter a small amount of breadcrumbs on the base of the chilled pie crust before adding the apples too – these will absorb the juices
- Tapioca flour. Adding tapioca flour to the macerated apples just before adding into the pie will help catch those excess juices and form a lovely thick apply gravy within your pie.

Ingredients needed for the pie filling

Lemons. Fresh lemon juice is used to keep the apple slices from turning brown and for a tangy flavour.
Bramley apples. These have a wonderful tart flavour and soften beautifully when baked.
Granny smith apples. They are a little sweeter than bramleys and hold together well. Using a mix of the two apples adds depth.
Brown sugar. For gorgeous sweet caramelly flavour.
Vanilla extract. I love the flavour it provides but you can omit if you roll your eyes at the inclusion of vanilla.
Spices. A gentle mix of cinnamon, ginger and nutmeg season the apples beautifully.
Tapioca starch. This naturally gluten-free flour is excellent at soaking up the apple juices which helps avoid a soggy bottom. You can substitute with arrowroot.
Gluten-free breadcrumbs. Sprinkled on the base of the pie crust the breadcrumbs soak up the juices too and give more body to our apple filling.
Step-by-step apple pie filling instructions
For full recipe instructions go to the recipe card at the end of this post.
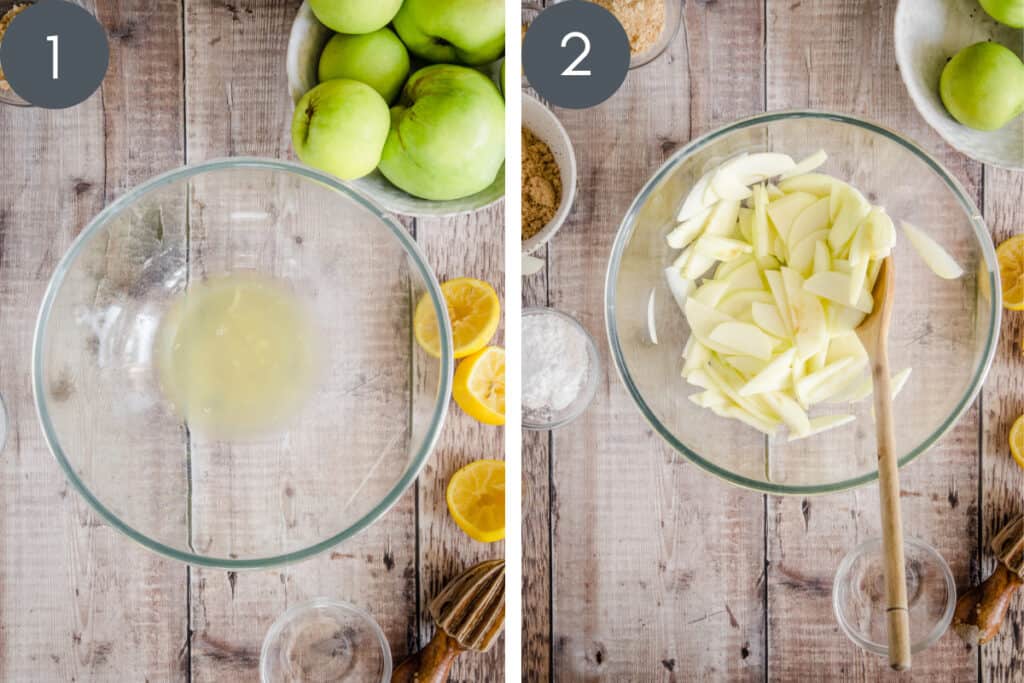
- Pour the lemon juice into a large mixing bowl.
- Stir in the apple slices to coat completely in the lemon.
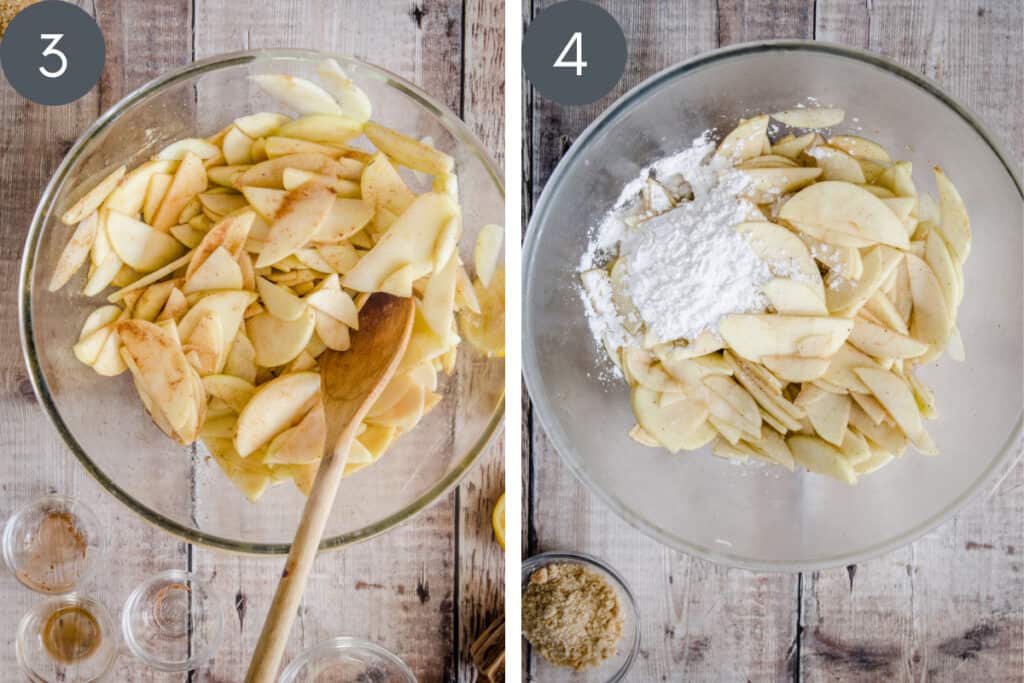
- Sprinkle the sugar, cinnamon, ginger and nutmeg over the apples in the mixing bowl and mix in.
- Rest the apples for at least 3 hours (or up to 6 hours) in the fridge.
- Toss with the tapioca starch just before adding the apples into the pie crust.
Apple Pie Filling Tips
As soon as you cut up each apple then stir into the lemon juice to prevent the slices from turning brown.
Allowing the apples to macerate in the seasoning is imperative to helping the apples retain their shape during their bake and not leak out their juices. This will lead to a soggy bottom.
Don’t discard the juice that you are macerating the apples in – you must include in your pie. Don’t worry it will not make your pie soggy. Use a slotted spoon to arrange the apple slices into your pie crust then once you have placed them all in then pour the juice over the top.
Homemade gluten-free pastry ingredients

When choosing ingredients for a gluten-free pastry your biggest challenge is to replicate the binding power of gluten so we have a pie crust which..
- is easy to roll out
- holds our filling without cracking
- doesn’t become dry and crumbly during the bake
It’s simple to master once you understand the different roles of our gluten-free flour choices and there is plenty of scope for substitution.
Cassava flour. This starchy flour is a great for pastry. It is mild in flavour but has a great stretchy quality which will prevent our pastry from serious cracking. Substitution – sweet rice flour (aka glutinous rice flour)
Oat flour. Chosen here for flavour and texture. The oat taste is rich and toasty which is a lovely vibe with the apples. Substitution –choose another wholegrain flour - buckwheat flour or sorghum flour work equally well but with different, still delicious, flavour results.
Defatted almond flour. This nut flour has even more protein than regular nut flour per 100g due to some of the fat being removed. This helps with the elasticity and of the pastry. Substitution – don't substitute for regular almond flour (ground almonds) but instead choose chickpea flour (gram flour) which has a similar amount of protein and soft texture).
Ground flaxseeds. Used for more protein power, to soften the pastry and give more stretch. Substitution – ground chia seeds.
Butter. We want unsalted so we can control the salt content and we need it ultra cold from the fridge which creates a lovely flakiness to our pastry.
Caster sugar. Just a light sweetness. It also helps gives structure to the pastry, the recipe doesn’t work without it.✨Alternative pastry. If you would like a pastry recipe without sugar then try this delicious Gluten-Free All Butter Pastry recipe which works exceedingly well as an alternative for this Gluten-Free Apple Pie.✨
Eggs. This recipe uses medium sized eggs, about 60g each. If you can’t find medium eggs then weigh them instead. This recipe requires 180g beaten egg.
Whole milk. This very small amount of extra liquid is only required if your pastry isn’t quite as sticky as you’d like. Often this recipe only requires an extra tablespoon.
Step-by-step pastry instructions
For full recipe instructions go to the recipe card at the end of this post.
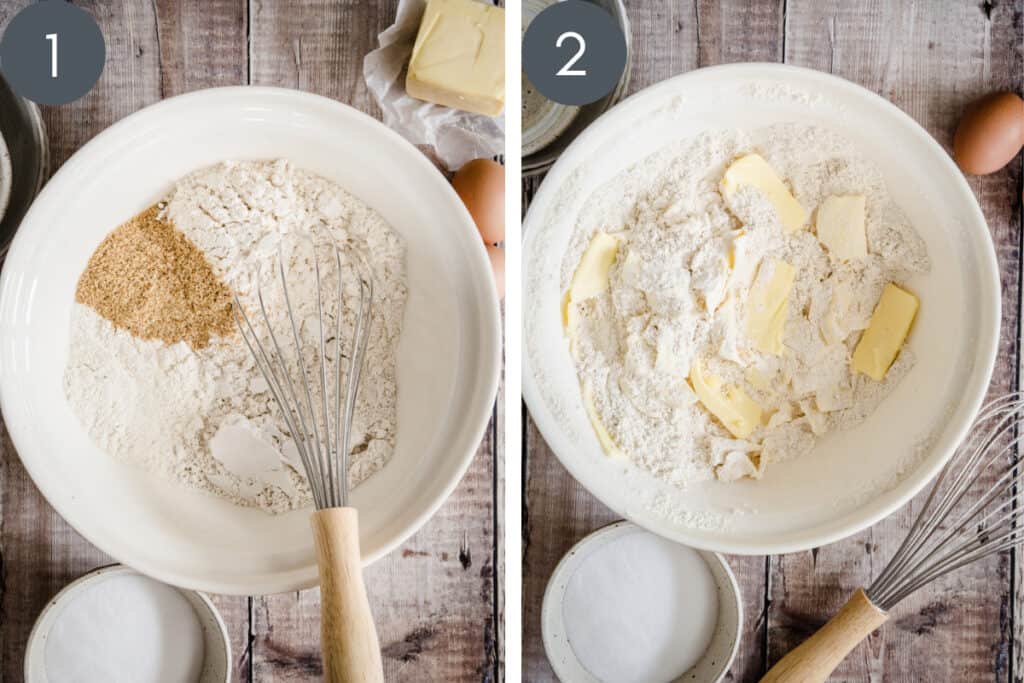
- Whisk together the cassava flour, oat flour, almond flour and flaxseeds in a large mixing bowl.
- Slice the butter very thinly and add to the flour.
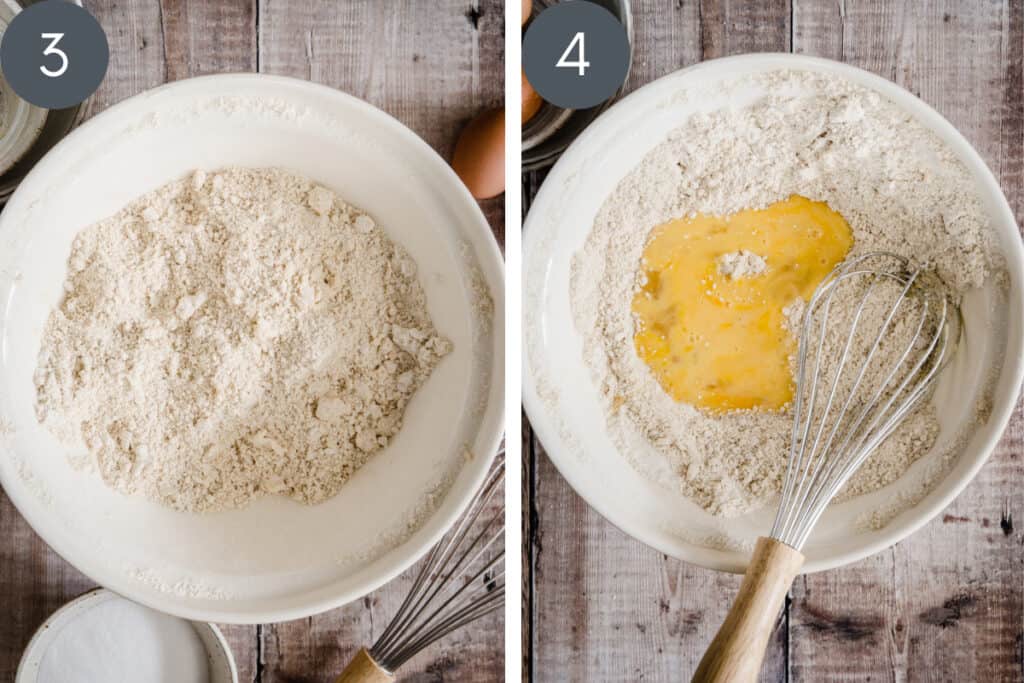
- Rub the mixture between fingertips until roughly shorn and crumbly.
- Whisk in the caster sugar.
- Pour in the eggs.
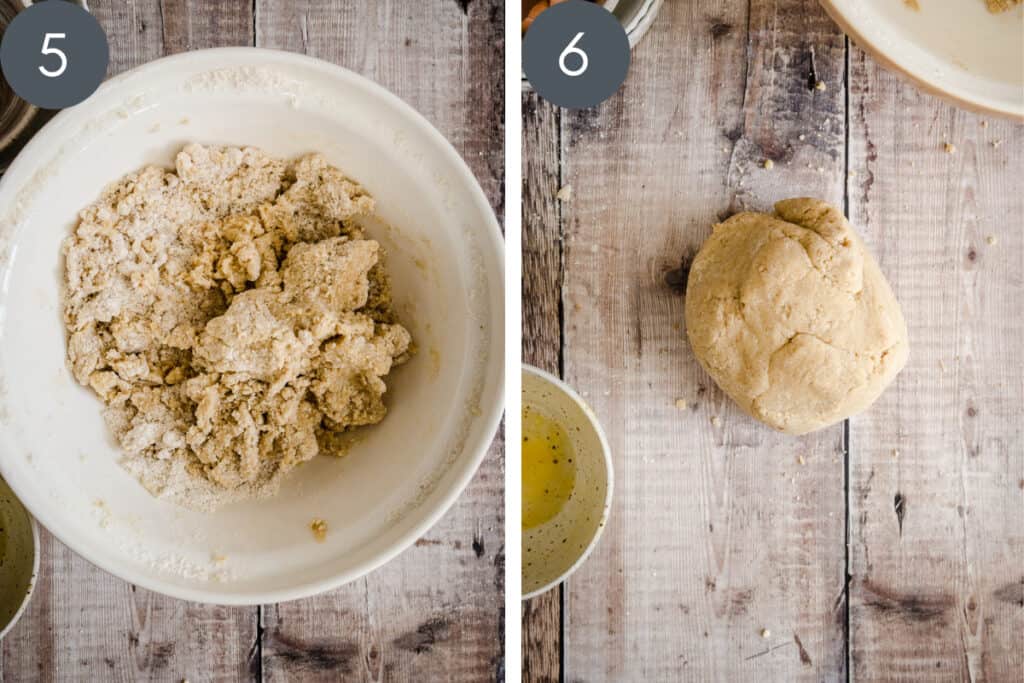
- Bring the dough together using a wooden spoon at first if you like and then your hands into a smooth round ball. If the dough is still too dry and crumbly then add a little extra milk.
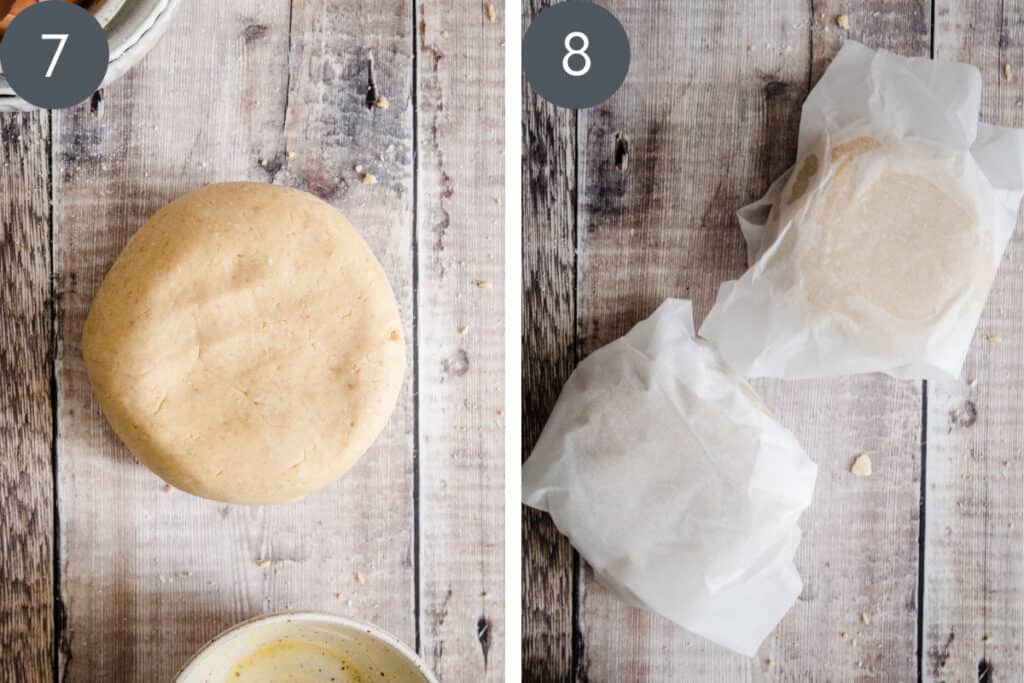
- Split the ball in half to create two round balls. Flatten each ball slightly.
- Wrap and chill. Wrap in baking parchment and chill for 30 minutes.
Pastry Prep Tips
You want to work with very cold butter. If your kitchen is warm and it’s quick to melt then try grating the butter in from frozen.
If using cold from the fridge I recommend peeling the butter into the flour mix so the butter is beautifully fine and will quickly rub into the flour.
The quicker the pastry is brought together and chilled the flakier and more tender your pastry.
Since this is a double crusted gluten-free pie you will need to split the pastry in half before you chill it.
Don’t miss out the chilling stages, this is imperative to a better bake for your pastry.
How to assemble and bake the pie
For full recipe instructions go to the recipe card at the end of this post.
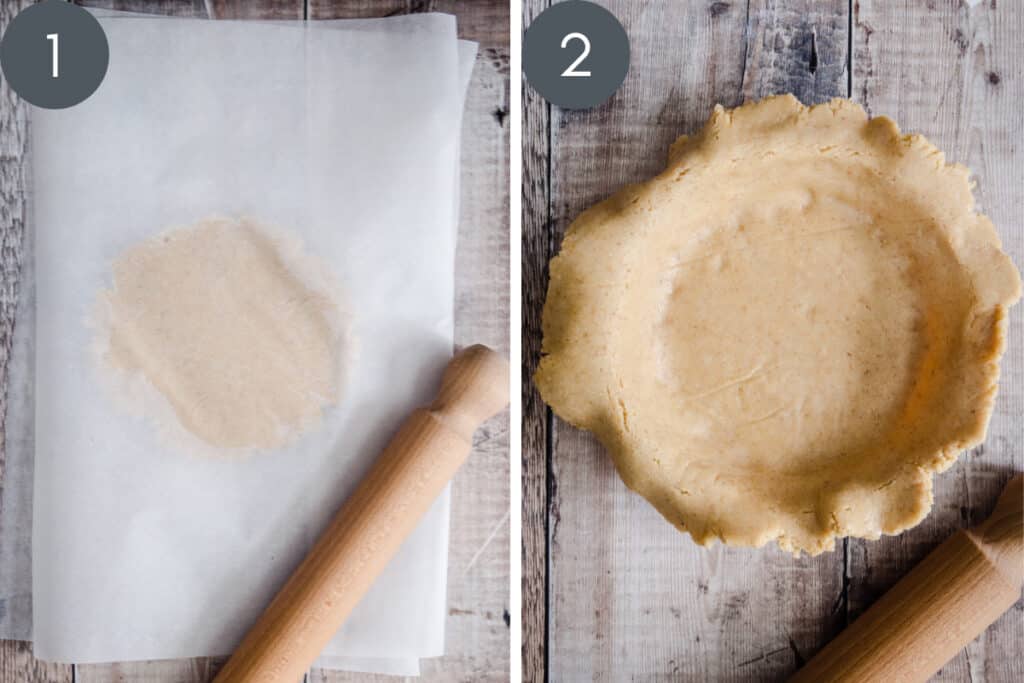
- Roll out one of the pastry discs in between two large pieces of baking parchment.
- Peel away the baking parchment and use the rolling pin to lift the pastry and drape it over the pie dish.
- Fit the pastry into the pie dish and chill.
- Roll out the second disc.
- Toss the tapioca starch into the apple filling until totally absorbed.
- Sprinkle the breadcrumbs on the pastry base into an even layer then spoon over all the apple slices, including the juices.
- Fit the second disc of pastry carefully over the top of the pie. Press the edges of the pastry together
- Roll the edges up together towards the pie to form a round ridge, crimping together if you like.
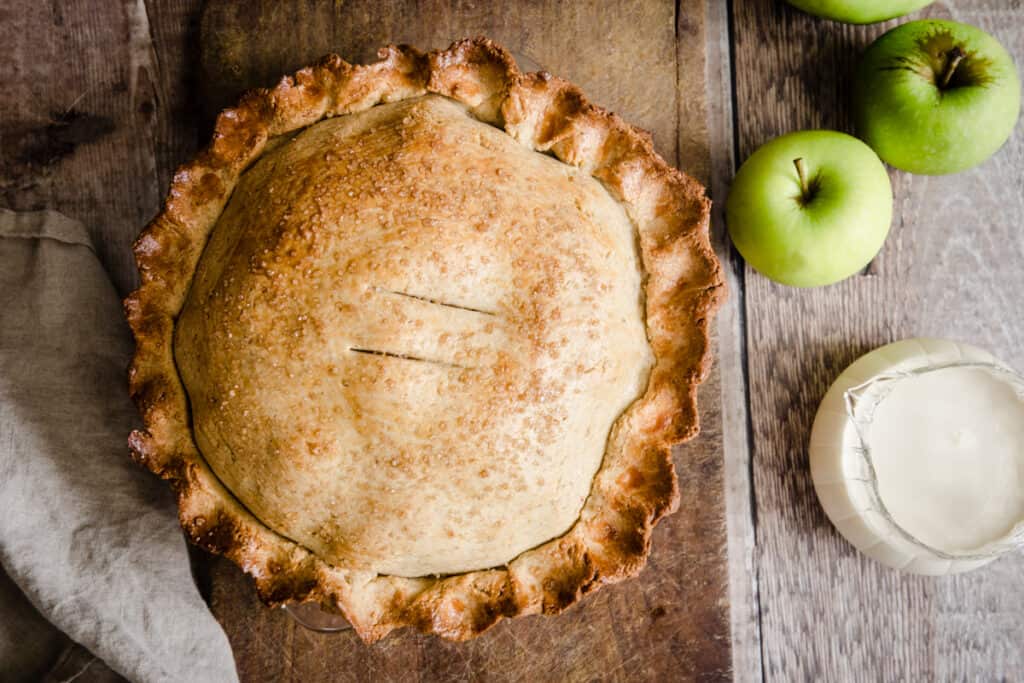
- Make two 2-3cm slits in the centre of the pie lid using a sharp knife.
- Chill for 30 minutes.
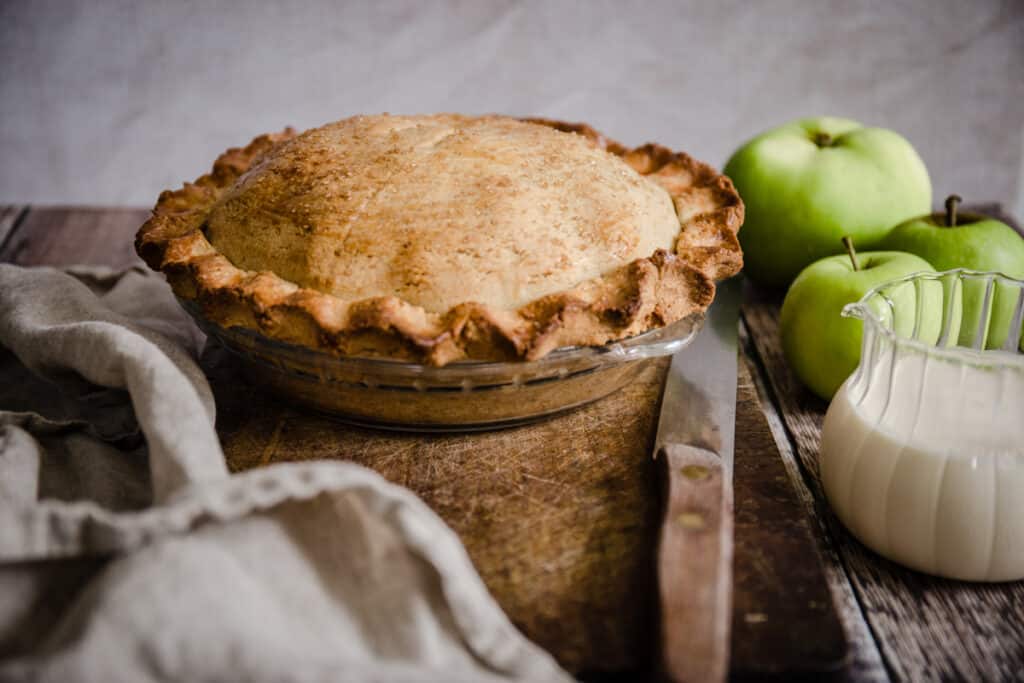
- Brush the egg wash over surface of the pie then sprinkle over the demerara sugar.
- Bake for 45 minutes.Cool for at least 30 minutes on a wire rack before cutting to serve.

Rolling Out Tips
Roll out your pastry between two sheets of baking parchment. You want to avoid adding excess flour to the pastry so this protects it. Plus it makes it less likely to crack and so much easier to manoeuvre into the pie dish.
If you like baking a lot of pies I recommend being aware of the exact size you need to roll your pastry out to so that it is the right thickness and will avoid pastry wastage. Draw a circle of the correct size onto the baking parchment and use this as a guide. It is about a 10 inch round.
Use a large rolling pin and roll with your forearms with a light even weight pressed to the pin.
Turn your pastry a quarter turn after every single roll for a balanced circle shape.
It is fine to roll out the pastry a little thicker than you might normally. This recipe produces the exact right amount of pastry.
After you have fitted the pastry lid over your pie then cut away the pastry excess to just past the edges of the pie dish. Pinch and roll the ends together towards the pie to seal. You can keep the edges just rolled for a rustic finish or crimp the edges together.
You need a very light egg wash brushed over the pastry before the pie is baked. Avoid the egg wash gathering in the crimped edges as too much moisture on the pastry will make it fall apart.
What pie dish to use
A glass pie dish is an excellent choice for baking this Double Crusted Gluten-Free Apple Pie. The glass is a reliable heat conductor and promotes a good even bake which browns and crisps well.
It also has the great advantage of being clear so you know how your pie crust has baked underneath without cutting into the pie.
This recipe uses this 20cm glass pie dish which is 20 x 16 x 3.9cm.
You could also use a light coloured aluminium pie tin of the same dimensions and will require the same cooking time.
Make in advance
You can bake the pie up to 3 days before serving. Once baked then cooled the pie is best kept in the fridge.
Re-heat in the oven at 200°C / 180°C / gas mark 6 for 15-20 minutes.
How to freeze
It is possible to freeze the whole pie after baking. Allow the pie to cool completely then carefully lift out of the pie dish, using a palette knife to ease off the edges if needed. Flash freeze the whole pie uncovered for 1 day until frozen then double wrap it in cling film and aluminium foil or a ziplock bag.
Defrost overnight at room temperature. Then you can re-heat in the oven. Re-heat at 200°C / 180°C / gas mark 6 for 15-20 minutes.
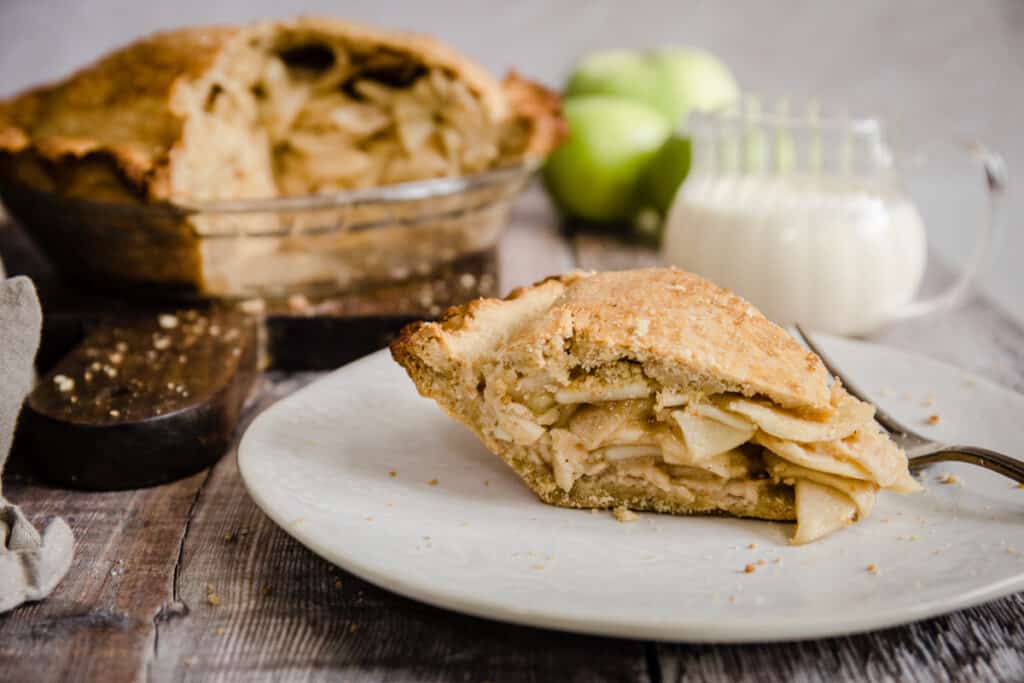
Serving suggestions
It’s a totally personal choice what you like to serve with your apple pie but here are my top 3 options.
- Cold cream. Luxurious double cream drizzled on top of warm apple pie is my favourite accompaniment.
- Custard. A delicious thick and creamy homemade custard cannot be beaten. Homemade Vanilla Custard. Strawberry Custard. Lemon Custard.
- Ice Cream. Vanilla Ice Cream is a classic. But can I also suggest this Gingerbread Ice Cream – it’s a wonderful accompaniment.

More gluten-free recipes you’ll love!

Enter your email below to get this recipe sent to your inbox plus get new recipes, baking tips, and updates.
Gluten-Free Apple Pie
Ingredients
Apple filling
- 2 lemons - juiced (about 50ml)
- 2 bramley apples - about 400g, or any cooking apple
- 4 granny smith apples - about 500g
- 75 g light brown sugar
- 1 teaspoon vanilla extract
- ½ teaspoon ground cinnamon
- ¼ teaspoon ground ginger
- ⅛ teaspoon freshly grated nutmeg
- 25 g tapioca starch
- 2 tablespoons gluten-free breadcrumbs
Double crust pie pastry
- 160 g cassava flour
- 145 g oat flour
- 85 g defatted almond flour*
- 30 g ground flaxseeds
- 145 g unsalted butter - directly from the fridge
- 115 g caster sugar
- 3 eggs - medium, lightly beaten
- 1 tablespoon whole milk - optional
Egg wash
- 1 egg - medium, beaten
- 2 teaspoons whole milk
- 2 teaspoons demerara - turbinado sugar for sprinkling on top
Instructions
Apple filling
- Pour the fresh lemon juice into a large mixing bowl. Then prepare the apples by coring, peeling, and thinly slicing them. Drop each apple slice into the lemon juice as you go and stir them in.
- Prepare the seasoning by combining the sugar, cinnamon, ginger and nutmeg in a small bowl. Sprinkle this seasoning over the apples and stir it all together until the apple slices are coated.
- Rest the apple slices for at least 3 hours (and up to 6 hours) in the fridge.
- Start making your pastry 1 hour before you wish to assemble and bake your pie.
Double crust pie pastry
- In a large mixing bowl whisk together the cassava flour, oat flour, almond flour and flaxseeds.
- Slice the butter very thinly directly from the fridge and add to the flour.
- Rub the mixture between fingertips until roughly shorn. It’s okay that the butter is still in largish pieces.
- Whisk in the caster sugar.
- Make a well in the centre of the dry mixture and pour in the beaten eggs.
- Bring the dough together using a wooden spoon at first, if you like, but switch to using your hands for the final gathering.
- Turn the shaggy pastry out onto a clean work surface and knead for about two minutes until the dough comes together into a smooth ball which is no longer sticky. If the dough is still too dry and crumbly then add a little extra milk.
- Split the dough into two even halves and roll into two balls. Flatten the balls slightly to make two thick round discs. Wrap each one in baking parchment and place in the fridge for 30 minutes - 1 hour to chill before rolling out.
Pie assembly
- Cut two large pieces of baking parchment, 2½ inches wider than the size you need to roll the pastry out to.
- Place one of the chilled pastry discs between the parchment sheets.
- Using a long rolling pin roll out the pastry into a round until it is about 5mm thick.
- Peel away the baking parchment and use the rolling pin to lift the pastry and drape it over the pie dish.
- Fit the pastry into the pie dish, patching up any cracking with excess pastry. Place the pie dish in the fridge whilst you roll out the second pastry disc in exactly the same way.
- Bring your apple filling out of the fridge after you have rolled out the second disc. Toss the tapioca starch into the apple filling until totally absorbed.
- Sprinkle the breadcrumbs on the pastry base into an even layer then spoon over the apple slices, layering them so that there are minimal gaps. Once the pie has been filled then pour all the apple filling juices over the top as well.
- Drape the second disc of pastry carefully over the top of the pie. Press the edges of the pastry together then cut away the excess pastry to just beyond the pie dish. Roll the edges up together towards the pie to form a round ridge, make sure there are no gaps in the pastry. You can leave the edge of the pie like this or crimp it together using your fingers.
- Make two 2-3cm slits in the centre of the pie lid using a sharp knife then place in the fridge for 30 minutes to chill.
Baking the pie
- Pre-heat the oven to 190°C / 170°C fan / gas mark 5.
- Make the egg wash by whisking the egg with the milk.
- Remove the pie from the fridge and brush the egg wash over lightly, making sure excess liquid does not gather in the creases of the pie which will make the crust unstable once cut. Sprinkle the Demerara sugar over the surface of the pie.
- Place in the centre of the oven on the middle shelf and bake for 45 minutes when the pastry is golden.
- Remove from the oven and allow the pie cool for at least 30 minutes on a wire rack before cutting to serve.
Video
Notes
- Cassava flour. Can be substituted for sweet rice flour (aka glutinous rice flour).
- Oat flour. Can be substituted for buckwheat flour or sorghum flour.
- Defatted almond flour. This is not the same as regular almond flour (ground almonds) as it has some of the fat partially removed. You can substitute it for chickpea flour (gram flour).
- Ground flaxseed. Can be substituted for ground chia seeds.

Omg, This pie was delicious! I used your Gluten-Free All Butter Pastry . I had to double the recipe, however I had leftover dough, I would say enough for a single crust.
A few things I would do differently. 1) the bottom crust was soggy, there was a little juice after slicing the 1st piece . The apples were sliced very thin and refrigerated for 90 minutes. The maceration produced alot of juice which i did not add to pie. I think the ¼ cup tapioca flour should be increased maybe to ½ cup. I did sprinkle 2 tablespoons of gf breadcrumbs. Not sure what else can be used to “seal” bottom crust?
I wish I could post a pic, because all and all it was a success. The top crust browned beautifully and was flaky/crunchy
Thank you for sending through your feedback on the apple pie. I'm so happy you enjoyed it and appreciate you letting us know about your experience with it despite the soggy bottom. Let me look into how I can improve the instructions so this doesn't happen to others.
Greetings from Canada! I'm of Indian origin and make rotis every few days. I also have a lot of experience with regular gluten all purpose flour pie crust. With this recipe , I made a double crust chicken pot pie. Amazing! The dough was a bit more fragile, but I handled it carefully. It took 45 minutes at 350°F. The baked crust was exactly as described in the recipe. Tender, buttery and absolutely delicious. I didn't need to blind bake. No xanthan gum too! Going to try a pumpkin pie next. Thank you!
That's great to hear - thank you for your feedback Fatima!
Does it work using vegan ingredients - coconut oil and flax egg?
Hi Chrissie, I'm afraid I haven't tested the recipe with vegan substitutions.