Homemade Creamy Vanilla Ice Cream (traditional style)
This post contains affiliate links. Please read my disclosures.
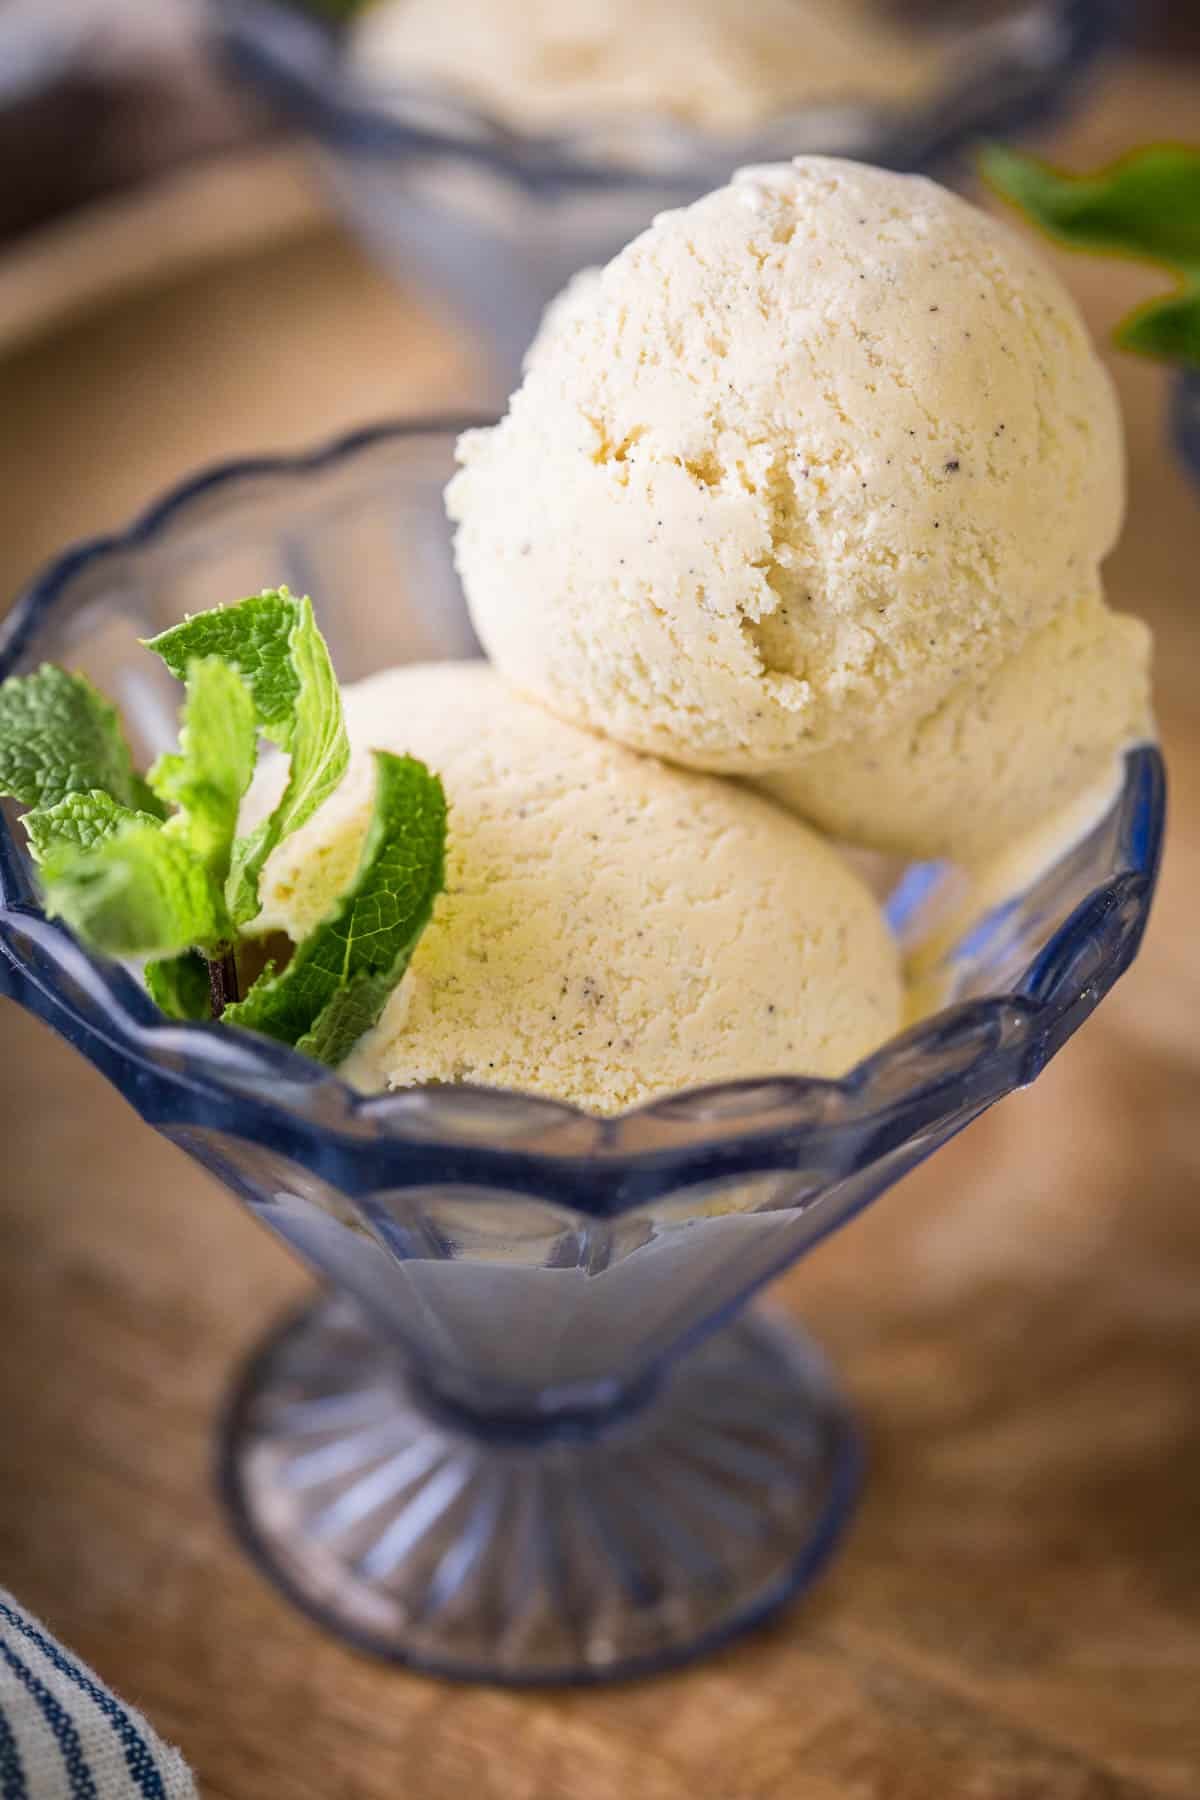
Nothing compares to homemade vanilla ice cream made the traditional French method using an egg custard base. It produces a perfectly balanced rich and creamy ice cream which has a huge depth of flavour and is so delicious just on its own but is also an excellent foundation for a knickerbocker glory, banana split or to top your favourite desserts. It’s very easy to make but you will need an ice cream machine.
Vanilla ice cream is truly the king of the flavours and has long been the only flavour of ice cream that truly satisfies every single member of our family. Especially if we’re given free rein for toppings! However, since developing this homemade recipe we have all agreed that there is simply no better ice cream. It beats all the branded versions including Haagan Daaz, Ben and Jerrys, Green and Blacks – and even Jude’s - absolutely hands down!! Plus there’s no weird ingredients, you can buy everything from any larger supermarket.
Homemade ice cream may seem a little intimidating but actually I really got into making ice cream when I first started writing this blog about 15 years ago when I thought seriously about launching my own business. It’s not only quite easy but also an incredibly addictive and satisfying hobby. Once you buy your first ice cream machine (which you will need for this recipe) then there will be no turning back. There is no better way to start than perfecting your very own vanilla ice cream.
I will explain how to choose your ice cream machine if you are on a budget or if you want an upgrade and want to treat yourself, plus I recommend other equipment you might need in a perfect ice cream making world.
I also give the best tips and tricks for achieving your ideal vanilla custard with ease that will churn up an absolute dream to create a silky smooth ice cream with no ice crystals. It’s not a quick recipe to make but a lot of it is hands off so it’s also not much bother.

Traditional Custard-Based Vanilla Ice Cream VS. No Churn
I can’t deny that I have dabbled in no-churn ice cream recipes over the years and have a few tried and tested versions that I love. But nothing beats a true traditionally churned ice cream.
With a custard-based ice cream that you make with an ice cream machine you have a richness, smooth velvety texture and a depth of flavour from using egg yolks as an emulsifier. You can also use lighter ingredients and keep the sugar content nicely balanced so it’s a lot more versatile.
No-churn ice creams are good if you don’t want to invest in an ice cream machine as they are quick and easy to make. However, as they need ultra fatty and sugary ingredients like double cream and condensed milk to avoid large ice crystals forming the texture is a bit more chalky rather than creamy and can leave a fatty film at the top of the mouth.
Why You’ll Love This Traditional Vanilla Ice Cream
- Extra creamy. We use double cream as the main dairy base but cut through with some whole milk to lighten it up. This gives it a richness but also lightness.
- Mmm mouthfeel. The ideal fat ratio in this recipe means your ice cream will have the perfect mouthfeel.
- Real vanilla flavour. We use real vanilla beans for this recipe for an incredible depth of flavour.
- Simple. It’s not hard to make ice cream but there are a few temperature considerations to bear in mind to ensure you get no pesky ice crystals and I’ll talk you through each step with ease.
Ingredients Needed
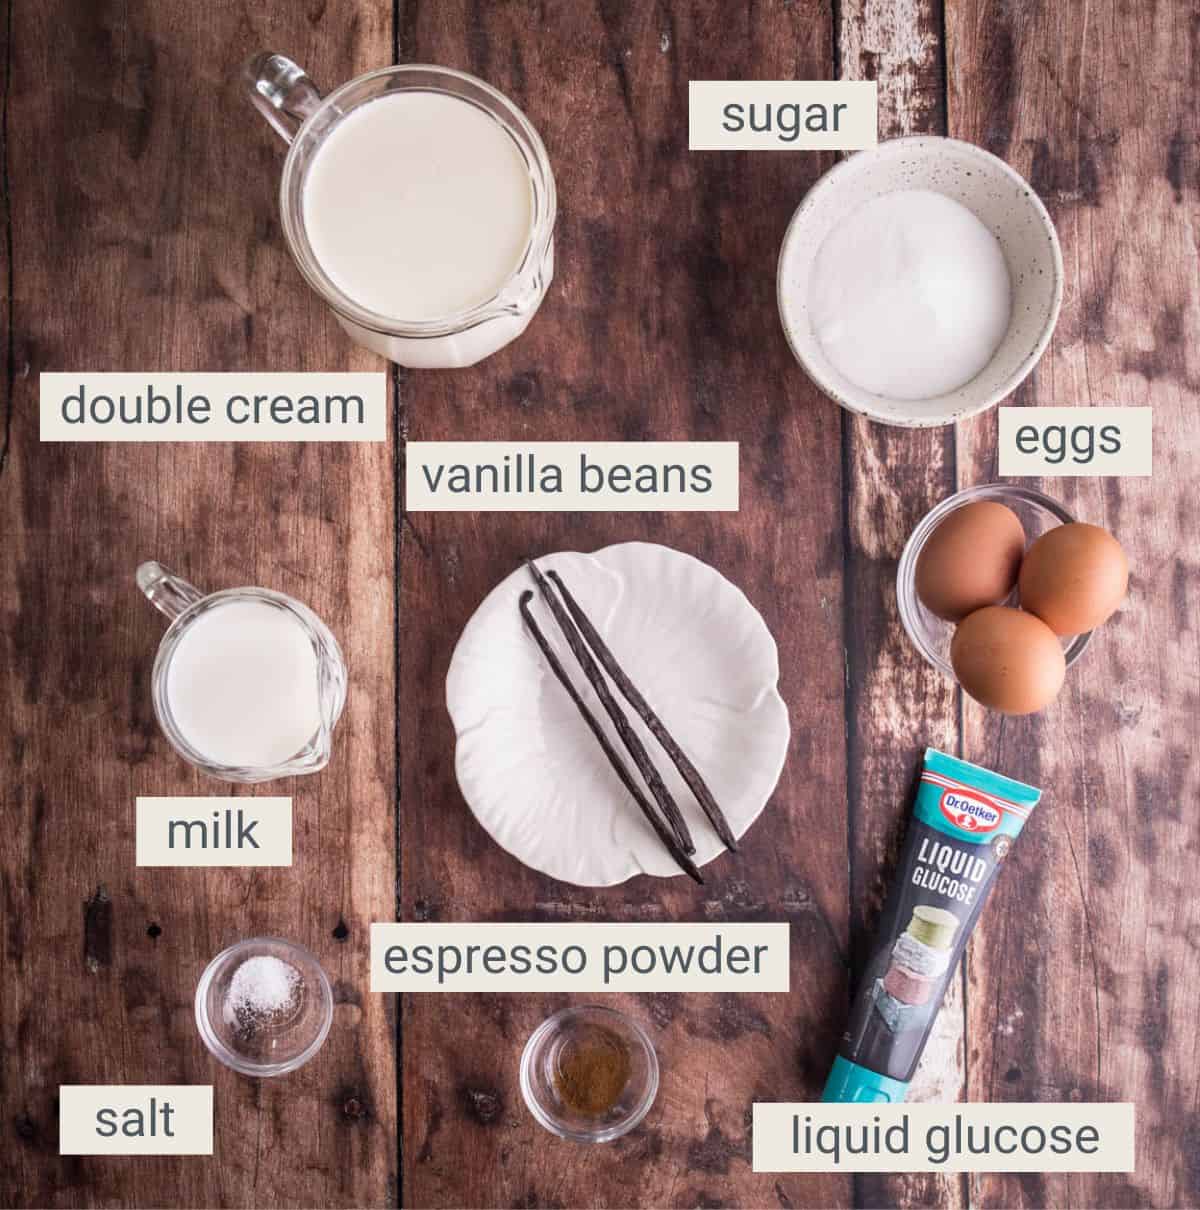
Double cream. You can substitute for heavy cream. Using a combination of double cream and whole milk is the perfect balance of . Don’t substitute for single cream. You could use just whipping cream instead of both the double cream and whole milk but I can’t always find it in the supermarkets. Double cream is much more reliable.
Whole milk. This is a dairy ice cream and I will post a separate recipe for a dairy-free ice cream at some point. But for this recipe I can’t recommend a plant-based substitute. And make sure to use whole milk, not semi-skimmed or skimmed – it will affect the finished texture of the ice cream.
Vanilla Beans. I made several versions of this ice cream switching out varied amounts of either real vanilla beans or using vanilla paste. I loved the versions using vanilla paste and it is the easier option as you don’t need to strain this recipe. However, different brands of vanilla paste have a wide variety of ingredients from agave syrup to xanthan gum to create the viscosity so their flavour and resulting sweetness differed. In the end I stuck to vanilla beans for consistency. However, feel free to switch out to vanilla paste – 1 tablespoon per vanilla bean. The final version may be slightly sweeter depending on the brand and you may want to reduce the liquid glucose by 1 tablespoon if a liquid sweetener is included in the paste's ingredients list.
Caster sugar. This is a fine white baking sugar available in the UK. If you want to use granulated sugar then I would just recommend giving it a quick whizz in the food processor to grind those sugar crystals a bit further. I don’t recommend reducing the amount or swapping for a non-refined sweetener as the caster sugar helps prevent the formation of ice crystals which sweetener does not.
Liquid glucose. I don’t expect you will necessarily have this ingredient in your larder but it’s actually an easy ingredient to buy and is available at most large British supermarkets. We use liquid glucose as well as sugar as it helps to add a little ‘chew’ to our ice cream, it helps reduce the formation of large ice crystals and also gives the ice cream a little more softness. You can omit or you can swap for corn syrup if you can’t get hold of it.
Egg yolks. Better egg yolks (by that I mean free-range or if you have access to great eggs from your farmer’s market or home chickens then even better!) will produce a more richly flavoured ice cream. You need about 3 egg yolks of medium eggs. This weighs up in total between 45-50g egg yolks.
Espresso powder. You are not making coffee ice cream don’t worry but this is a tip I found from Heston Blumenthal (and who I am to argue!) who claimed that using espresso powder lengthens the vanilla flavour. Of course he was right and it really makes a difference. I ask everyone who has tried the ice cream if they can detect the ‘secret ingredient’ and no one mentions coffee so safe to say that it’s virtually undetectable, although once you know it’s there it does give a little vibe. I used a pinch of Nescafe Azera and tried it both with decaf and regular and there wasn’t a difference.
Salt. You only need a small pinch and I used kosher salt (like I do for most of my baking recipes). It helps to keep the flavours all balanced.
Equipment Needed
Ice Cream Machines
There are two main types of ice cream machine:
Freeze-first. Those which have a bowl which requires pre-freezing for 24 hours prior to churning your ice cream. These can vary in cost from about £40-£100.
Self-freezing. Those which you can just plug and play. You can just pour your pre-chilled custard into its inner bowl and it freezes as it churns. A good model will start at around £200 and then go up dramatically in price.
I have recently upgraded from a freeze-first model to a self-freezing model (Cusinart Ice Cream & Gelato Professional ICE100BCU) simply because we eat a lot of ice cream in our house and I adore making it so when my pre-freeze model broke I upgraded.
This recipe can be made with either a freeze-first or a self-freezing machine. Although I have given basic instructions for what to do about churning your ice cream you should always follow the manufacturer’s instructions as they may vary from machine to machine.
Other Equipment
Digital thermometer. You can make ice cream without a digital thermometer but using one means that you can take your custard to the exact right temperatures so that the custard doesn’t split and avoids the production of bacteria.
Large casserole dish (or sink) for the icebath. I prefer a casserole dish as they are smaller so it’s easier to fill with ice and keep cold.
Ice cubes (lots). You will need a bag of ice as you need to keep that icebath at a cold temperature so it will need to be replenished a couple of times during the initial chilling time.
Food storage bag. This is to pour your hot custard into which you will then carefully seal and submerge into your icebath. I like to use a new one every time for this purpose as I have made the mistake before of using an old one with a hole in and custard leaked everywhere!
Food storage bags clip stand. Do you have one of these in your kitchen? If you use food storage (or ziplock) bags then you will find this an invaluable investment. I use food storage bags to store my fresh stock, freezer meals, custard for the freezer and these clip stands will hold your freezer storage bags for you so you have free hands for transferring the food. It means you don’t need someone else to hold the bag for you whilst you are pouring in the hot ice cream custard.
1.5lt airtight containers. I use 1.5 litres as these are the most useful for all your ice cream uses. If you wanted to add some mix-ins or change the vanilla flavour slightly then there is headroom in the container.
How To Make This Custard-Based Vanilla Ice Cream
For full recipe instructions go to the recipe card at the end of this post.
Getting ready:
Prepare the ice cream machine. If you are using a freeze-first machine you need to put the bowl in the freezer for 24 hours before you start churning the ice cream.
Just before you start to make your ice cream prepare your ice bath for the initial chill. Half fill a large pot with ice and top with cold water to just about cover the ice.
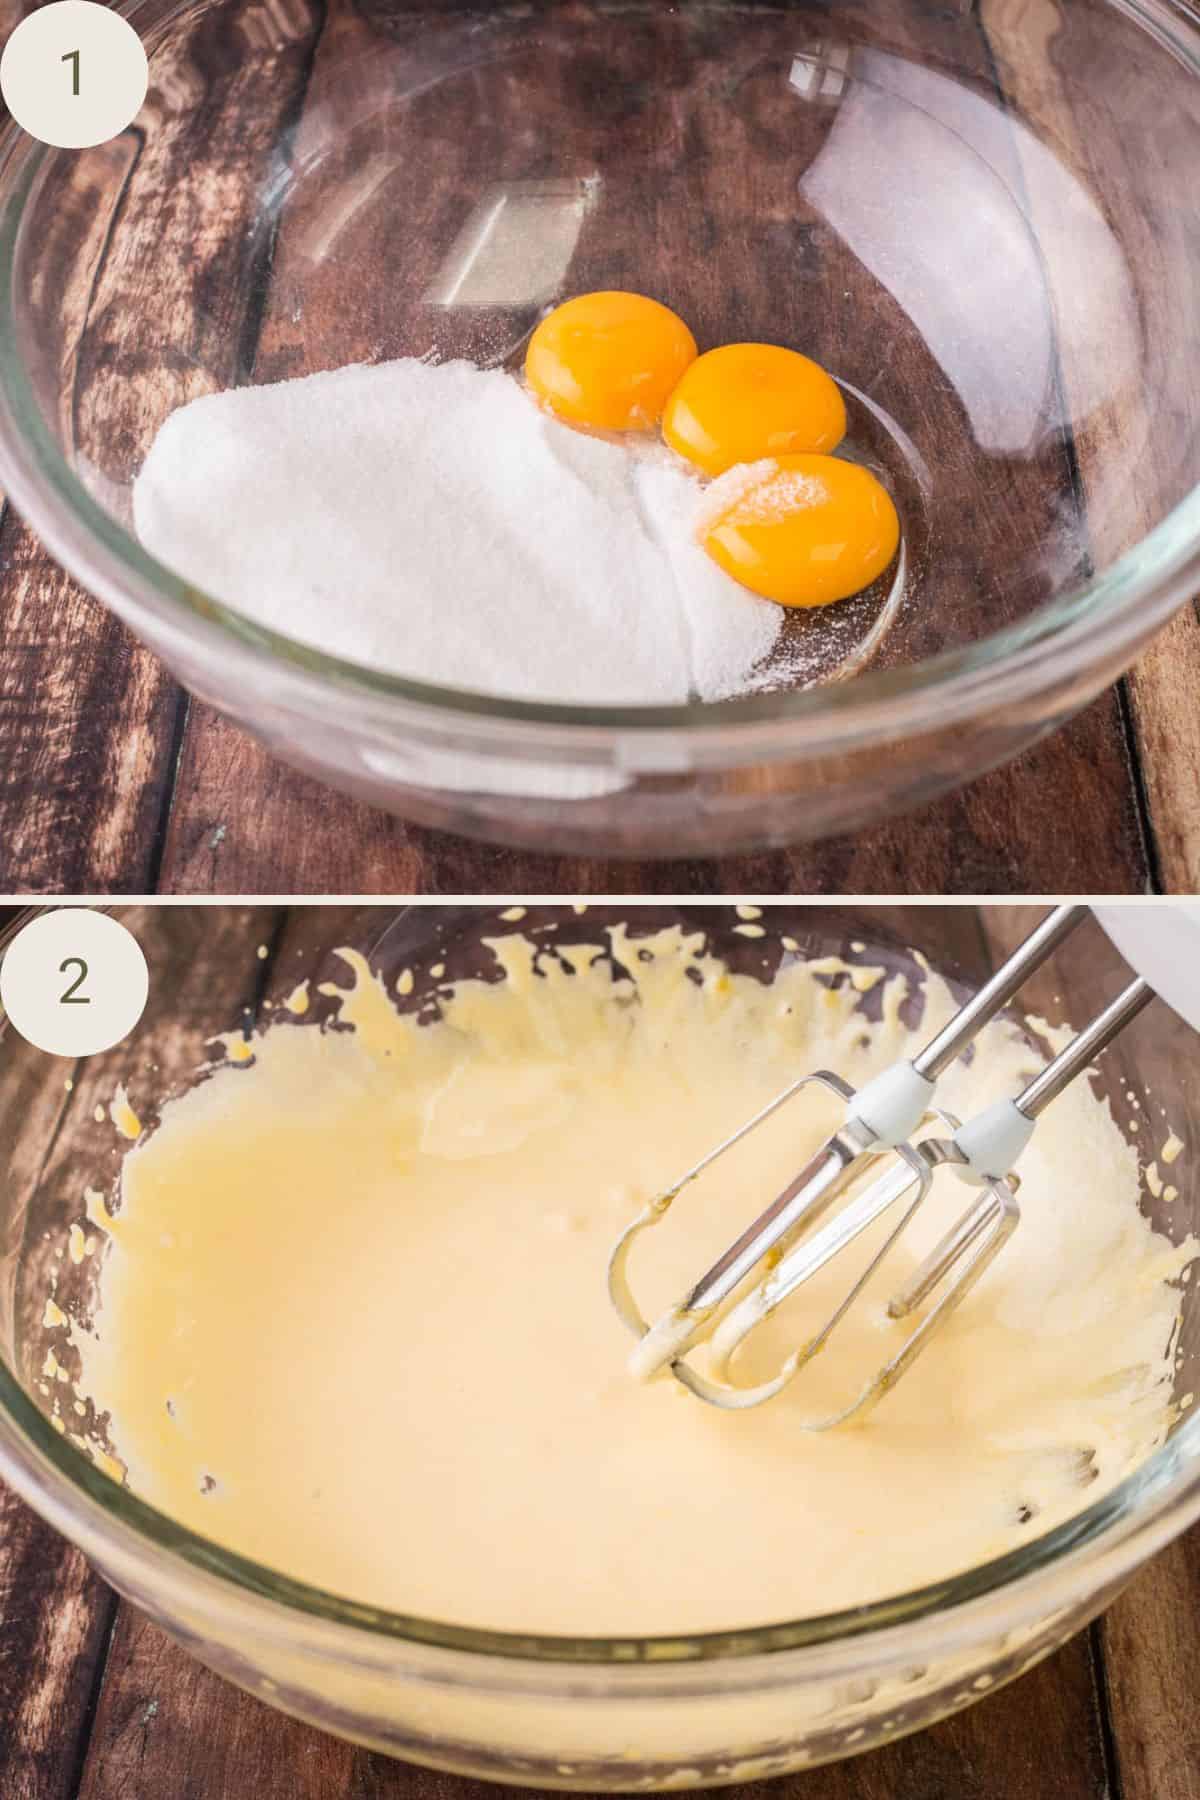
Whisk the sugar and egg yolk together in a large bowl until thick and creamy.
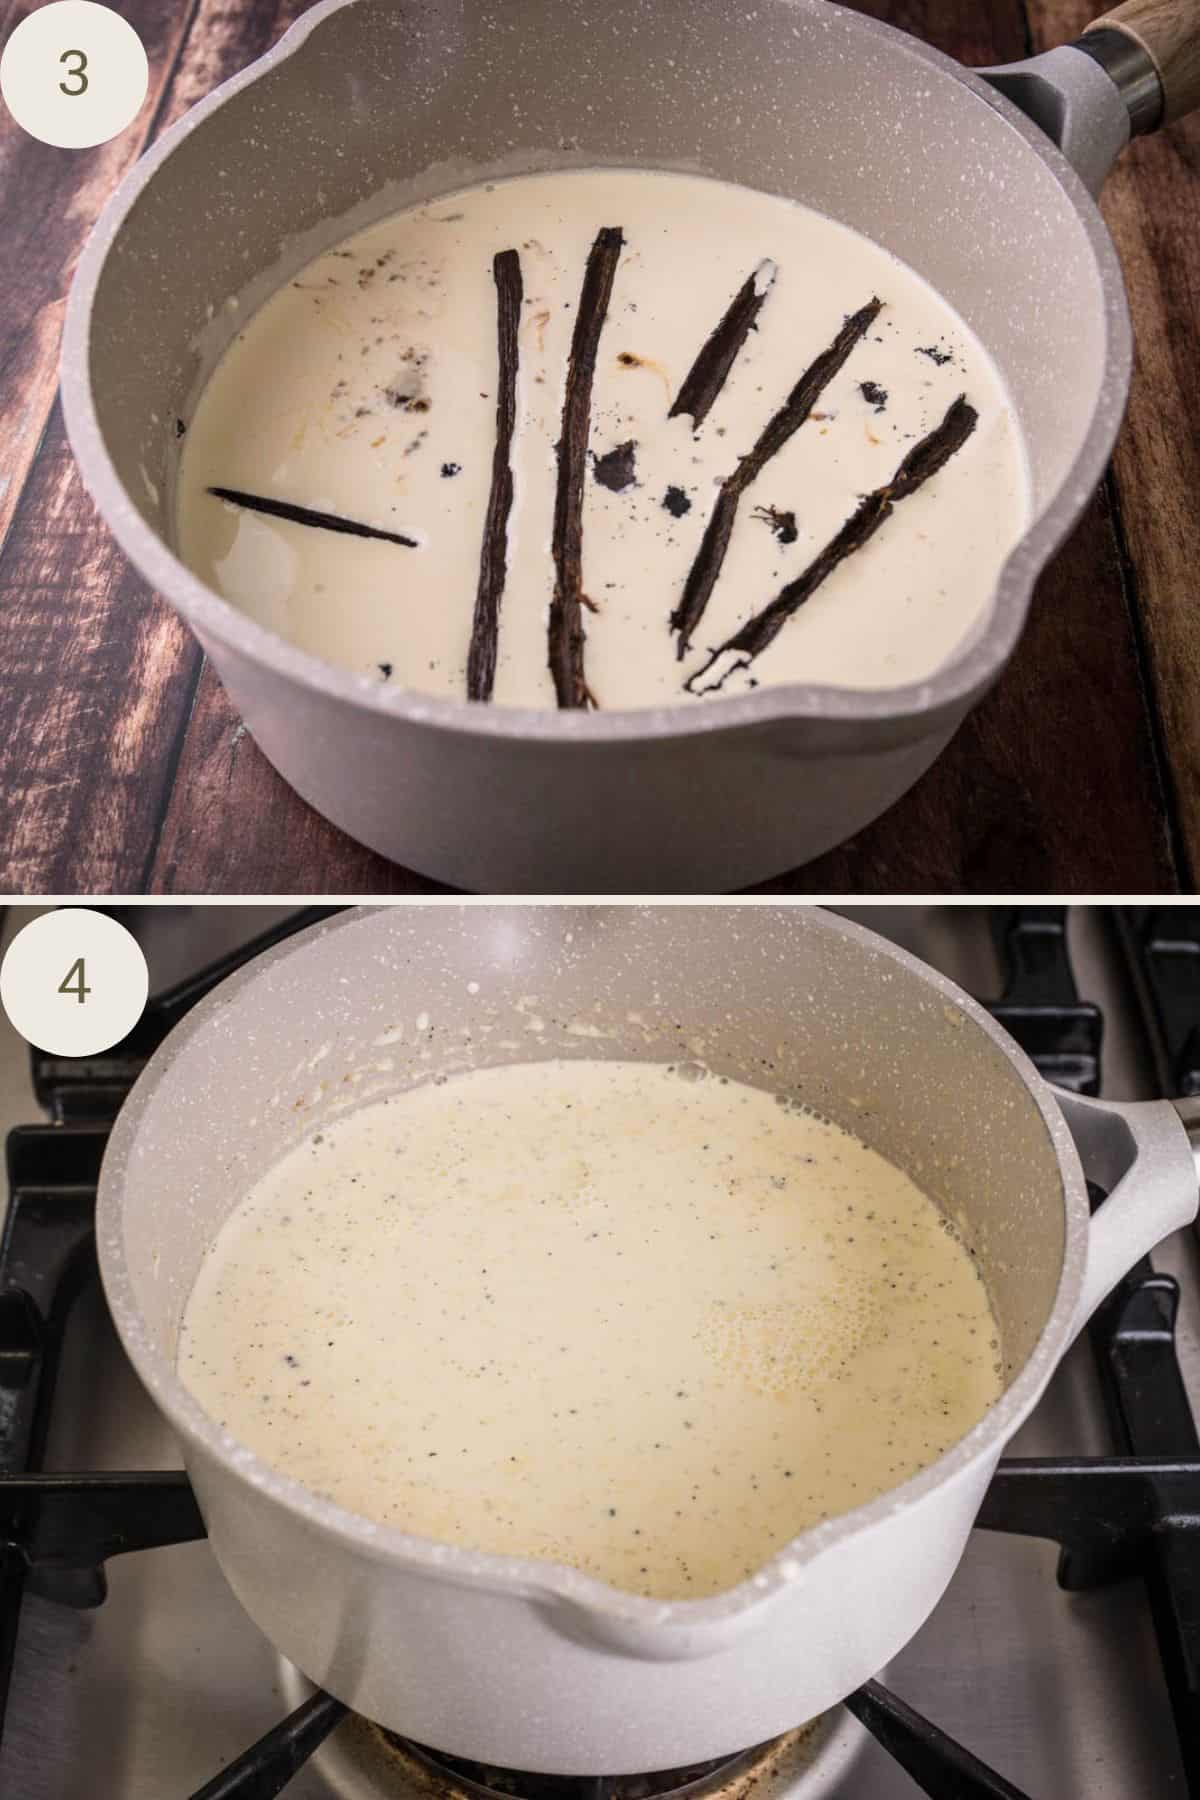
Split the vanilla beans in half lengthways, scraping out the seeds with a teaspoon. Place the seeds and the pod halves in a large saucepan along with the cream, milk, liquid glucose, espresso powder and salt. Warm the ingredients at a medium heat until it reaches 60-65°C (140-149°F). Remove from the heat.
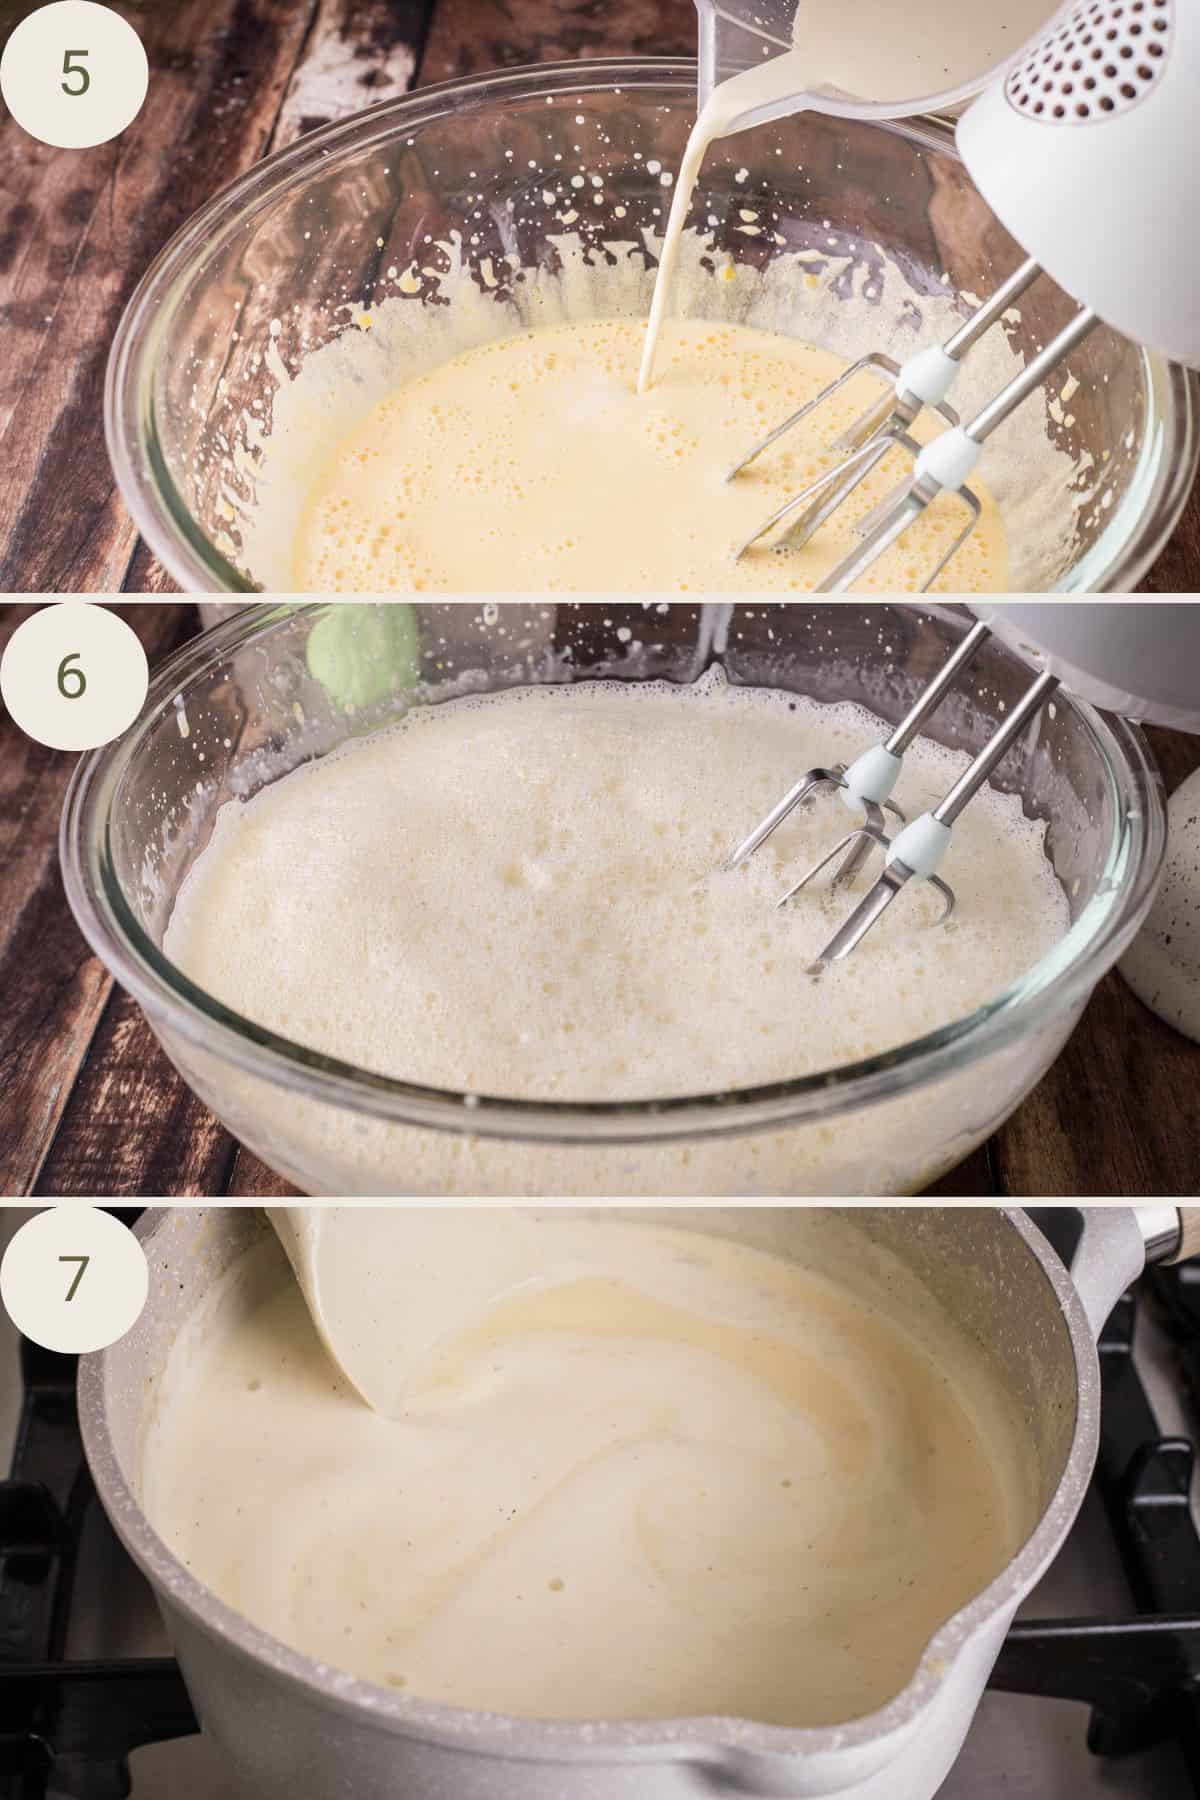
Temper the egg yolk mixture by pouring the warm vanilla cream slowly into the eggs, whisking all the time to produce a thin custard.
Pour the custard back into the original saucepan and heat to 80°C (176°F), stirring all the time. Turn the heat down to the lowest setting and keep at this temperature for 2-4 minutes if you can so you can ensure it’s at a stable temperature. If it starts to increase in temperature remove from the heat.
Remove the custard from the heat. You need to cool it as quickly as possible. You can achieve this by transferring the custard to a food storage bag that you will submerge in your prepared ice water bath. The temperature needs to reduce to 4°C (39°F) within 90 minutes to avoid bacteria forming. It should only take about an hour to get to that temperature so keep checking it with a digital thermometer and replenish the ice every so often to keep it as cold as possible.
Transfer the chilled custard to the fridge to rest for at least 4 hours but preferably overnight. You can leave in the ziplock bag or transfer to a jug and place cling film on the surface (this will make it easier to pour into your ice cream machine later).


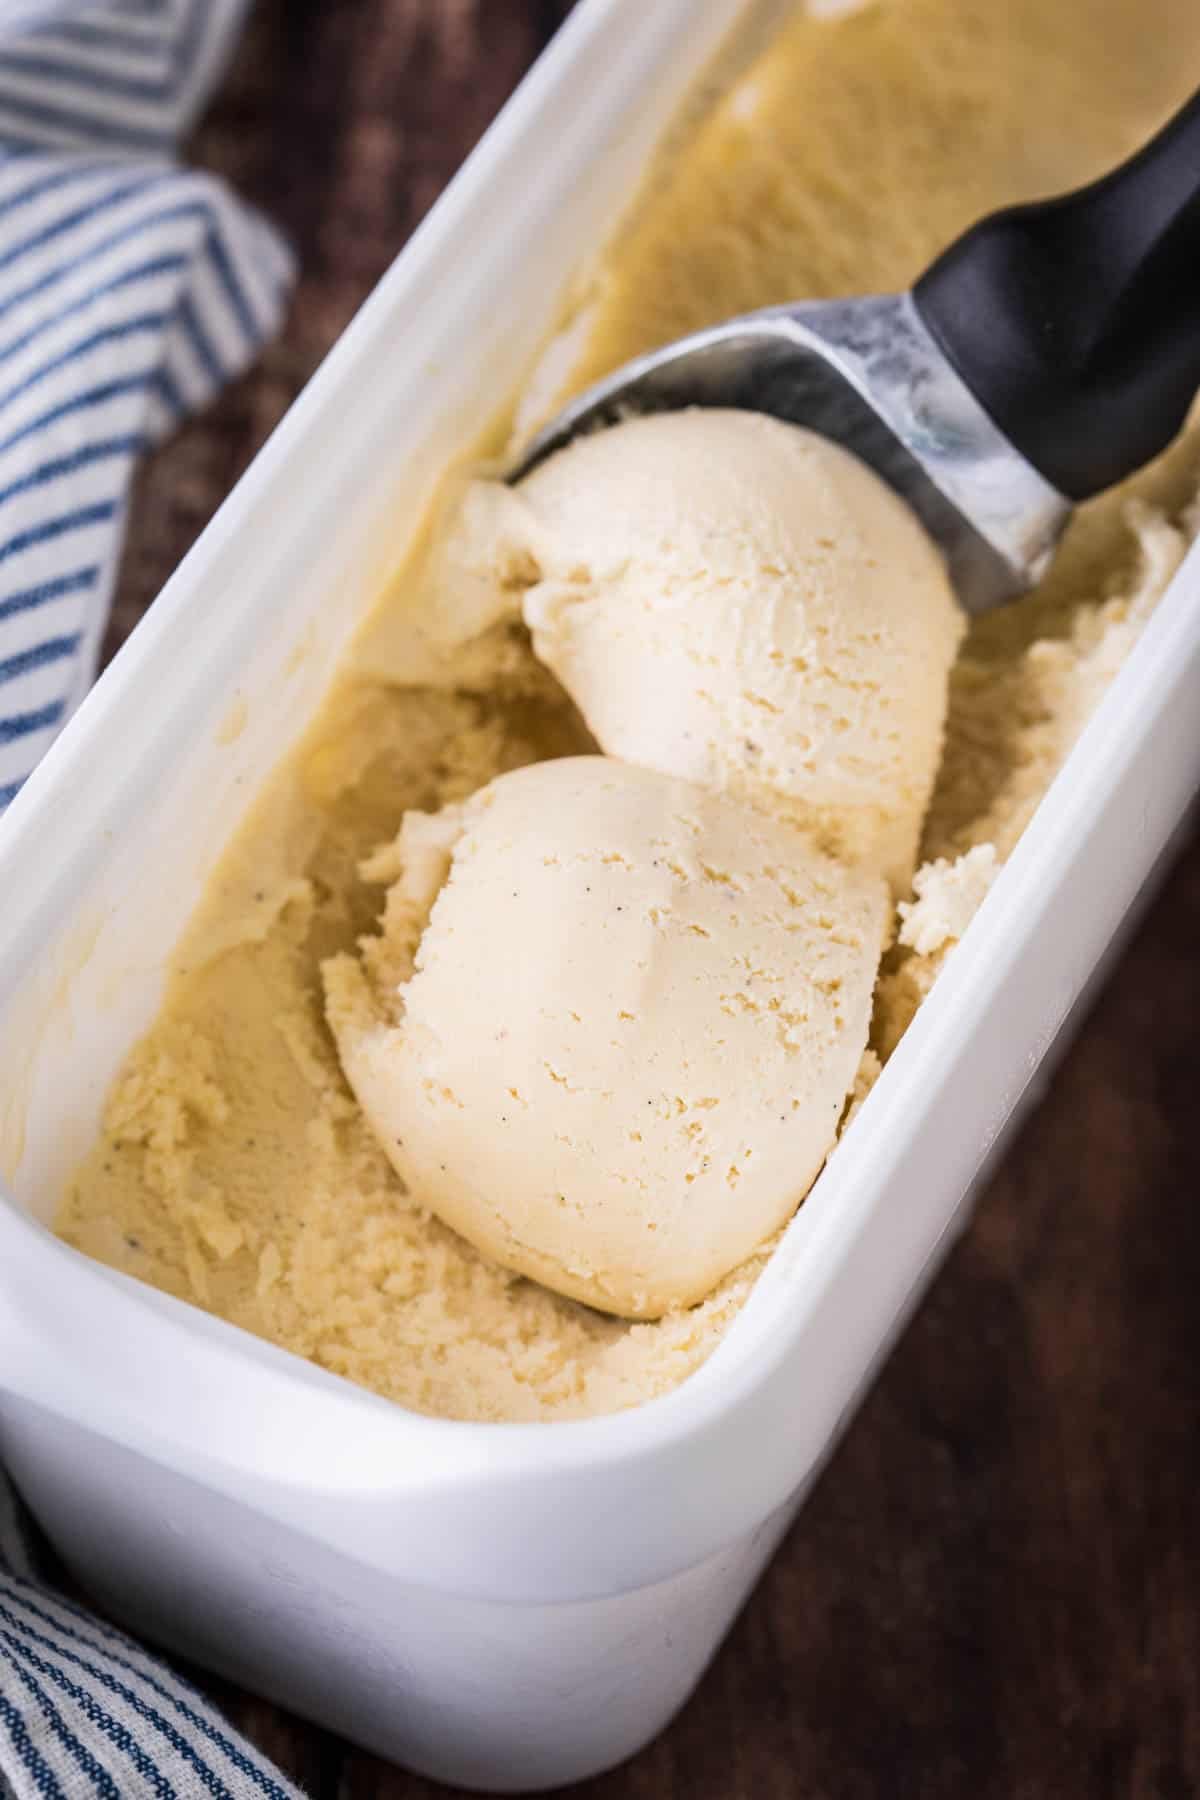
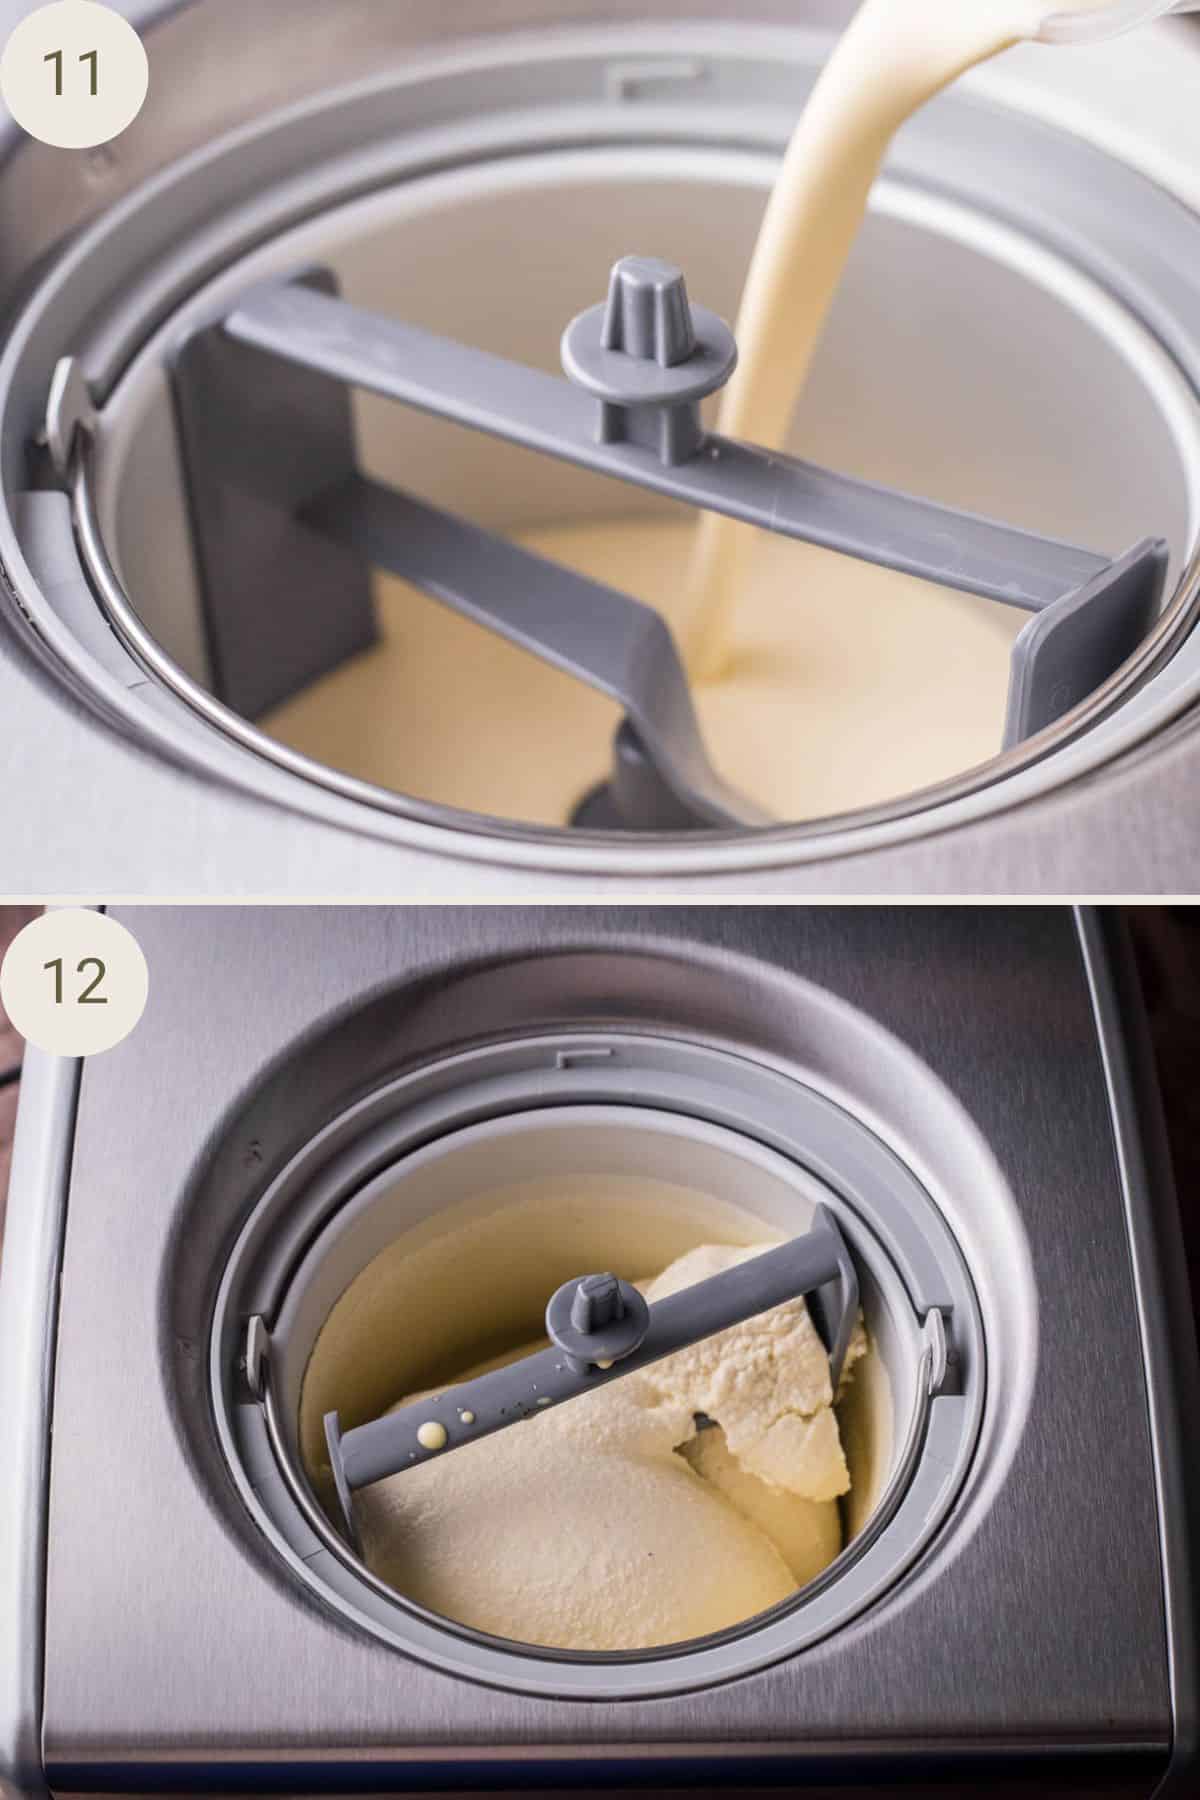
Churn the custard in your ice cream machine according to the manufacturer’s instructions. If you are using the Cusinart ICE then it will take about 40 minutes. The ice cream will be the consistency of soft serve immediately after churning but store in the freezer for at least 3-4 hours to achieve a good scoopable consistency.

Expert Tips
Whisk the cream and milk with the vanilla in the saucepan to get the seeds to separate in the liquid as they have a tendency to clump together.
I have made this ice cream recipe many times without using a digital thermometer. However, if you have one then it’s the safest way to ensure a fully cooked custard to kill any potential bacteria and also means you have control over the temperature to avoid any curdling after the eggs have been added.
You don’t want the cream/milk to boil when you heat them initially. Watch the saucepan carefully so that you remove the cream/milk from the heat just as it starts to shimmer with bubbles forming under the surface. If you have a digital thermometre you want the temperature to be between 60-65°C (140-149°F). Remove off the heat immediately when you think it's ready, it can boil over very quickly.
Infusing the vanilla. You’ll notice for this recipe I don’t bother resting the cream/milk after its initial heat to infuse the vanilla. I found in my taste testing that this extra infusing time at the start of the recipe didn’t make a discernible difference to the end flavour of the ice cream.
Transfer the cream/milk to a large 2 litre measuring jug for when you add it to the eggs and sugar as this will give you the best control when pouring it in so it can stream in slowly and consistently.
I like to use a ball whisk when mixing the cream/milk mixture on the saucepan. I use an electric beater when mixing the eggs and sugar (you could do it by hand with a ball whisk or balloon whisk) and then I continue using the electric beater when adding in the cream/milk into the eggs (you could again, whisk by hand). However, I transfer to a silicone spatula when mixing the custard as it has been poured back into the saucepan as I like to feel the texture of the custard and scrape the bottom of the pan to avoid the egg from sticking.
Chill your ice cream container before pouring your churned ice cream into it so it doesn’t immediately start melting.
The best way to avoid freezer burn with your homemade ice cream is to press a piece of baking parchment (or cling film) to the surface of your ice cream in the freezer, this will keep it extra well protected.
Your ice cream will need to harden in the freezer about 4 hours before it’s ready to serve otherwise it’s too melty.
After 24 hours your ice cream will have hardened significantly more and then make sure you remove it from the freezer 10 minutes before serving. This will soften it and make it easier to scoop.
FAQs
You can store in any airtight container. I prefer long ones rather than the cartons so you can drag the ice cream to achieve the best scoops. These containers are the perfect size, they are stackable and help avoid freezer burn.
I think we have every kind of ice cream scoop in our house but the best kind is the one that you can pull along the ice cream so it drags into a scoop and can also go into the dishwasher. They work well if your ice cream is super scoopable (i.e. allowed to rest out of the freezer for a good 15 minutes). I like the classic trigger scoops too as they give an attractive ice cream crackly crust if your ice cream is a bit more solid.
You want to position the scoop sideways to the ice cream and drag it along into the spoon until the ice cream has filled your scoop. That’s why the long containers will always give a better shaped scoop. This works best with ice cream that you have allowed to rest out of the freezer for 10-15 minutes.
Most of the water content in ice cream recipes comes from the dairy ingredients and some from the eggs. When frozen ice crystals are created from the water in the ingredients. The ice crystals are integral to the ice cream's structure but if they are formed slowly then they can become too large and will create an 'icy' texture. So you need to churn/freeze the ice cream quickly to avoid the creation of these large crystals. That's why ice cream machines will produce a smoother ice cream result as the ice crystals will be small and broken up evenly throughout the finished ice cream.
I haven't tested this particular recipe using only plant based ingredients so I would recommend that you turn to a different recipe if you need to avoid dairy and eggs. Don't worry - that is my next ice cream adventure and I will be publishing a dairy-free and egg-free recipe soon.
Vanilla beans will always give the purest most authentic flavour. Split them in half lengthways, scrape out the seeds and place the seeds and pod into the cream/milk to infuse. You can remove the pod later – just before churning.
Vanilla bean paste is easy to use and gives a good rich flavour and still has the pretty seeds. So they are a great substitute if you can’t find real vanilla beans. However, they often use a sweetener or thickener to make the paste viscous so do check the ingredient labels to ensure you are happy with the extra ingredients. If you are adding paste with sweetener then your finished ice cream will be sweeter.
Vanilla extract. Avoid using for this specific recipe if you can. Not that it isn’t fine – your ice cream will still be good but the flavour won't be as rich or deep and you don’t get the pretty seeds (although my 5 year old would prefer that as she turned her nose up at the ‘black bits.’) If you’re going through the effort of making your own vanilla ice cream then it makes sense to choose the superior bean or paste option. For other flavours you may choose to use extract if the vanilla flavour isn’t the main focus.
Store in an airtight freezer container with a piece of baking parchment pressed to the surface. Most home freezers are set around -19°C which means your ice cream will keep well for about a month. (Professional or commercial kitchens set their freezers at a lot lower temperature so which is why ice cream can store for longer in those temperatures). After a month larger ice crystals will begin forming so the texture won’t be as smooth.
For the best creamy delicious texture and luxurious mouthfeel you will need to use an ice cream machine for this recipe. Ice creams made by hand will naturally have more of an icy texture.
Variations and Uses
This ice cream recipe can be a base for any number of ice cream flavours. If the main flavour of your ice cream is no longer vanilla though then you need only use 2 vanilla beans.
- Try swirling fresh lemon curd or fruit puree in to create fruity ripple ice creams like Raspberry Ripple.
- Use it to make a Knickerbocker Glory.
- Use it to make a homemade arctic roll.
- Use it to make a banana split.
- Use it for a delicious ice cream cake.
- Top your favourite desserts with vanilla ice cream from apple pie to strawberry crumble.

Delicious Topping Ideas
Top your vanilla ice cream with a variety of different homemade sauces to make your simple dessert that bit more special:
And if you don't have any more time to spare then an easy drizzle of golden syrup, maple syrup or your favourite jam will be absolutely delicious!
Enter your email below to get this recipe sent to your inbox plus get new recipes, baking tips, and updates.
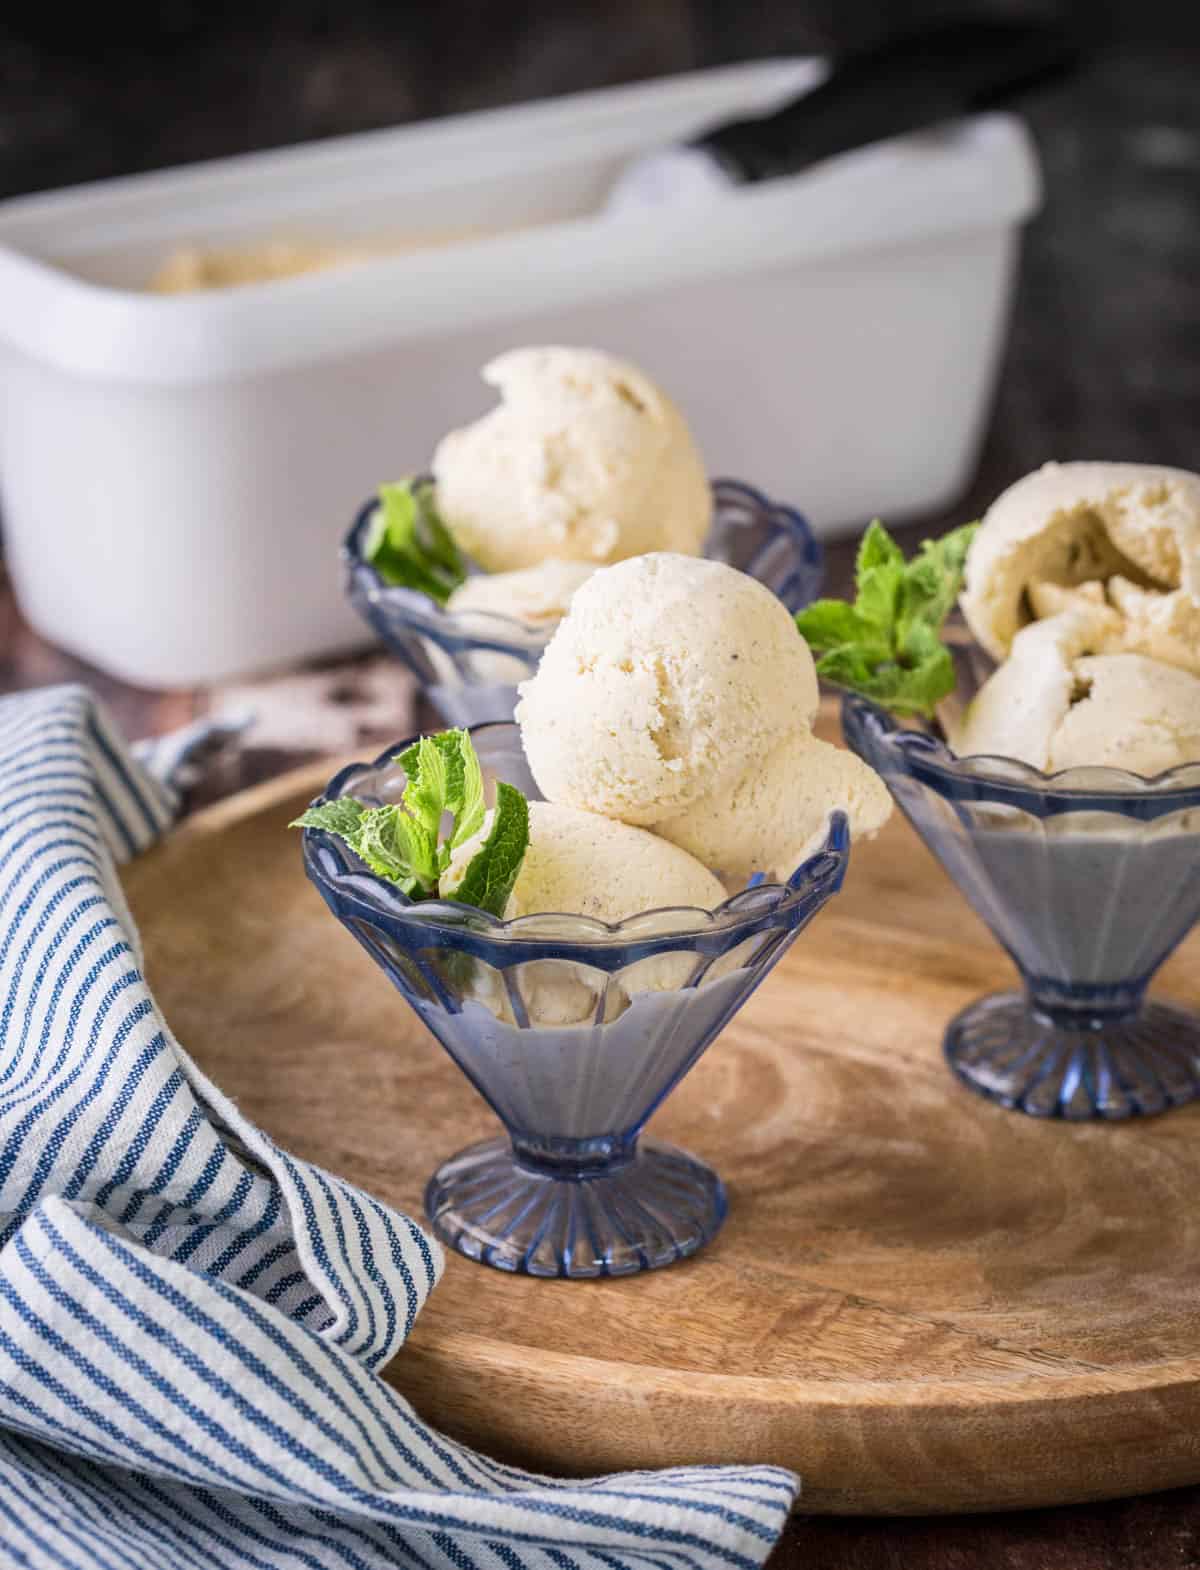
Homemade Creamy Vanilla Ice Cream
Ingredients
- 550 g double cream
- 180 g whole milk
- 3 vanilla beans
- 2 tablespoons liquid glucose - glucose syrup
- ⅛ teaspoon espresso powder
- ⅛ teaspoon salt
- 100 g caster sugar
- 3 egg yolks - medium sized, 45-50g
Instructions
- If you are using an ice cream maker which requires you to pre-freeze the bowl then place in the freezer 24 hours prior to making your custard. The bowl will need at least 24 hours to properly chill.
- If you are using an ice cream maker which doesn’t require you to pre-freeze the bowl then position it on a flat work surface ready for churning. These kinds of ice cream makers require 24 hours in the correct position so they churn effectively.
- First prepare your ice bath which you’ll need for cooling your custard prior to refrigeration. You will need a large deep casserole dish / crockpot (you could use the sink but I find the casserole dish easier to keep cold as it’s smaller). Fill halfway up with ice then top up with a little cold water.
- Whisk the sugar and egg yolk together in a large bowl until thick and creamy then set aside whilst you warm the cream and milk.
- Split the vanilla beans in half lengthways, scraping out the seeds with a teaspoon. Place the seeds and the pod halves in a large saucepan along with the cream, milk, liquid glucose, espresso powder and salt. Warm the ingredients at a medium heat until it reaches 60-65°C (140-149°F). Remove from the heat.
- Temper the egg yolk mixture by pouring the warm vanilla cream slowly into the eggs, whisking all the time to produce a thin custard.
- Pour the custard back into the original saucepan and heat to 80°C (176°F), stirring all the time. Turn the heat down to the lowest setting and keep at this temperature for 2-4 minutes if you can so you can ensure it’s at a stable temperature. If it starts to increase in temperature remove from the heat.
- Remove the custard from the heat. You need to cool it as quickly as possible. You can achieve this by transferring the custard to a food storage bag that you will submerge in your prepared ice water bath. The temperature needs to reduce to 4°C (39°F) within 90 minutes to avoid bacteria forming. It should only take about an hour to get to that temperature so keep checking it with a digital thermometer and replenish the ice every so often to keep it as cold as possible.
- Transfer the chilled custard to the fridge to rest for at least 4 hours but preferably overnight. You can leave in the ziplock bag or transfer to a jug and place cling film on the surface (this will make it easier to pour into your ice cream machine later).
- After its resting period churn the custard in your ice cream machine according to the manufacturer’s instructions. If you are using the Cusinart Ice Cream & Gelato Professional ICE100BCU then set the timer to 40 minutes. The ice cream is ready when it has thickened considerably and looks like ice cream. It will be the consistency of soft serve immediately after churning but store in the freezer for at least 4 hours to achieve a good scoopable consistency.
- Ice cream can be stored in a home freezer for up to 1 month. After about 24 hours in the freezer the ice cream will be quite hard so allow to rest for 10-15 minutes at room temperature before scooping and serving.
Notes
- Freeze-first. Those which have a bowl which requires pre-freezing for 24 hours prior to churning your ice cream.
- Self-freezing. Those which you can just plug and play. You can just pour your pre-chilled custard into its inner bowl and it freezes as it churns. This recipe was tested using a Cusinart Ice Cream & Gelato Professional ICE100BCU.

Hello! I am equally obsessed with homemade ice cream, but for the purpose of making my own dairy-free versions. I have found most good ice cream recipes can easily be made dairy-free using good quality canned full fat coconut milk in place of the cream and milk. I am totally going to try that espresso powder trick in my next batch of vanilla. I just love all your gluten free recipes!
Yes, I think coconut milk was going to be my first experiment as well as cashews as I love the flavour base that cashews give non-dairy recipes.