Homemade Chicken or Turkey Stock
This post contains affiliate links. Please read my disclosures.
This easy homemade poultry stock recipe is perfect for soups, gravies and pies. It uses the bones of leftover chicken or turkey carcasses for the best authentic flavour. We’ll go through how to make it on the stove or in the Instant Pot, which aromatics to use and how to organise the ingredients and store the finished stock so you always have fresh stock on hand to level up dinner.
I have made my own chicken or turkey stock since I started the family cooking in particular making the Sunday lunch, in my late teens. Up until a few years ago I had never even bothered to buy stock cubes as I would always have fresh stock ready in the freezer for dinner ingredients. Having 4 young children changed my perspective slightly on having some instant flavour standbys to hand so now I do keep some gluten-free stock cubes in.
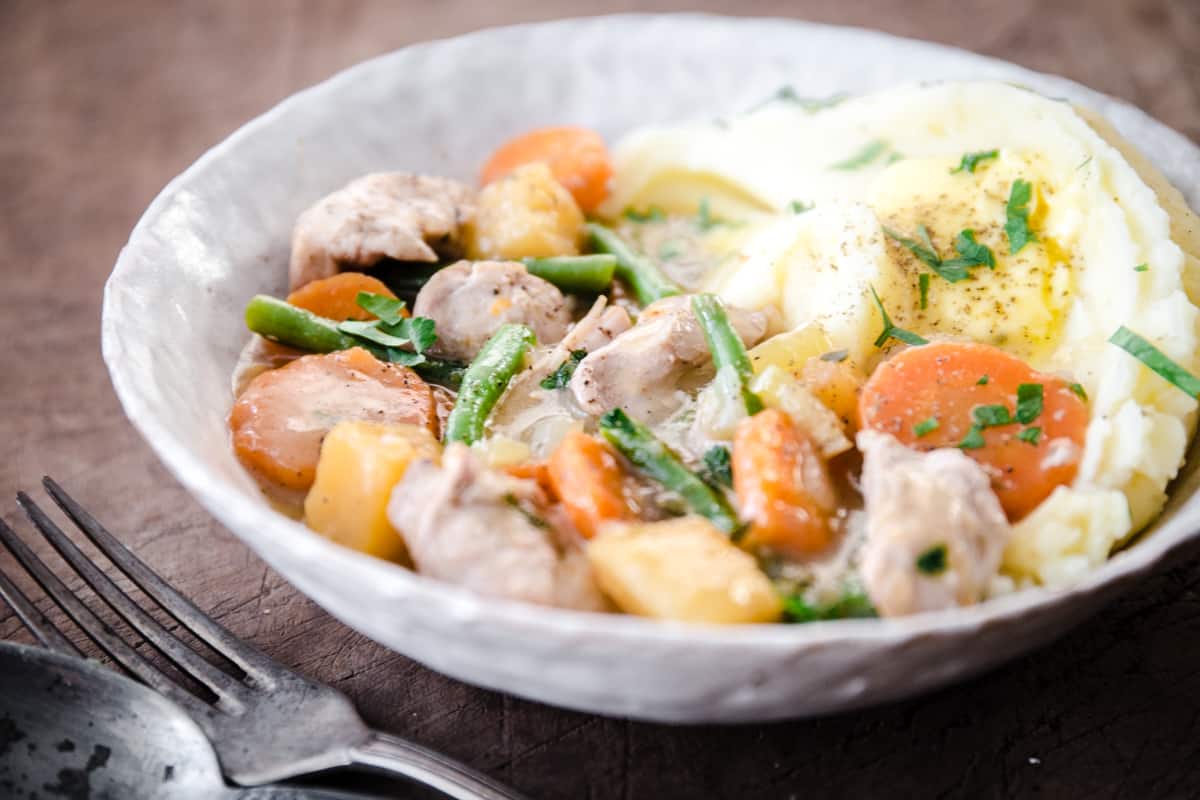
But the difference in using the two is incomparable. Particularly in dishes where the flavour and texture of the stock is most apparent. I would never think to use stock cubes in Shepherd’s Pie, Hotpot, Risotto and especially Homemade Gravy.
My husband is just as invested in homemade stock and without prompting (which is unusual for his ADHD brain- no dig it’s just what it is) he will get on and prepare the stock himself if he sees our collection of bones has built up in the freezer. It's an essential building block of our family kitchen.
Although the steps to make stock are incredibly simple and once you've made it once you'll see that a recipe is more of a loose guideline, I'll give you much more than that here. These tips for the whole process are direct from my kitchen garnered from years of making the stock both on the stove and in the Instant Pot (directions for both methods given), for collecting the bones, storing them, which vegetables and aromatics to use and whether every single one is essential. Then I'll give you important advice on cooling your stock and storing your stock in the freezer, which storage methods to choose and how to thaw quickly.
We've got some stuff to get through and hopefully this guide will be thorough but drop a comment at the bottom if you have any questions or more guidance is needed. Let's go!
Frozen bones
Our freezer is full of leftover cake, bones and homemade stock. I must seriously advocate for freezing any poultry bones. For example, when I make a dinner that just involves chicken thigh meat, I will debone it and freeze the bones. If we’re having chicken wings, which we do a lot as my five-year old twins are obsessed, then I collect all the bones from our plates after dinner and add to our bone collection.
Gosh, it sounds rather ghoulish doesn’t it. I garnered this tip though from Nigella Lawson and if she does it then I’m comfortable with the practice. Keep food storage bags for them in your freezer which you can keep adding to. Once the bag is full then you can make your stock (you don’t need to thaw the bones just chuck them straight in the pot). If you’ve had a roast chicken or roast turkey then you can make your stock straightaway as one carcass can be enough. Especially turkey which has a much more intense flavour.
I have bags of chicken carcasses and bones from various meals. However, I don’t really keep turkey carcasses in the freezer as I just get on and make the stock using one carcass immediately on Boxing Day (or even Christmas Day evening), then I have the stock on hand for all my turkey leftover cooking including Turkey Hotpot and Turkey Risotto which are our family favourites.
Homemade Stock Vs. Stock Cubes
This theme of this whole website is that I’m a bit of a control-obsessive. This definitely has pros and cons in the kitchen and I’ve been learning to let go a bit since having children. Although I’ll never get all the way there I’m afraid and homemade stock is one of those essential practices I will never apologise for.
The main reason for making your own stock vs. using stock cubes is mainly about recipe control.
Flavour. Dried herbs are not my favourite and I find the flavour overpowering in stock cubes. Homemade stock uses fresh herbs and as such has a brighter taste with more subtlety. You can actually pinpoint the meat flavour and the fresh vegetables give a better complexity and depth to your finished dish.
Salt content. Different brands of stock cubes have varying amounts of salt. By making your own you can be sure your stock is well seasoned and won’t produce overly salty dishes. You can also choose to omit the salt entirely and make a neutral base which gives you full rein to season the recipe you are making with the stock instead.
Strength. You’d be surprised about how you only need to use a little homemade stock to give a real punchy strength of flavour. If it’s too much you can water it down. On the other hand you can use more bones for an increased intensity without adding more salt.
Makes use of otherwise wasted ingredients. I don’t usually use the best vegetables for my stock but instead the floppy celery, the wrinkled carrots and the slightly ropey leek. Never mouldy though, just slightly past their best. And obviously the bones which would have been destined for the bin but are usually still have good meat clinging on.
Superior texture and flavour. Enjoying a gravy with your Sunday Lunch which has been made with fresh stock will ruin all other gravies for you. Silky smooth, velvety, rich with umami and real meat flavour complexity. Anything else made with stock cubes tastes thin and you have to add more ingredients to get a satisfying flavour.
Economics. Of course stock cubes are breaking nobody’s bank balance. Although if you are buying fresh stock that’s another matter (they are always far too salty – I don’t recommend!). However, fresh stock is essentially free, if you are using ingredients which would otherwise have gone to waste in your kitchen. For such a versatile ingredient which will work so hard for you in everyday dinners it’s like liquid gold.
Gluten-free / allergy friendly. Some stock cubes are not gluten-free but you can be sure if you are making your own that you are only using ingredients that are suitable for your dietary requirements. There is no need to add any kind of gluten ingredient to your homemade stock.
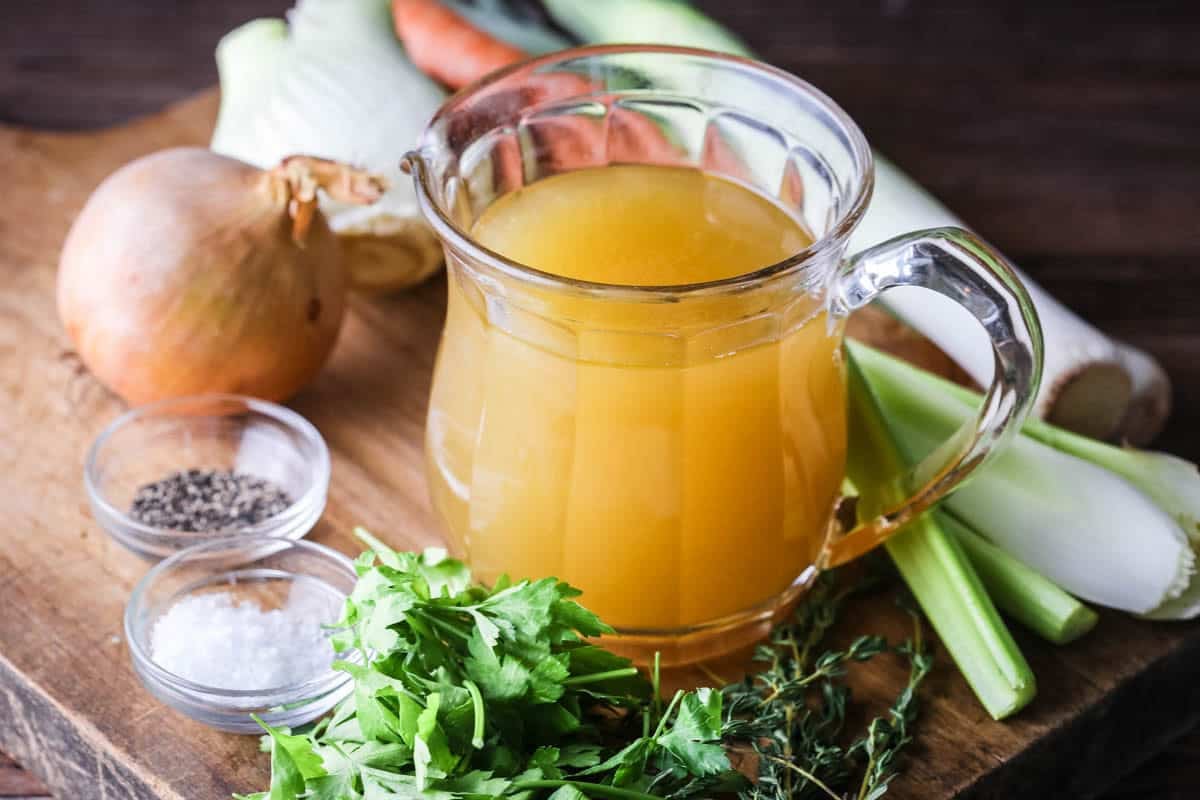
Ingredients Needed

Chicken or turkey bones. You can use leftover bones which have just been scooped up from plates, or bones from the butcher. You can even use bones which you have saved from previous meals which you have kept in the freezer specifically for when you have enough to make your stock. Turkey bones will give a more intense flavour, so it’s important to label whether your stock is chicken or turkey.
Vegetables. You can use all the following vegetables or only those you have knocking around your fridge. Don’t feel that just because you don’t have any fresh fennel in that you can’t make stock or have to go specially to the shops. As long as you have the carrots, onion and celery then you will have a good base of flavour. They don’t need to be the freshest of veg but they do need to be clean and edible.
Aromatics. I use parsley stalks (as otherwise these tend to get wasted in my kitchen), thyme and bay leaves. Again, if I don’t have in any thyme or parsley I won’t sweat it. Bay leaves are always in my garden and give a great subtle base of flavour.
Seasoning. You can omit the salt entirely if you prefer to keep the stock neutral which means you have more control over the seasoning of the main. I like to add a little salt and pepper as it adds depth. You can reduce if you prefer. I use kosher salt in my cooking which has a gentle flavour. If you are using table salt then half the amount.
Suggested Equipment
Conical sieve / chinois. This has a finer mesh than a regular sieve so you’ll get a cleaner stock without any vegetable or bone fragments. It’s also helpfully shaped so is the best shaped sieve for focusing the stock through without clogging it up and it’s less messy as it makes sure the liquid is directed through a smaller surface area.
Large casserole dish (or sink) for the icebath. I prefer a casserole dish as they are smaller so it’s easier to fill with ice and keep cold.
Ice cubes (lots). You will need a bag of ice as you need to keep that icebath at a cold temperature so it will need to be replenished a couple of times during the chilling time.
Food storage bag. These have a dual purpose. First they are essential in cooling your stock (if you are making ahead and not using it in a recipe straightaway). They are also so useful in storing your stock.
Food storage bags clip stand. Do you have one of these in your kitchen? If you use food storage (or ziplock) bags then you will find this an invaluable investment. I use food storage bags to cool custard / stock quickly and also for storing my fresh stock and freezer meals, and these clip stands will hold your freezer storage bags for you so you have free hands for transferring the food. It means you don’t need someone else to hold the bag for you whilst you are pouring in the hot stock.
Digital thermometer. This isn’t essential but it is helpful in monitoring the cooling process of your stock so you can make sure it gets to the right temperature within the 90 minute cooling time.
How To Make Chicken or Turkey Stock
For full recipe instructions go to the recipe card at the end of this post.
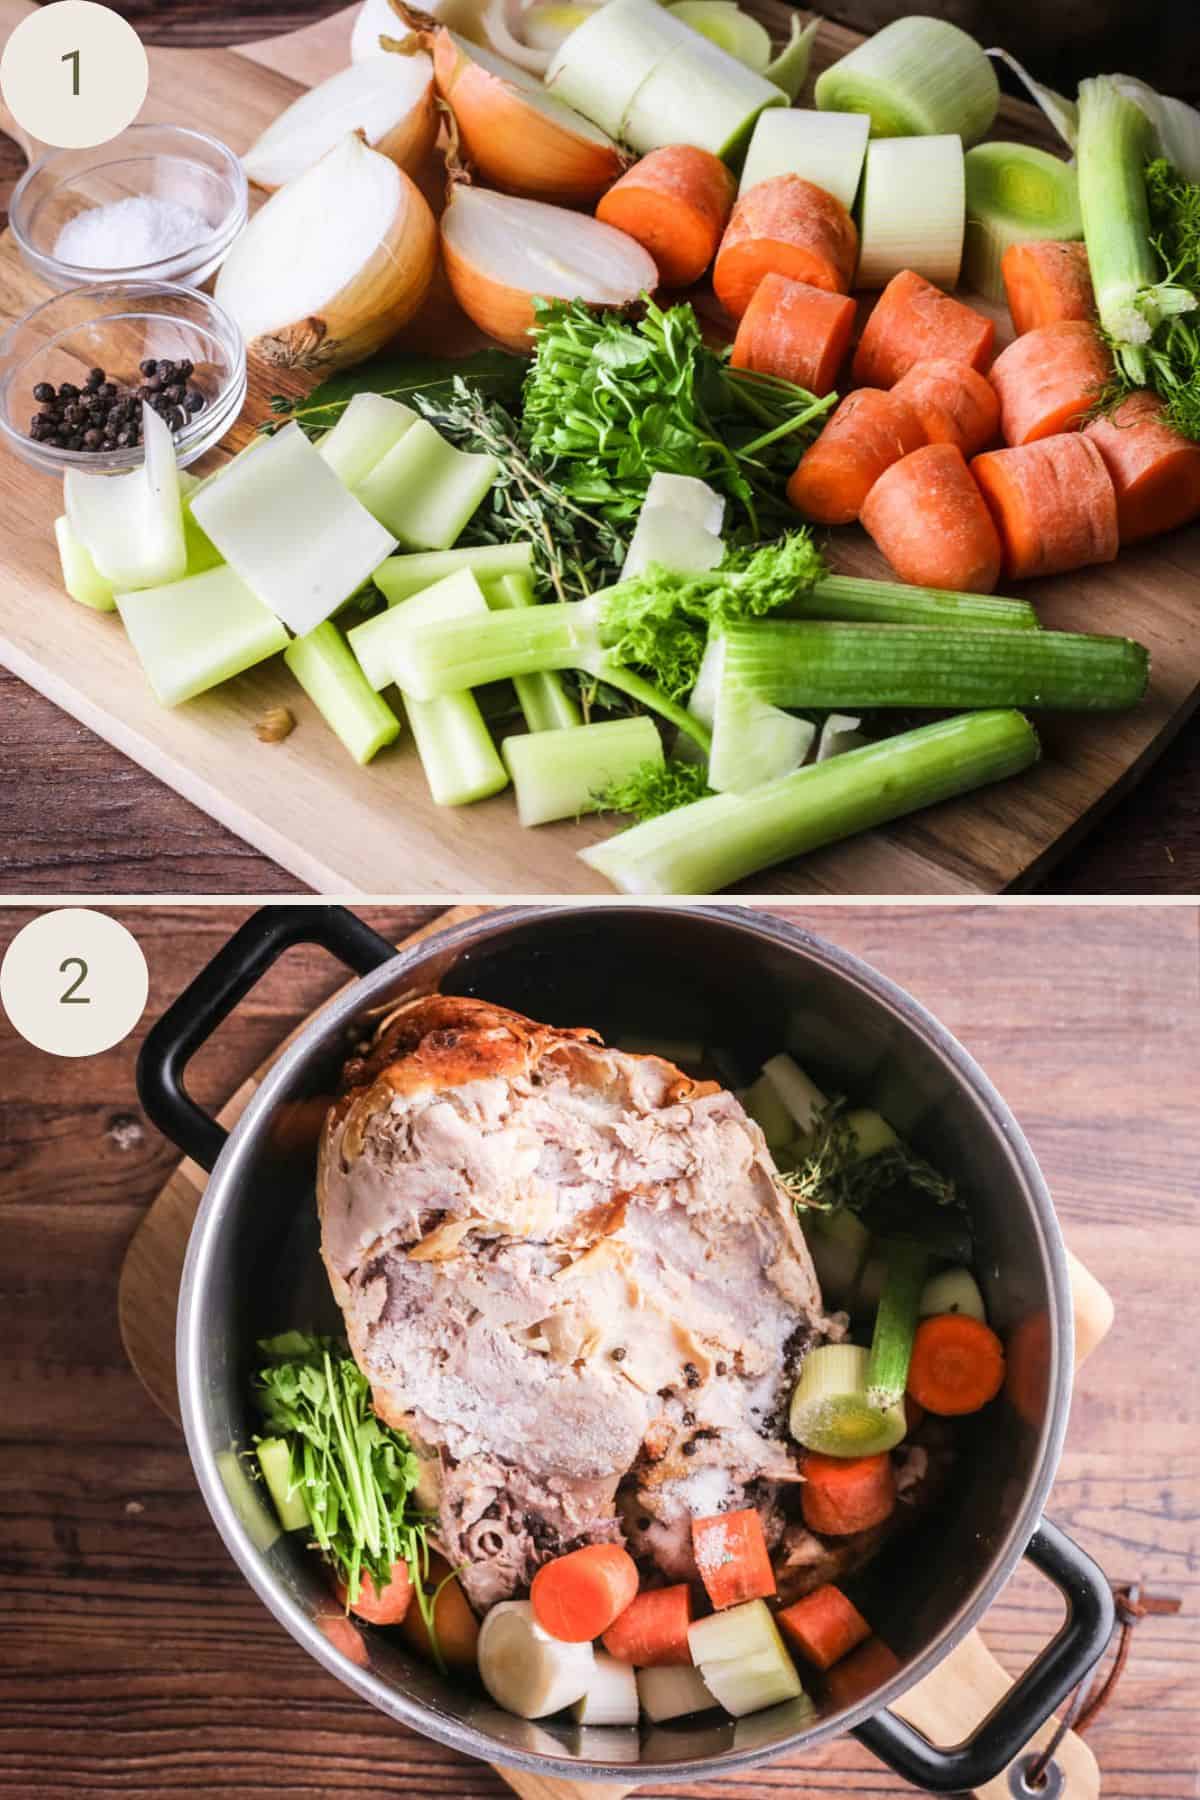
Roughly chop all the vegetables. Don’t worry about peeling, just make sure they are washed and clean. Place them in the pot along with the leftover poultry bones, herbs, salt and pepper.
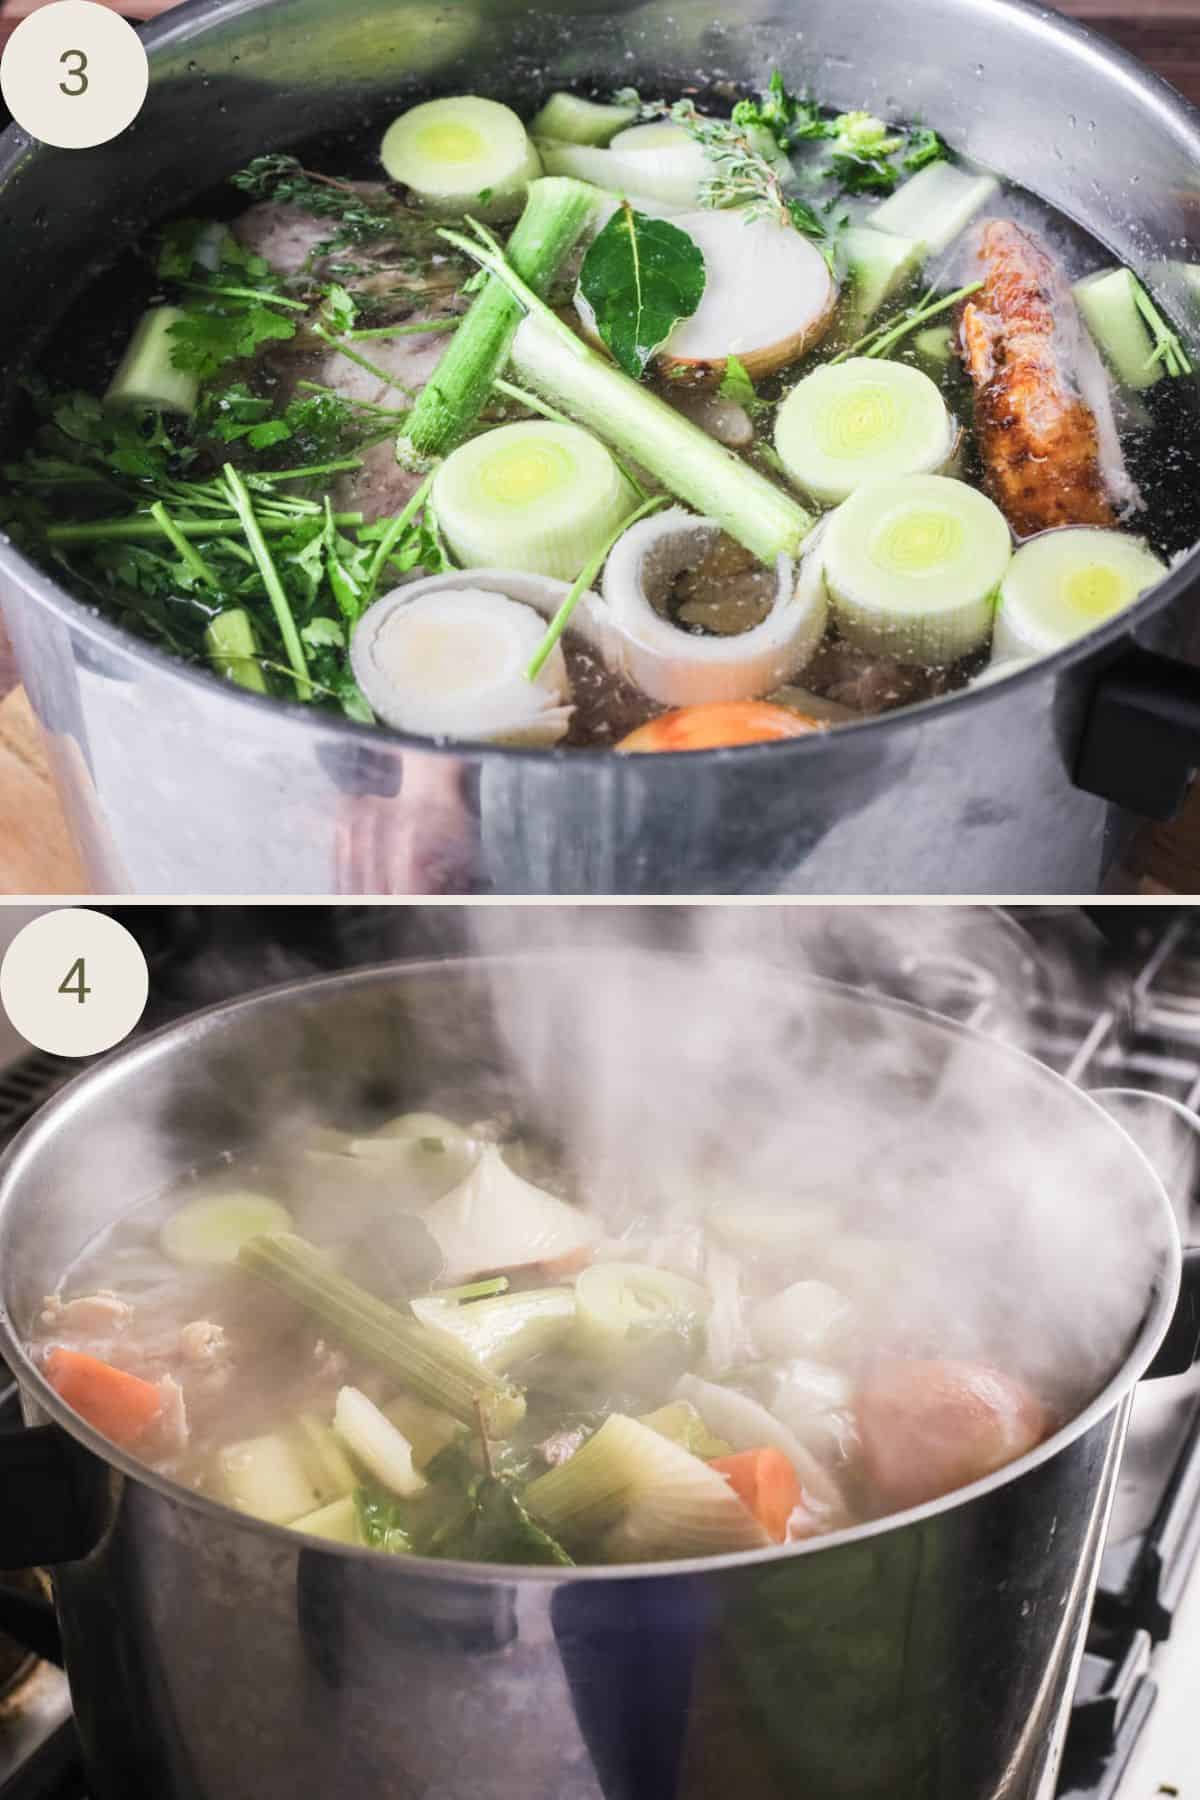
Fill the cooking pot up with water to cover the bones and the vegetables. Place the cooking pot on the stove and simmer with the lid on for 2 hours (chicken) or 4 hours (turkey).
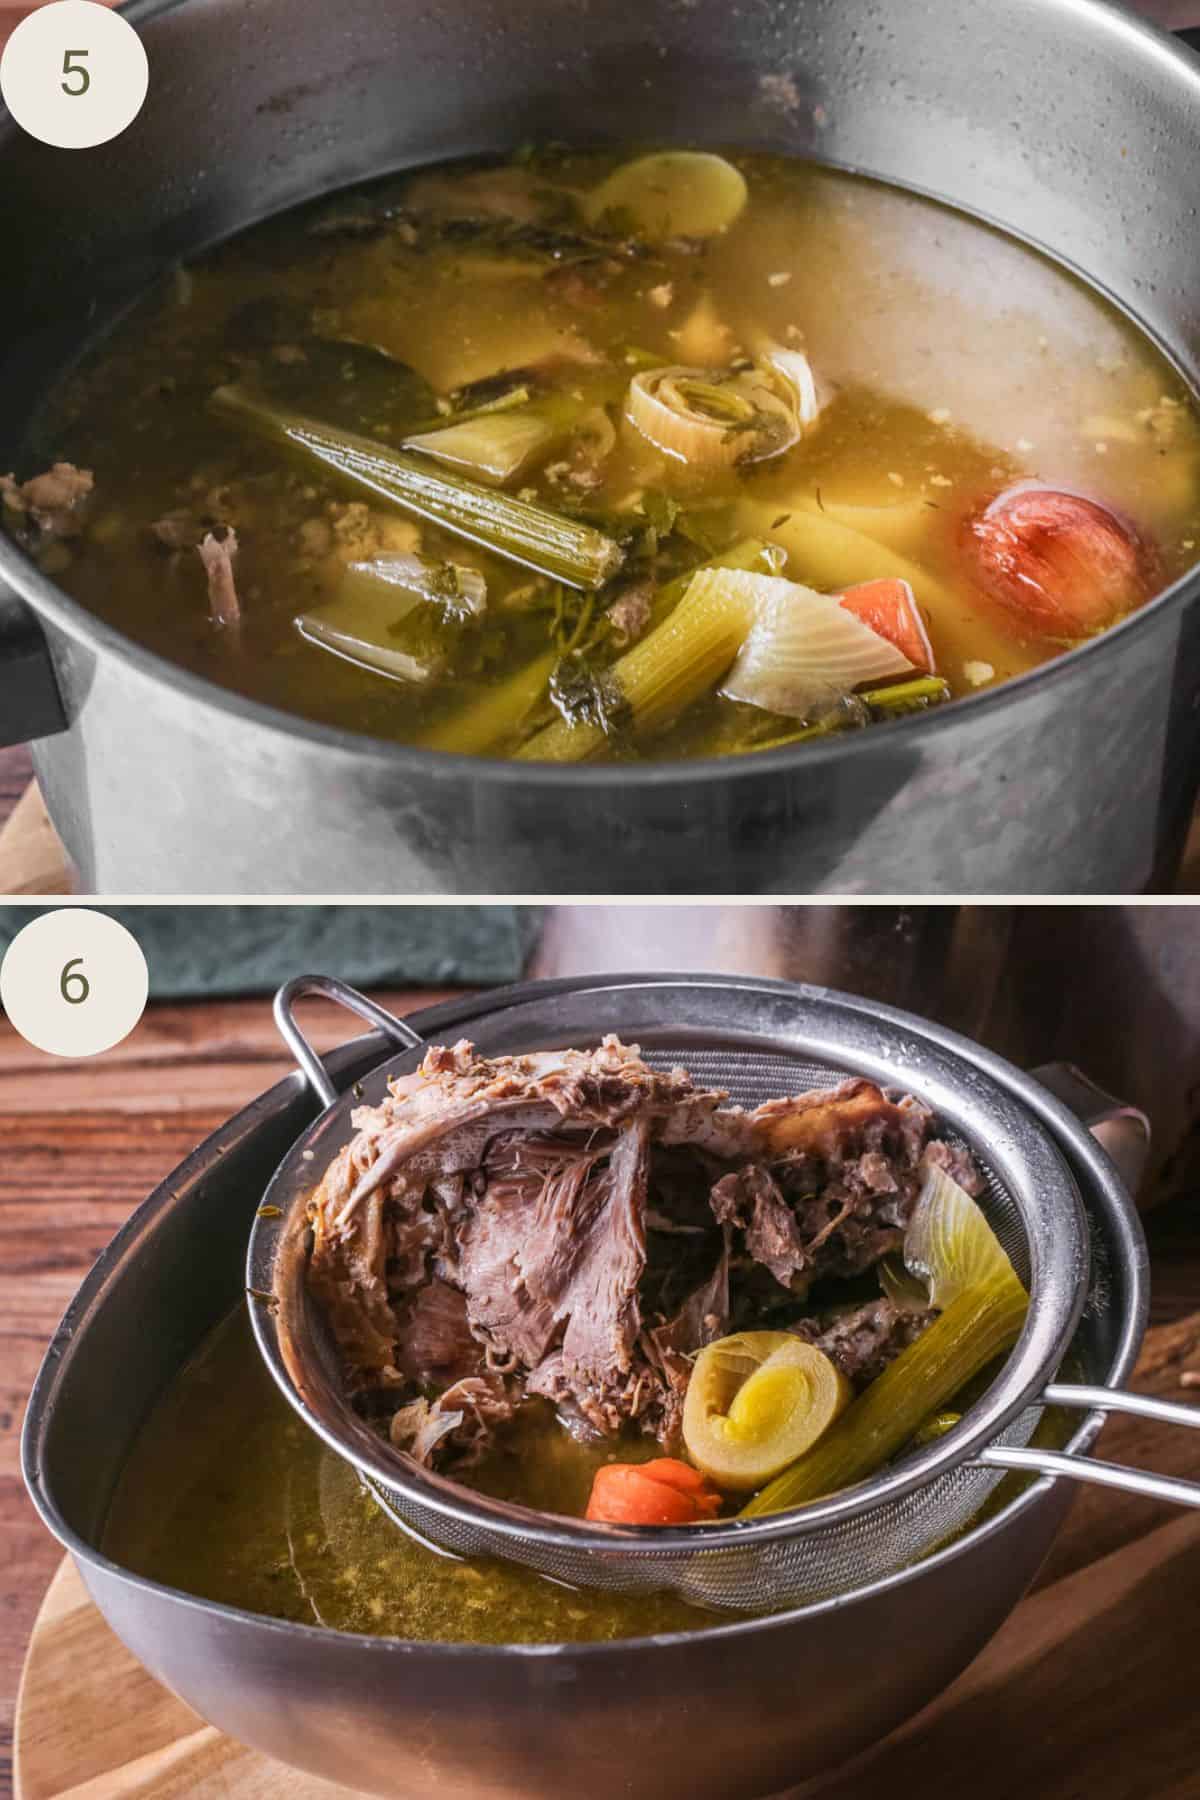
Turn off the heat and strain the stock into a large container with a pourable spout.
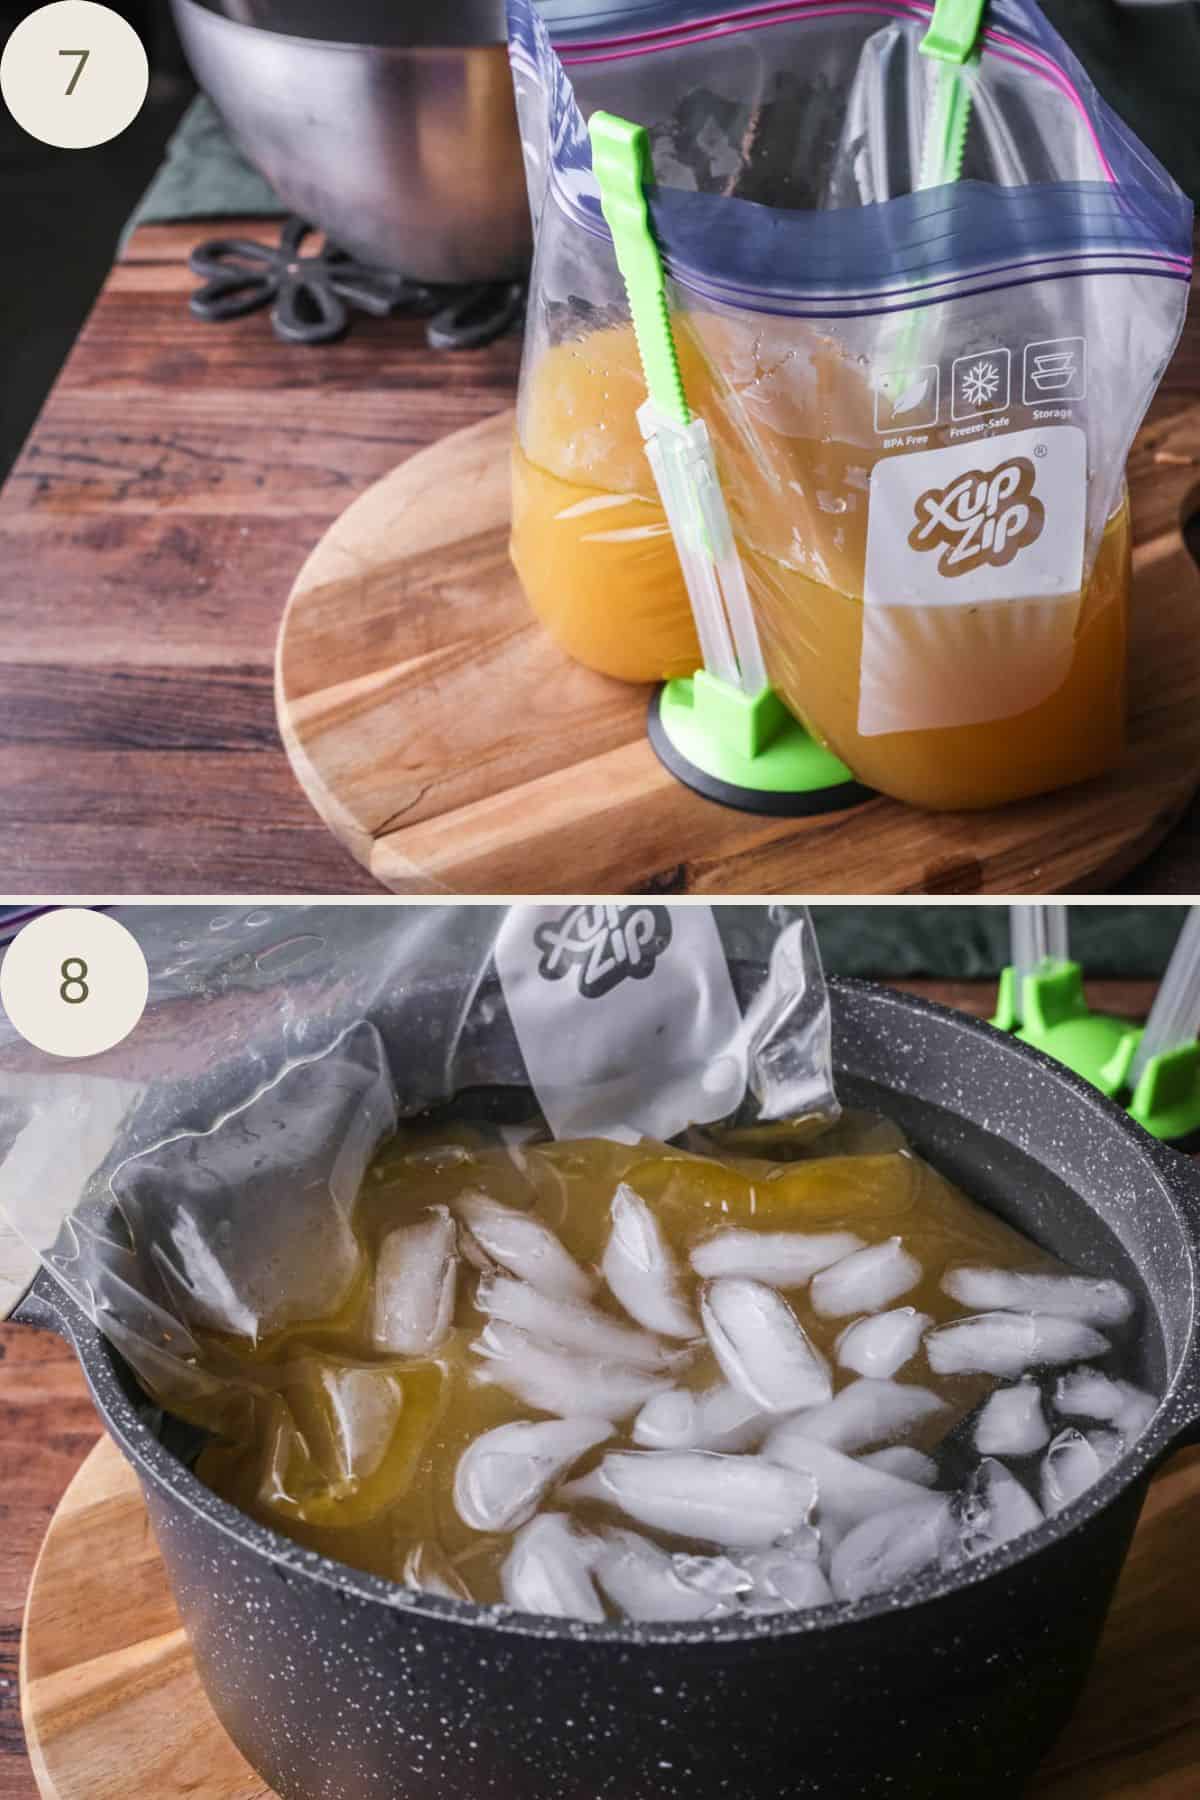
Pour the sieved stock into food storage bags, expel the air from the bags and seal. Submerge the bags into an ice water bath to cool the stock quickly to 4°C (39°F). It should only take about an hour to get to that temperature so keep checking it with a digital thermometer and replenish the ice every so often to keep it as cold as possible.
Once the stock has cooled then decant into your chosen storage method and place the stock in either the fridge or freezer, depending on which suits your cooking plans.
Making Stock in the Instant Pot/ Pressure Cooker
A key decision in buying my Instant Pot was specifically to make my bi-weekly chicken stock. It saves on so much time and this is such an essential ingredient in my kitchen that it was a no-brainer. I haven’t looked back.
Cooking stock in the Instant Pot is quick and easy. It saves room on the hob and means you can set it and forget it. Leaving an open flame on my hob for up to 4 hours isn’t my favourite thing to do in a house of young children. It doesn’t make as much as my large cooking pot and doesn’t fit a whole 5k turkey carcass so I tend to use it to make chicken rather than turkey stock.
- Prepare the ingredients as the recipe below but placing everything in the Instant Pot.
- Fill the pot with water up to the maximum limit.
- Place the lid on the Instant Pot and set the valve to sealed.
- Press Pressure Cook and set the timer for 45 minutes (chicken) or 60 minutes (turkey).
- When the timer goes off to signal the end of the 45 minutes, allow it to naturally release for 10 minutes.
- Quick release the pressure from the pot then turn off the Instant Pot, remove the lid and strain the stock and continue as per the recipe below.
Tips and Troubleshooting
If your carcass has been stuffed with garlic and lemon/orange /herbs then I would usually remove the citrus as otherwise the stock can become a little bitter. However, I leave the garlic and herbs in there as they’ll just add to the flavour.
Remove any fatty skin from the bones as it will just add unnecessary fat to the finished stock.
The ingredient amounts are very loose. Really you don’t need to worry too much about how many carrots / leeks you are adding. I don’t always have fennel in either so I won’t worry about including anything I don’t already have in. Carrots and onions are a must I feel, anything else, including herbs is a happy bonus and will round out the flavour.
You can choose whether to omit the salt (I usually don’t omit the pepper) as then you will know exactly how much salt is added to your final dish. I will usually include a little but then just be mindful when I’m seasoning the final dish.
You don’t want your stock to boil furiously. Bring up to a gentle simmer and keep it at that for the length of the cooking time. A hard boil will promote a cloudy stock.
Check the stock occasionally during cooking to skim off any impurities from the top of the pot.
When you are straining the stock don’t push the vegetables and bones through the sieve otherwise the stock will get cloudy (honestly if you mind at all which I don’t usually – I’m not cooking for a restaurant).
If you don’t have a digital thermometer to monitor the cooling progress of your stock then don’t worry, an hour in the ice bath should be enough time to cool it down to the right temperature before moving it to the refrigerator / freezer.
Cooling
It’s essential to cool the homemade stock quickly to adhere to Food Standards Agency guidance and an ice bath is the most effective way.
Just before you remove the stock from the heat then half fill a large pot with ice (you could use a small sink) and top with cold water to just about cover the ice.
- Pour the strained stock into clean food storage bags (with the help of food storage clip holders). Expel the air from the bags then seal them.
- Submerge the sealed bags into your prepared ice water bath. The temperature needs to reduce to 4°C (39°F) within 90 minutes to avoid bacteria forming. It should only take about an hour to get to that temperature so keep checking it with a digital thermometer and replenish the ice every so often to keep it as cold as possible.
- As soon as the stock has cooled then you can either store in the refrigerator in an airtight container for up to three days or the freezer.
Freezing
Freezing is the best way in extending the life of your homemade stock. Having a stash of stock in your freezer is invaluable in pulling together quick meals using the best ingredients your kitchen has to offer.
Freeze in airtight containers for up to 3 months. Thawing instructions are below.
Storage Options
You have various options for storing your homemade stock in the freezer.
Food storage bags. The great thing about these bags is that I use the bags to cool the stock in their ice bath so we need them anyway and then to double them up as the storage device makes sense. They are handy to keep in the freezer drawers and they are re-useable and last a surprisingly long time. Although I tend to use a new one for liquid ingredients / meals like stock as holes can happen.
Once the stock is inside and you have expelled the air and sealed the bag you can store flat. I recommend weighing the amount of stock you put into these bags for your most common uses. For example I use 800ml homemade stock in my gravy so this is the usual amount I keep in the bags.
250/500ml airtight containers. I find these two sizes the most useful for storing stock. Stackable containers are a must. The thicker containers with decent lids are the best.
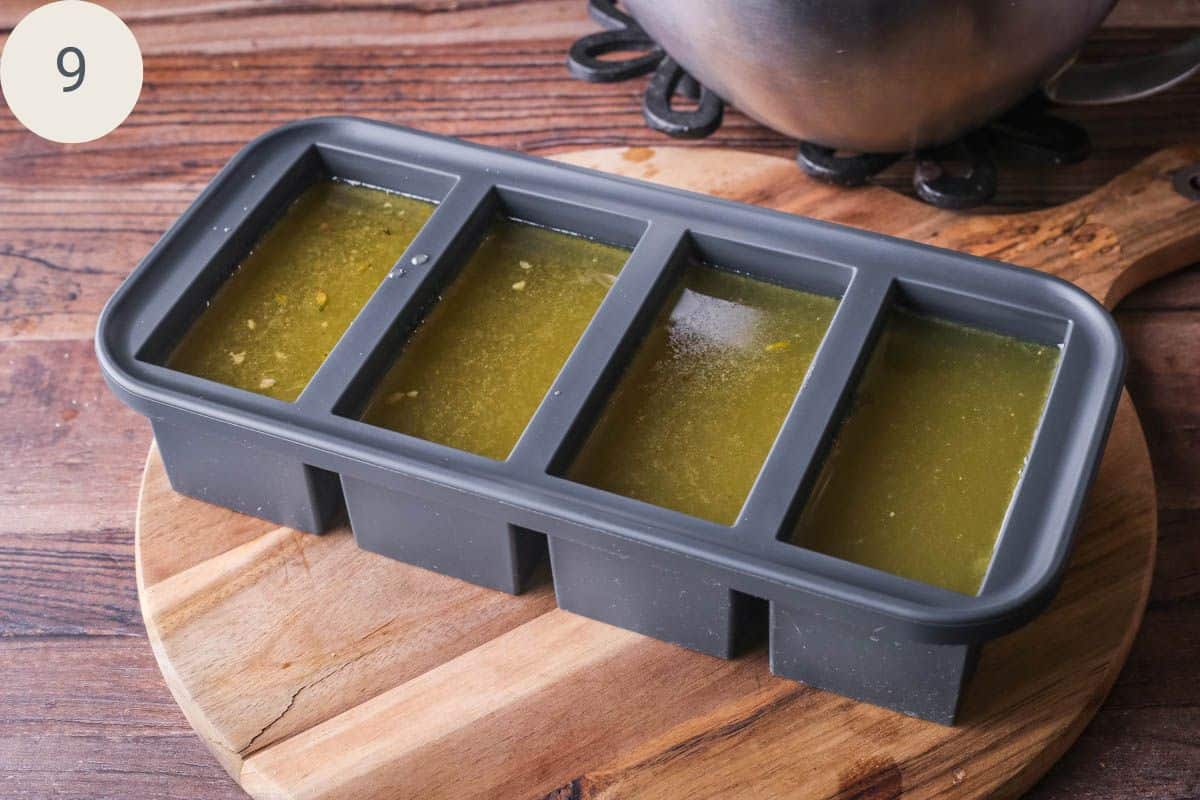
Souper Cubes. These are a relatively new addition to our freezer game and I’m a total convert as they don’t tend to slip out of the freezer as the silicone is grippy. They also are compartmentalised into 250g portions and are easy to pop out and thaw.
Thawing
I don’t pre-thaw my stock, especially as for the most part when you are adding stock to your recipes you need it to be hot. You can heat it up directly from frozen ready to use.
Food storage bags. If I’m using stock frozen in food storage bags then you can thaw easily from the bags as you place the whole bag in a sink of tap water and leave for 10 minutes. If you need the stock hot then you can warm up in a saucepan.
Airtight containers. If I’m using the stock which has been frozen in airtight containers then I remove the lid, turn the container upside down and hold under a warm running tap for a few seconds until the stock can be popped out in a block. Place in a medium sized saucepan, place the lid on and heat on a low-medium heat until it comes to a gentle simmer.
Souper Cubes. The contents in these silicone storage containers can be popped out easily. Pop out the amount you need directly into a saucepan, place the lid on and heat on a low-medium heat until it comes to a gentle simmer.

Using Homemade Stock
It’s not necessary to use homemade stock every single time chicken stock is included in an ingredients list. For most mid-week meals a stock cube will suffice, if it’s just for adding a bit of seasoning and liquid.
However, there are certain meals / recipes where I would definitely advocate that homemade stock will take your meal from delicious to gosh darn delicious. It will give your meal that velvety unctuous texture to the sauce and a real complexity of flavour, essential for the following recipes:
FAQs
Turkey stock has a more intense flavour than chicken and a more recognisable flavour. I would happily use chicken stock for any turkey dishes (or even vegetable or pork or red meat dishes). However, I would tend to use turkey stock a bit more mindfully.
For more delicate soups or risottos I would tend to use chicken stock (except for my Turkey Risotto where the turkey stock is integral). This is the stock I generally keep in as I only make turkey stock once a year, so chicken is my go-to.
For wintry dishes like fully flavoured gravies, casseroles or stews I would opt for turkey stock if I have some in.
You can use either turkey or chicken bones for this homemade stock but chicken bones, which are smaller, will release their flavour quicker so the stock doesn’t need to be cooked as long as when you’re using turkey bones. Chicken stock can be simmered for 2-3 hours. Turkey stock for 3-4 hours. The longer you simmer the more intense the flavour.
You could roast your bones first for a darker stock which has a more intense flavour. However, I don't and I don't think for the average home cook it’s necessary.
Stock and broth are pretty similar. However, broth is often more of a sipping liquid which is perfectly seasoned whereas stock is meant to be built upon. The term ‘bone broth’ which has been popularised on the health food circuit refers to broth which has been cooked on a much lower heat and for much longer to really wring out those nutrients. This recipe for chicken stock is more of a cooking ingredient than a health food. Not that it isn’t hugely beneficial to our health. It has much the same properties as bone broth but in a lower quantity as we haven’t gone to town on the length of cooking.
Use a large cooking pot with a lid. A dutch oven or casserole pot also works well. The size depends on how many bones or how much stock you want to make. The main thing to consider is whether your bones will fit in your pot along with the vegetables and still hold enough water to make the recipe worthwhile. If I’m using my Le Creuset large casserole dish or my Instant Pot then one chicken carcass will fit well. If I’m using a large bag of bones or two chicken carcasses or one turkey carcass then I will haul out my Ikea 365+ 8 litre pot.
This totally depends on the pot which you are making your stock in. For this particular recipe which uses either two chicken carcasses or one turkey carcass with the 8 litre pot then the final recipe will make about 3 ½-4 litres. If I’m only using one chicken carcass and cooking the stock in a small pot or the Instant Pot then the recipe produces about 2 litres.
If your finished stock is greasy then there was probably too much fat or skin left on the bones. Chill the stock in an airtight container with a flat surface (so not a storage bag) and then when it’s cold you can scoop off the fat (or use paper towel to press to the surface to absorb it) which will have risen to the surface.
If your stock isn’t flavoured as strongly as you’d like then it’s possible you used too much water or not enough bones or aromatics. If you reduce the finished stock then the flavour will intensify. Since it’s rare you will be using the stock in isolation you can fix the flavour by adding extra herbs / garlic / mustard etc. when you are finishing your dish (depending on what it is).
More Homemade Sauces and Flavour Bases You'll Love
Gluten-Free Cheese Sauce has a full-bodied flavour which can be used in a variety of meals from pasta sauce to cauliflower cheese and is velvety smooth thanks to the use of the right gluten-free flour.
If you want a delicious tasting Gluten-Free White Sauce in a hurry then this recipe will become indispensable. It’s a quick and easy sauce which is ready in 5 minutes using only 5 ingredients and no roux making involved.
For this Roasted Tomato Sauce fresh tomatoes are tucked into a large casserole dish with vegetables, herbs and garlic, braised then given a final roast in the oven to deepen the flavour. This deliciously rich sauce is blended together then frozen in small batches for emergency mid-week dinners.
Enter your email below to get this recipe sent to your inbox plus get new recipes, baking tips, and updates.
Homemade Chicken or Turkey Stock
Ingredients
- 2 chicken carcasses or 1 turkey carcass
- 2 carrots
- 1 large onion
- 2 celery stalks
- 1 fennel bulb
- 1 leek
- handful parsley stalks
- 2 bay leaves
- large sprig thyme
- 1 teaspoon kosher salt - optional
- 1 teaspoon whole black peppercorns
Instructions
- Place the chicken / turkey carcass/es / bones in a large cooking pot which has a lid.
- Roughly chop all the vegetables. Don’t worry about peeling, just make sure they are washed and clean. Place them in the pot along with the bones.
- Add the herbs, salt (if you are using) and pepper into the pot.
- Fill the cooking pot up with water. If you are in the UK then tap water is fine. You can take your pot over to the tap to fill up directly. The water should cover the bones and the vegetables but make sure there is decent headroom to the top of the pot so it won’t boil over.
- Place the cooking pot on the stove and heat over a medium-high heat. As soon as the water reaches a gentle simmer then turn the heat down so the liquid stays at a simmer. Place the lid on and cook for 2 hours (chicken) or 4 hours (turkey). Check on the progress every so often.
- After the allotted time then turn off the heat. Allow to sit for a moment whilst you prepare the ice bath to cool the stock. You will need a large deep casserole dish / crockpot (you could use the sink but I find the casserole dish easier to keep cold as it’s smaller). Fill halfway up with ice then top up with a little cold water.
- Strain the stock into a large container with a pourable spout. You’ll probably need to do this in two / three stages due to how big your container is and how full your sieve is getting.
- Pour the sieved stock into food storage bags (if you are planning on storing the stock in the food storage bags you might like to measure the amount you are adding in). Expel the air from the storage bags and seal.
- Submerge the bags into your prepared ice water bath. The temperature needs to reduce to 4°C (39°F) within 90 minutes to avoid bacteria forming. It should only take about an hour to get to that temperature so keep checking it with a digital thermometer and replenish the ice every so often to keep it as cold as possible.
- Once the stock has cooled then decant into your chosen storage method and place the stock in either the fridge or freezer, depending on which suits your cooking plans.
Instant Pot Method
- Follow the recipe as above but place the bones, vegetables and aromatics in the Instant Pot.
- Fill the pot with water up to the maximum limit.
- Place the lid on the Instant Pot and set the valve to sealed.
- Press Pressure Cook and set the timer for 45 minutes (chicken) or 60 minutes (turkey).
- When the timer goes off to signal the end of the 45 minutes, allow it to naturally release for 10 minutes.
- Quick release the pressure from the pot then turn off the Instant Pot, remove the lid and strain the stock and continue as per the recipe above.
