Gluten-Free Gooseberry Pie
This post contains affiliate links. Please read my disclosures.

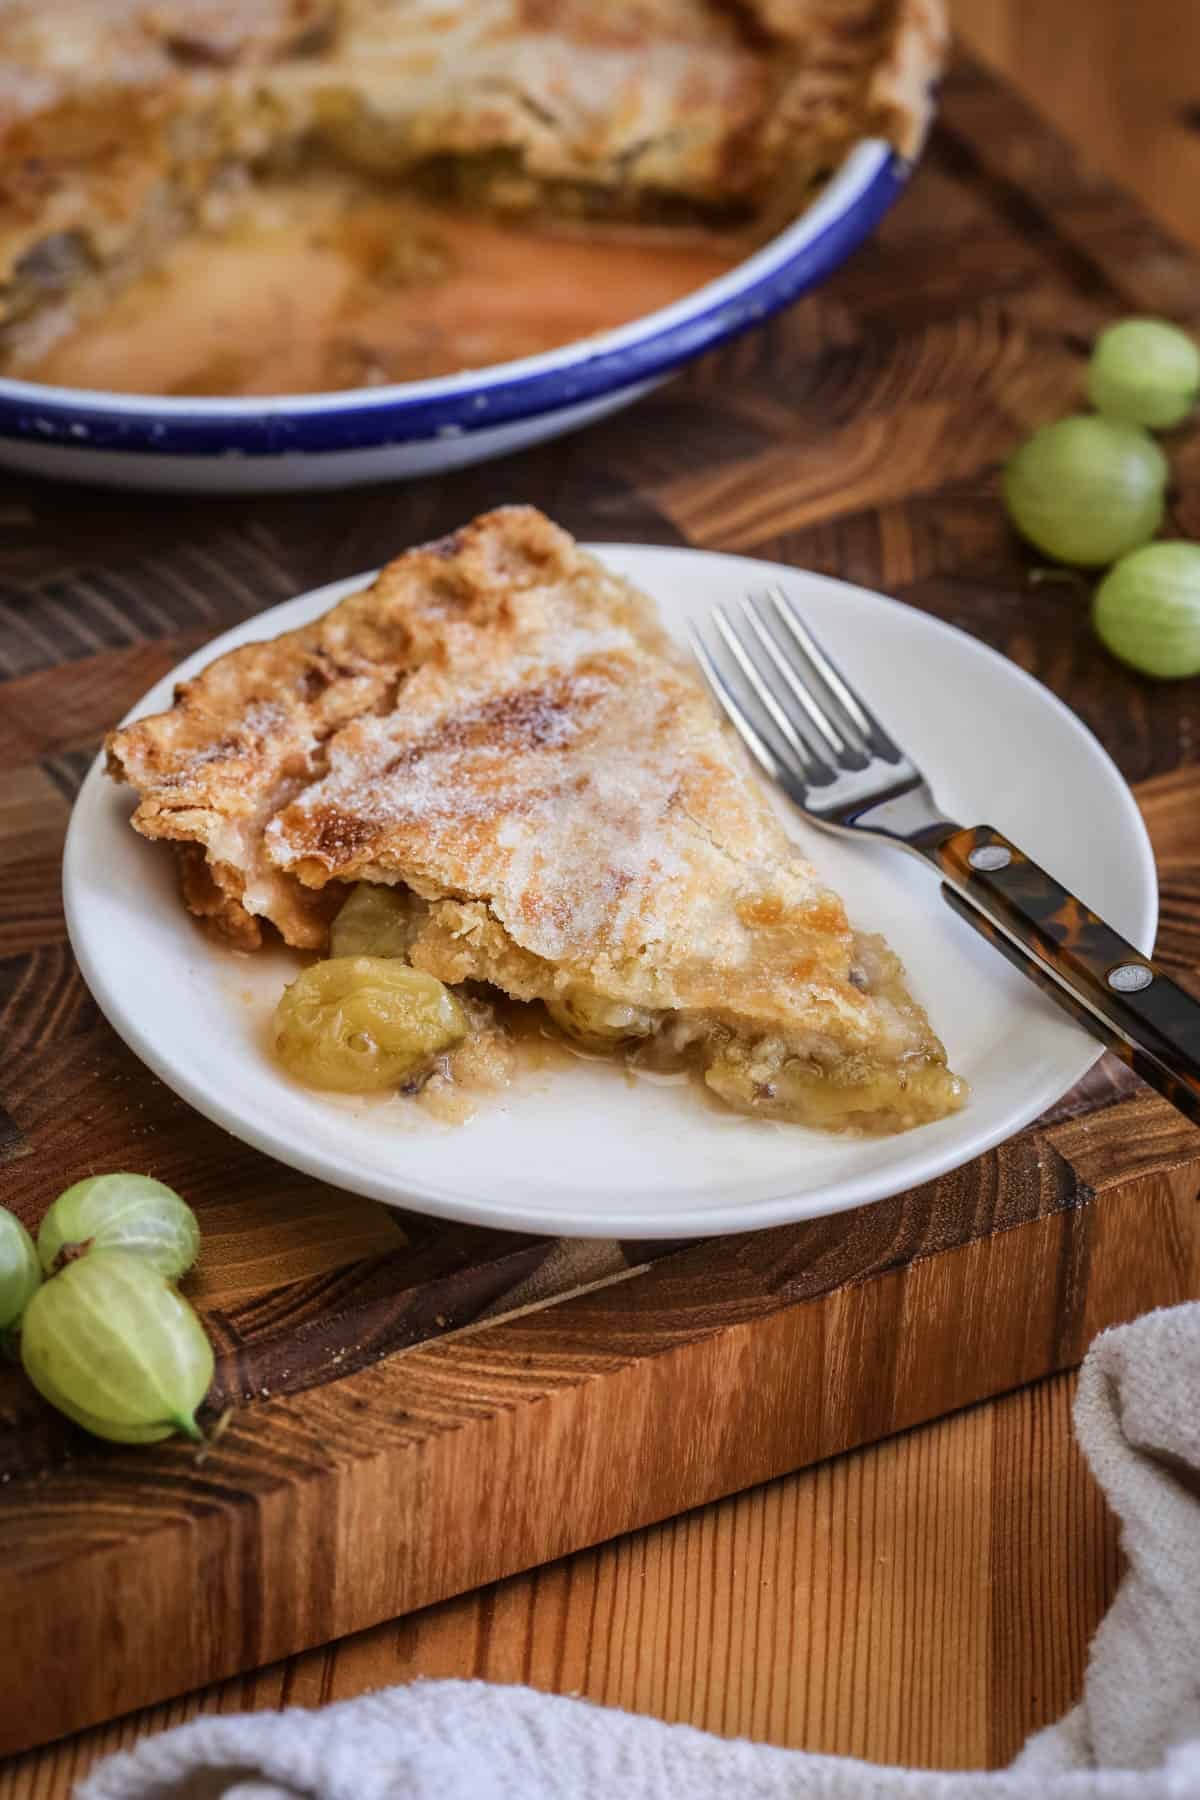
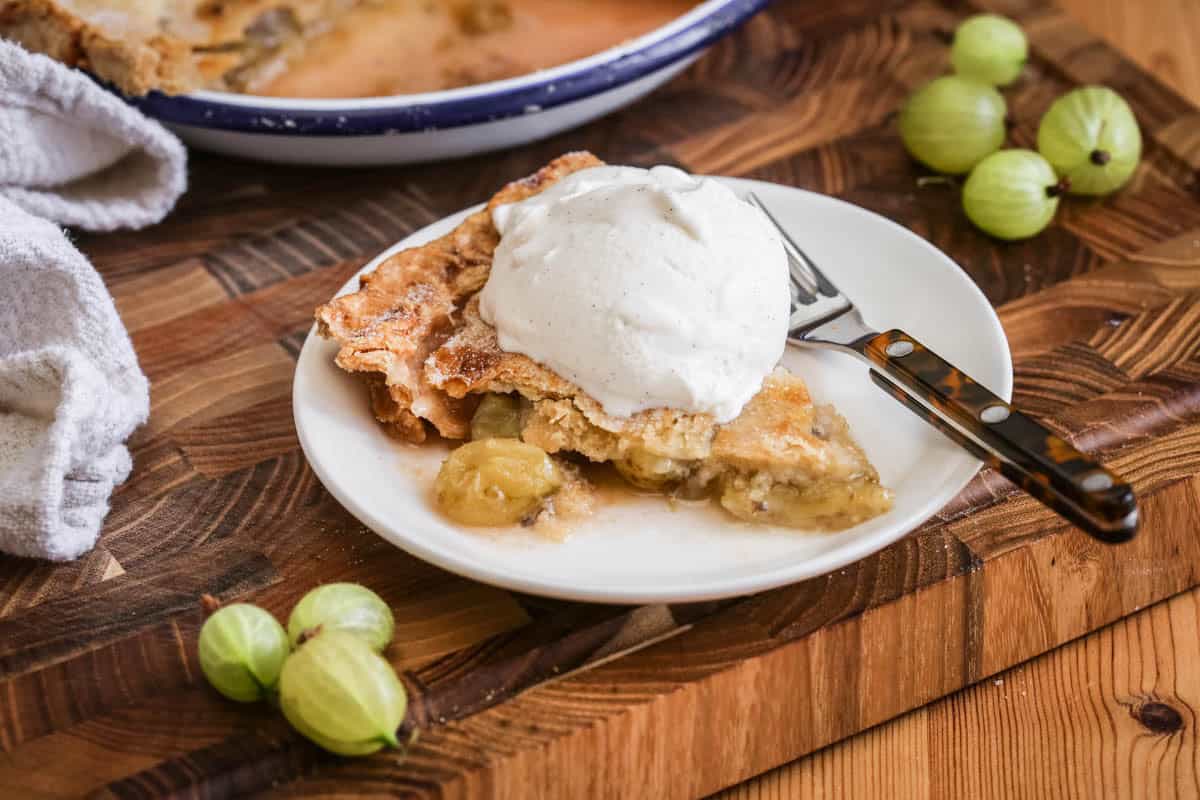
Gluten-Free Gooseberry Pie is made with a crisp and buttery homemade gluten-free pastry and filled with perfectly balanced sweet-tart gooseberries.
I’ve been waiting for summer to make a gooseberry pie ever since my Winter rewatch of Bridgerton when gooseberry pie was used as a lure for the Duke of Hastings to come to the Bridgerton’s for dinner. Apparently it’s his favourite. And it totally worked – that’s the power of gooseberry pie. It launches romances.
Since I’m a great fan of gooseberries (and the romance genre) and always try to make the most of this fine fruit’s very short season I’ve been intrigued to make my own version using my favourite gluten-free shortcrust pastry recipe.
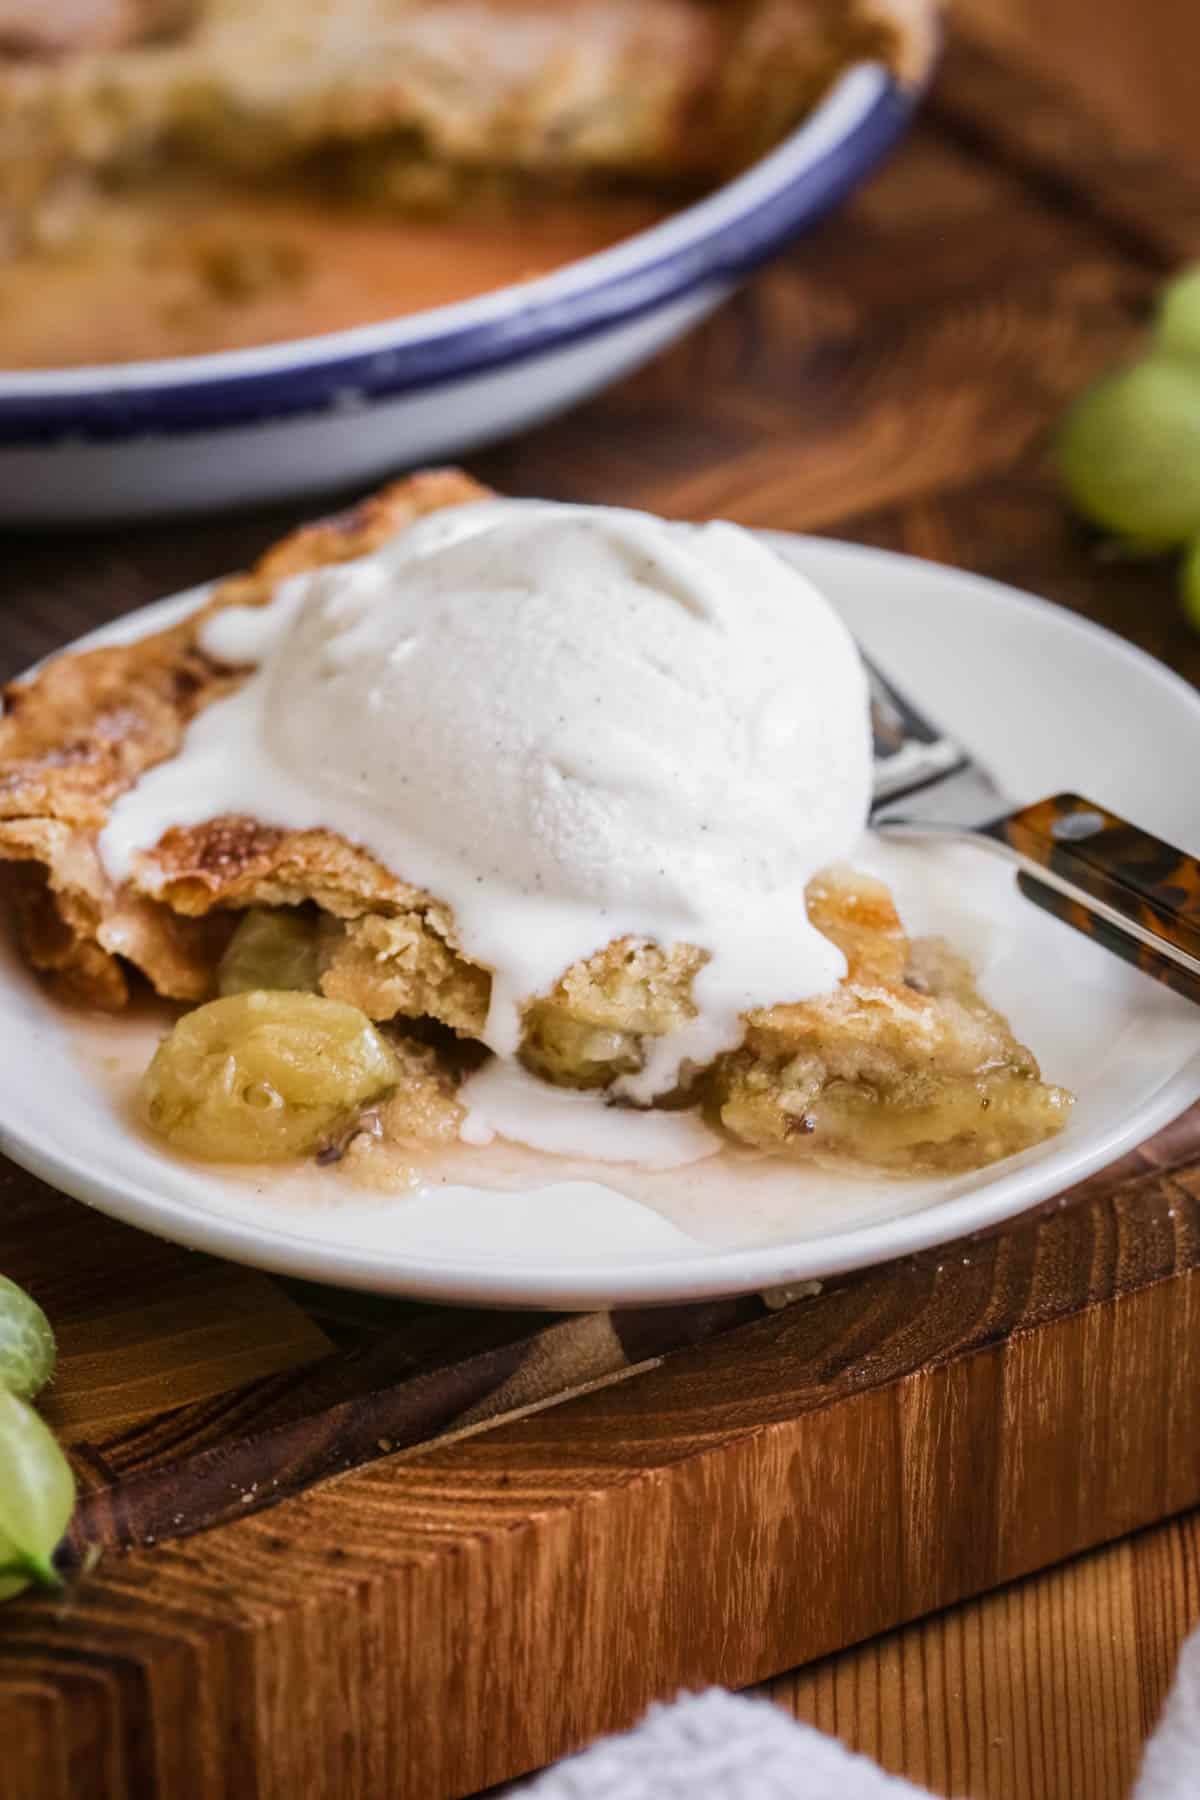
Well it turns out that gooseberry pie definitely deserves a comeback; the tart fruit balanced with the perfect amount of sweetness is heaven on a plate. Especially if you’re serving it with homemade ice cream. My mum will insist on fresh custard with a pie whatever the season but ice cream is especially delicious in these warm summer months.
This is a very easy gluten-free shortcrust pastry that doesn’t need any xanthan gum and is made with a blend of single origin flours so you don’t need to find exactly the right brand. Bursting with an equally straightforward gooseberry filling, you can whip up this pie in no time. It’s pretty simple, even if you’re not a seasoned pie baker.
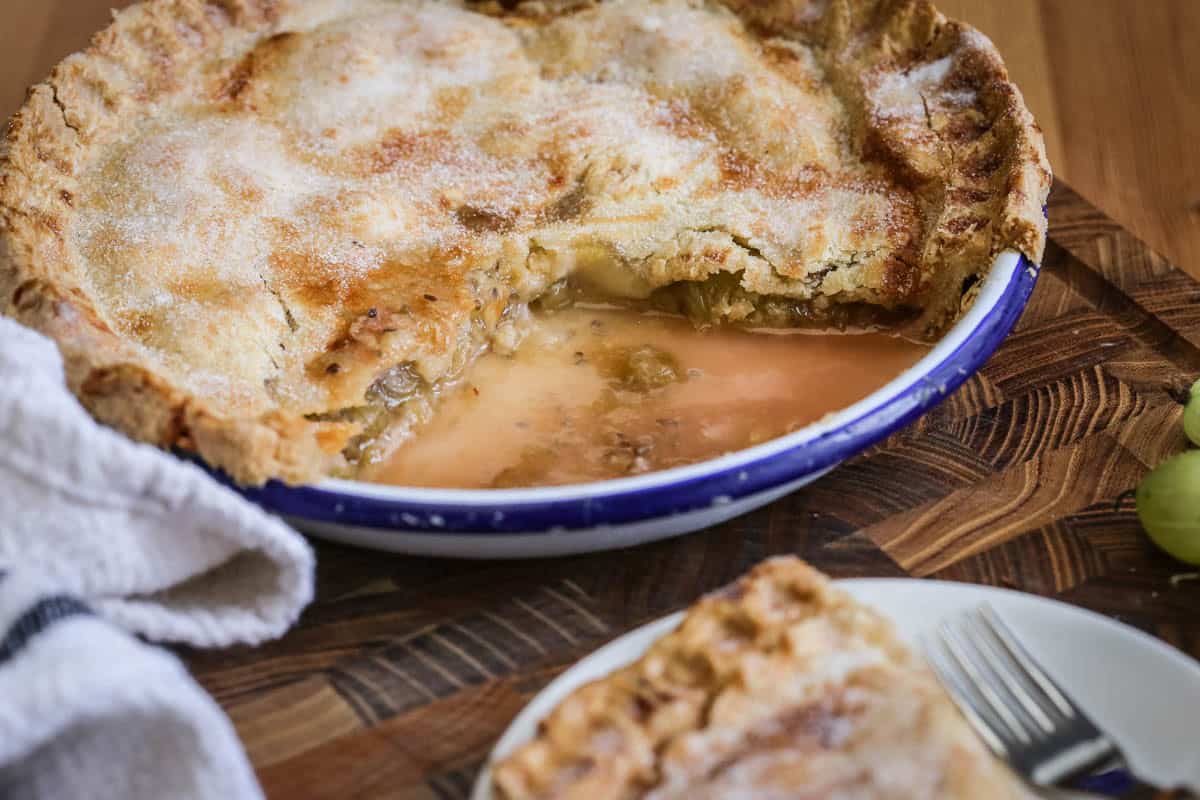
We pre-cook some of the gooseberries prior to filling the pie as I prefer this thick jammy texture but tumbling in some whole gooseberries before baking means you get the best of both worlds. Allow the pie to cool and your pie will perfectly set; serve warm and the juices gloriously spill out to mingle with your ice cream. How you serve your pie is something deeply personal so it’s truly up to you.
Why You’ll Love This Gluten-Free Gooseberry Pie
- Balanced sweet/tart flavour.
- Very easy crisp gluten-free buttery shortcrust without any xanthan gum needed or branded flours.
- You can use fresh or frozen gooseberries.
- Ready in under 2 hours.
- Freezer-friendly.
How To Prepare Gooseberries
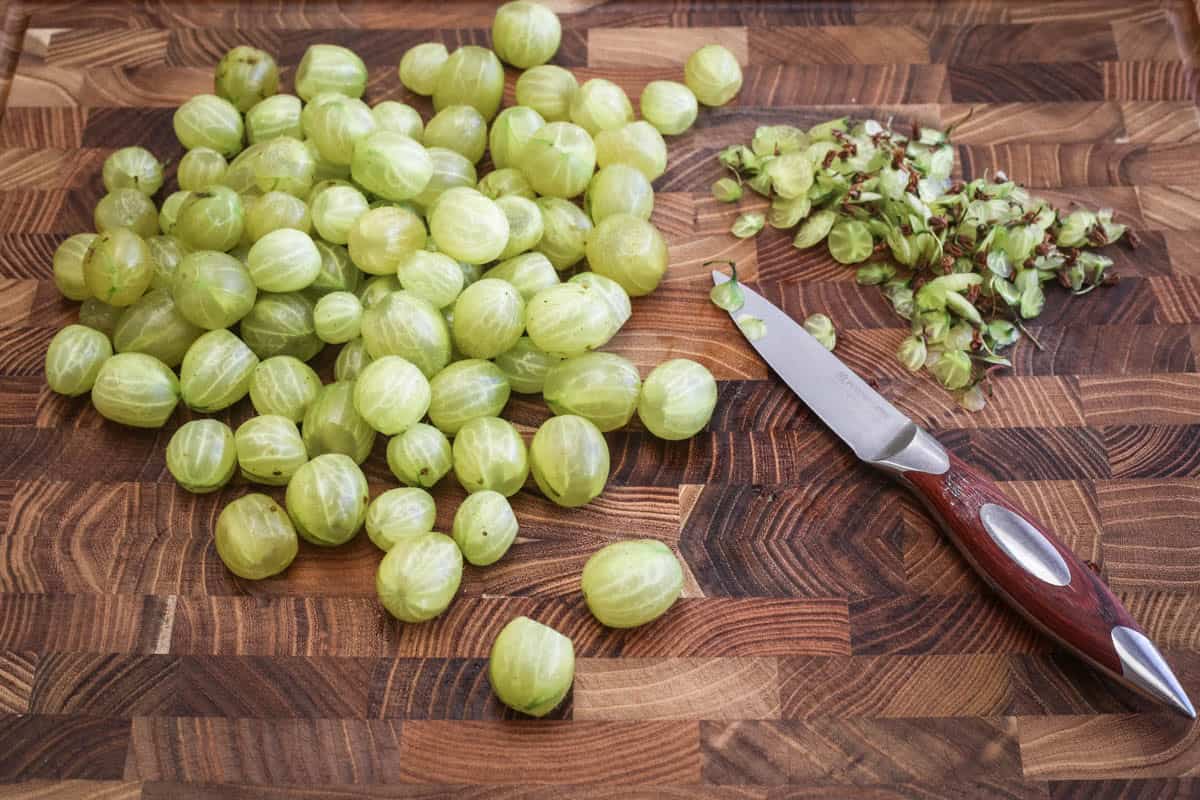
Always wash the fruit but also each gooseberry should really be topped and tailed prior to making the filling. It’s a bit of a dull job but otherwise the filling can be a little gritty. If you are using frozen fruit then do it whilst the berries are frozen and they slice straight off.
Ingredients Needed
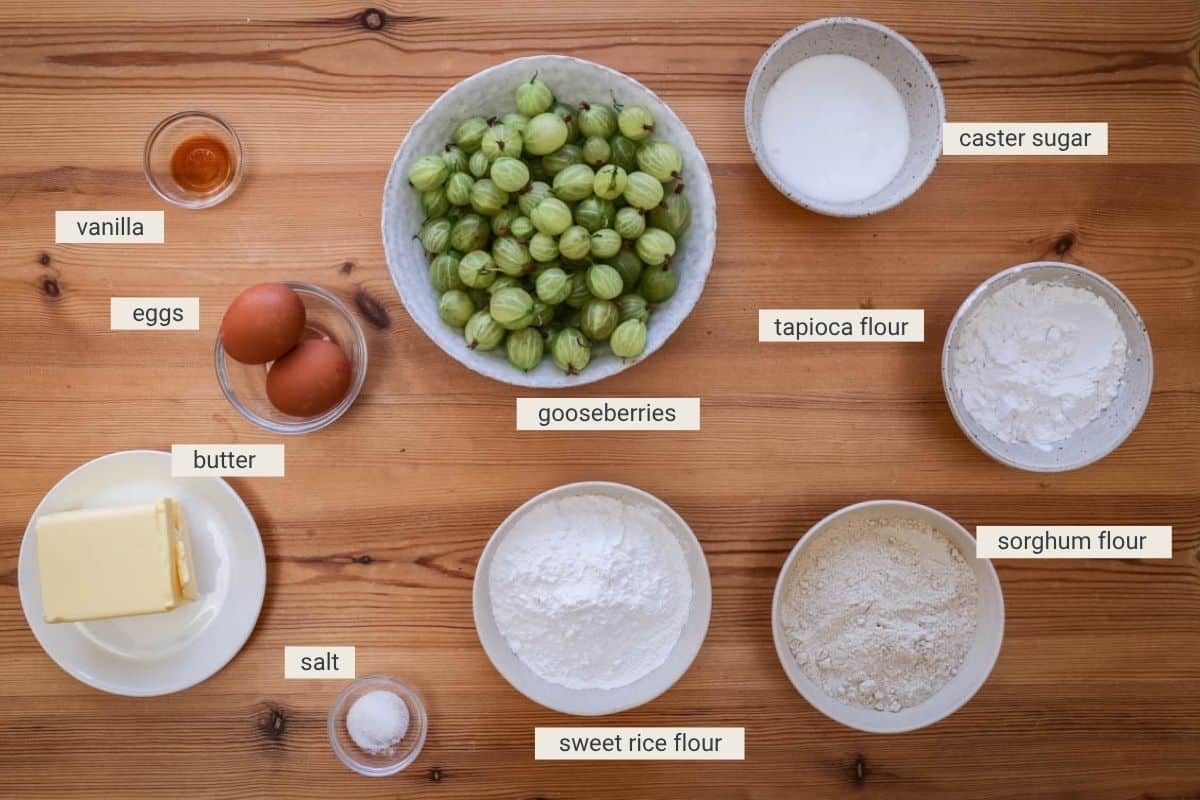
Gooseberries. This recipe was tested with green gooseberries (I understand that red gooseberries exist but I’m not sure I’ve ever seen them). They are tart with slight sweetness and really benefit from being sweetened correctly; the kind that you’re not really able to eat straight from the punnet. Gooseberries are in season in the UK from late May to July. If you are making this out of season then you can use frozen gooseberries but use them directly from the freezer without thawing. Avoid fruit that has excessive ice attached as well as otherwise it adds too much extra water to the recipe which means the filling might not set correctly and will potentially lead to a soggy bottom.
Caster sugar. It’s a fine white baking sugar available in the UK. Regular white granulated sugar can be substituted.
Sweet rice flour (glutinous rice flour). This is an important starchy flour to use in our pastry for its binding power. It makes our dough elastic so it’s easy and forgiving to roll. Also it’s quite neutral in taste so will go with everything. You can buy sweet rice flour from online suppliers like Healthy Supplies or Amazon. Or you can find it in specialist Asian stores as it’s a very common ingredient in Asian recipes.
Sorghum flour. We need this flour for structure. It adds a crisp bite to the pastry and a lovely earthy flavour. If you can’t get hold of sorghum flour you can substitute with buckwheat flour or gluten-free oat flour.
Tapioca flour (tapioca starch). This smooth soft flour is used in both the filling to help capture the juices and set them and also in our pastry as an extra binder. It balances out the sweet rice flour and avoids it becoming gummy. You should be able to buy tapioca flour in larger supermarkets or health food shops. For the pie filling you can use cornflour (cornstarch) or arrowroot instead of tapioca flour.
Unsalted butter. We need unsalted so we can control the salt content of the recipe. Make sure it is super cold straight from the fridge.
Eggs. This recipe uses medium size, about 60g each with shell (50g each without shell). These are often classified as large eggs in the US. I recommend weighing your eggs to ensure the correct amount.
Vanilla extract. It just enriches the gooseberry filling. Use a good quality extract, I like Nielsen Massey.
Milk. You just need a drop for the egg wash over the pastry.
Salt. I like to use kosher salt in my baking as it has a round gentle flavour. Using salt in your baked goods lifts and sharpens all the other flavours.
How To Make Gluten-Free Gooseberry Pie
For full recipe instructions go to the recipe card at the end of this post.
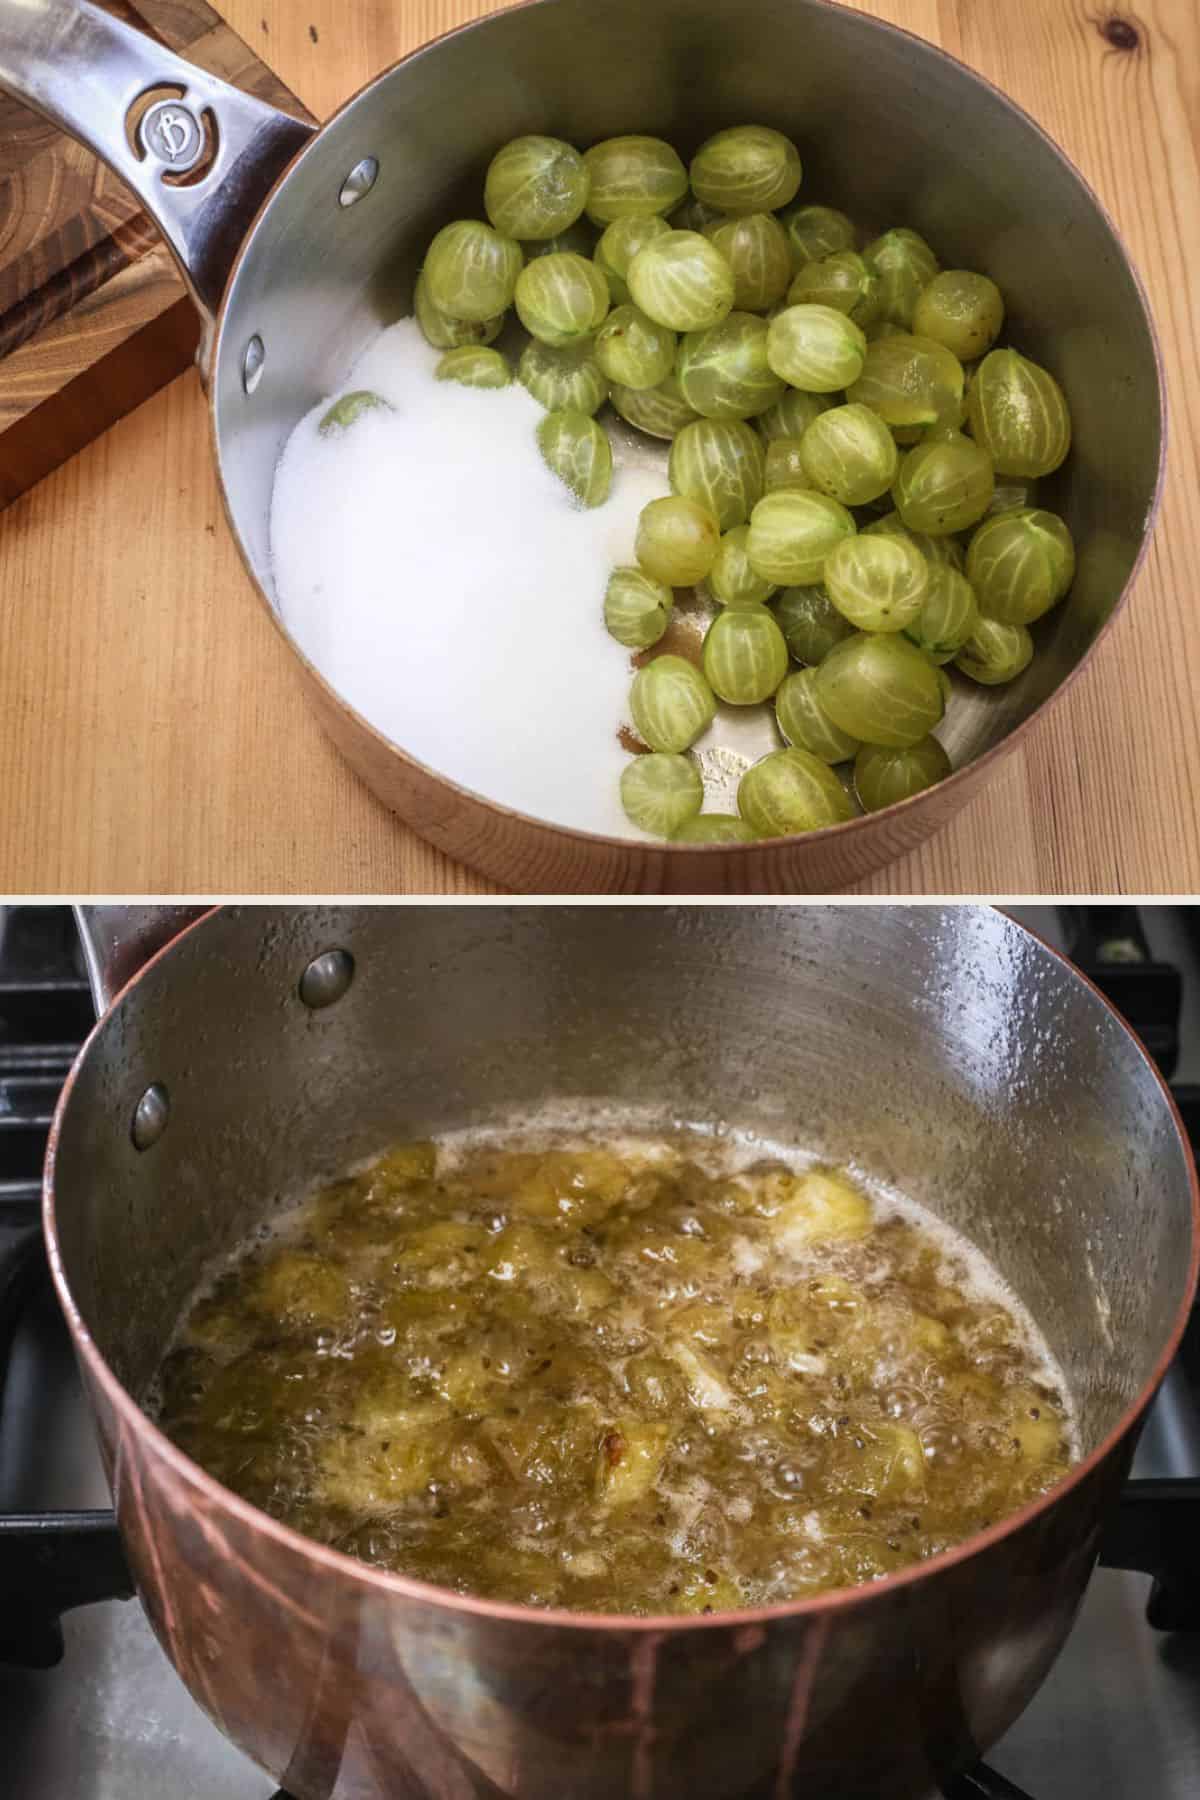
Place around 300g prepared gooseberries into a saucepan with the sugar and vanilla. Cover with a lid and cook over a medium heat until the fruit softens and collapses. Once the fruit has broken down, remove the lid and simmer for a further 5 minutes until syrupy to evaporate the excess water. Take off the heat and stir in the remaining gooseberries. Chill whilst you are preparing the pastry.
For the pastry crust, combine the dry ingredients (sorghum flour, sweet rice flour, tapioca flour, sugar and salt) in a large mixing bowl.

Peel in the cold butter and rub in lightly with fingertips, leaving visible small butter pieces for a flaky crust.
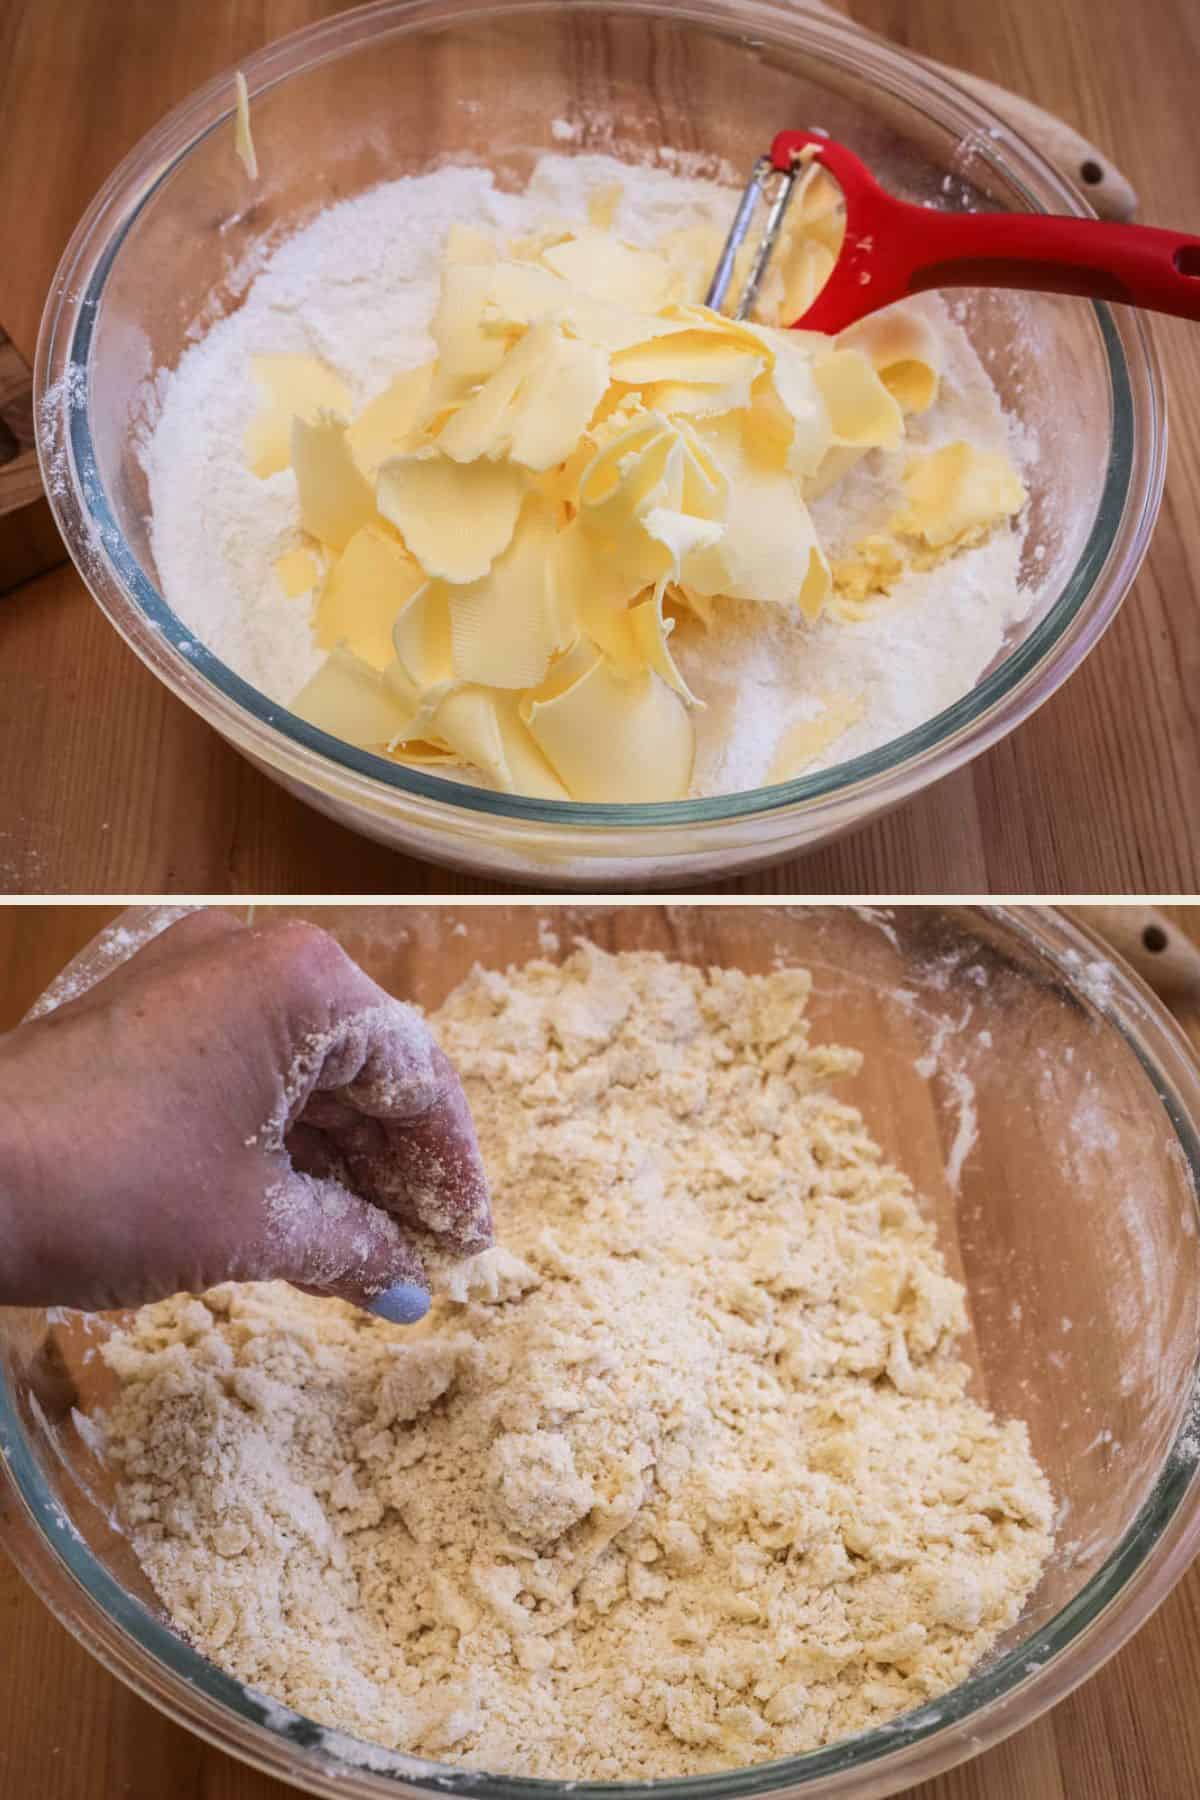
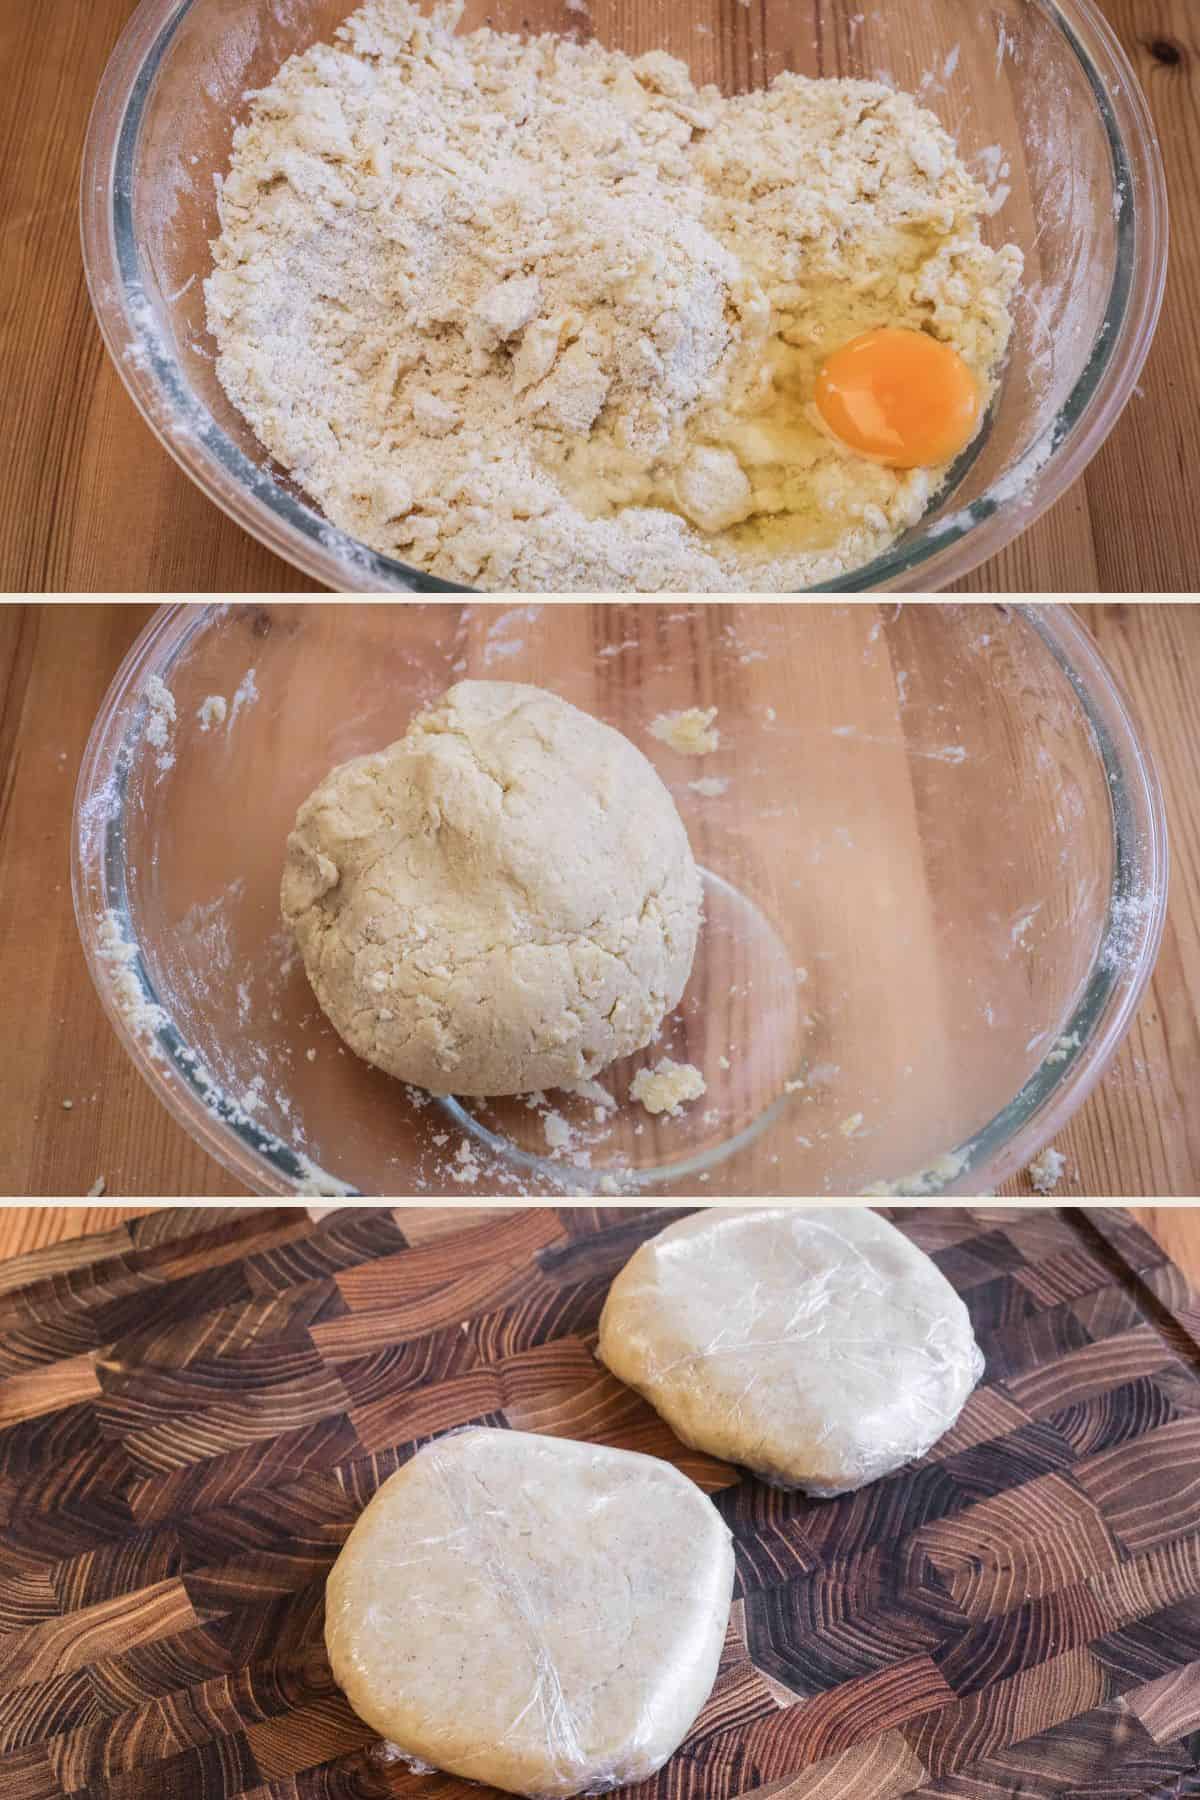
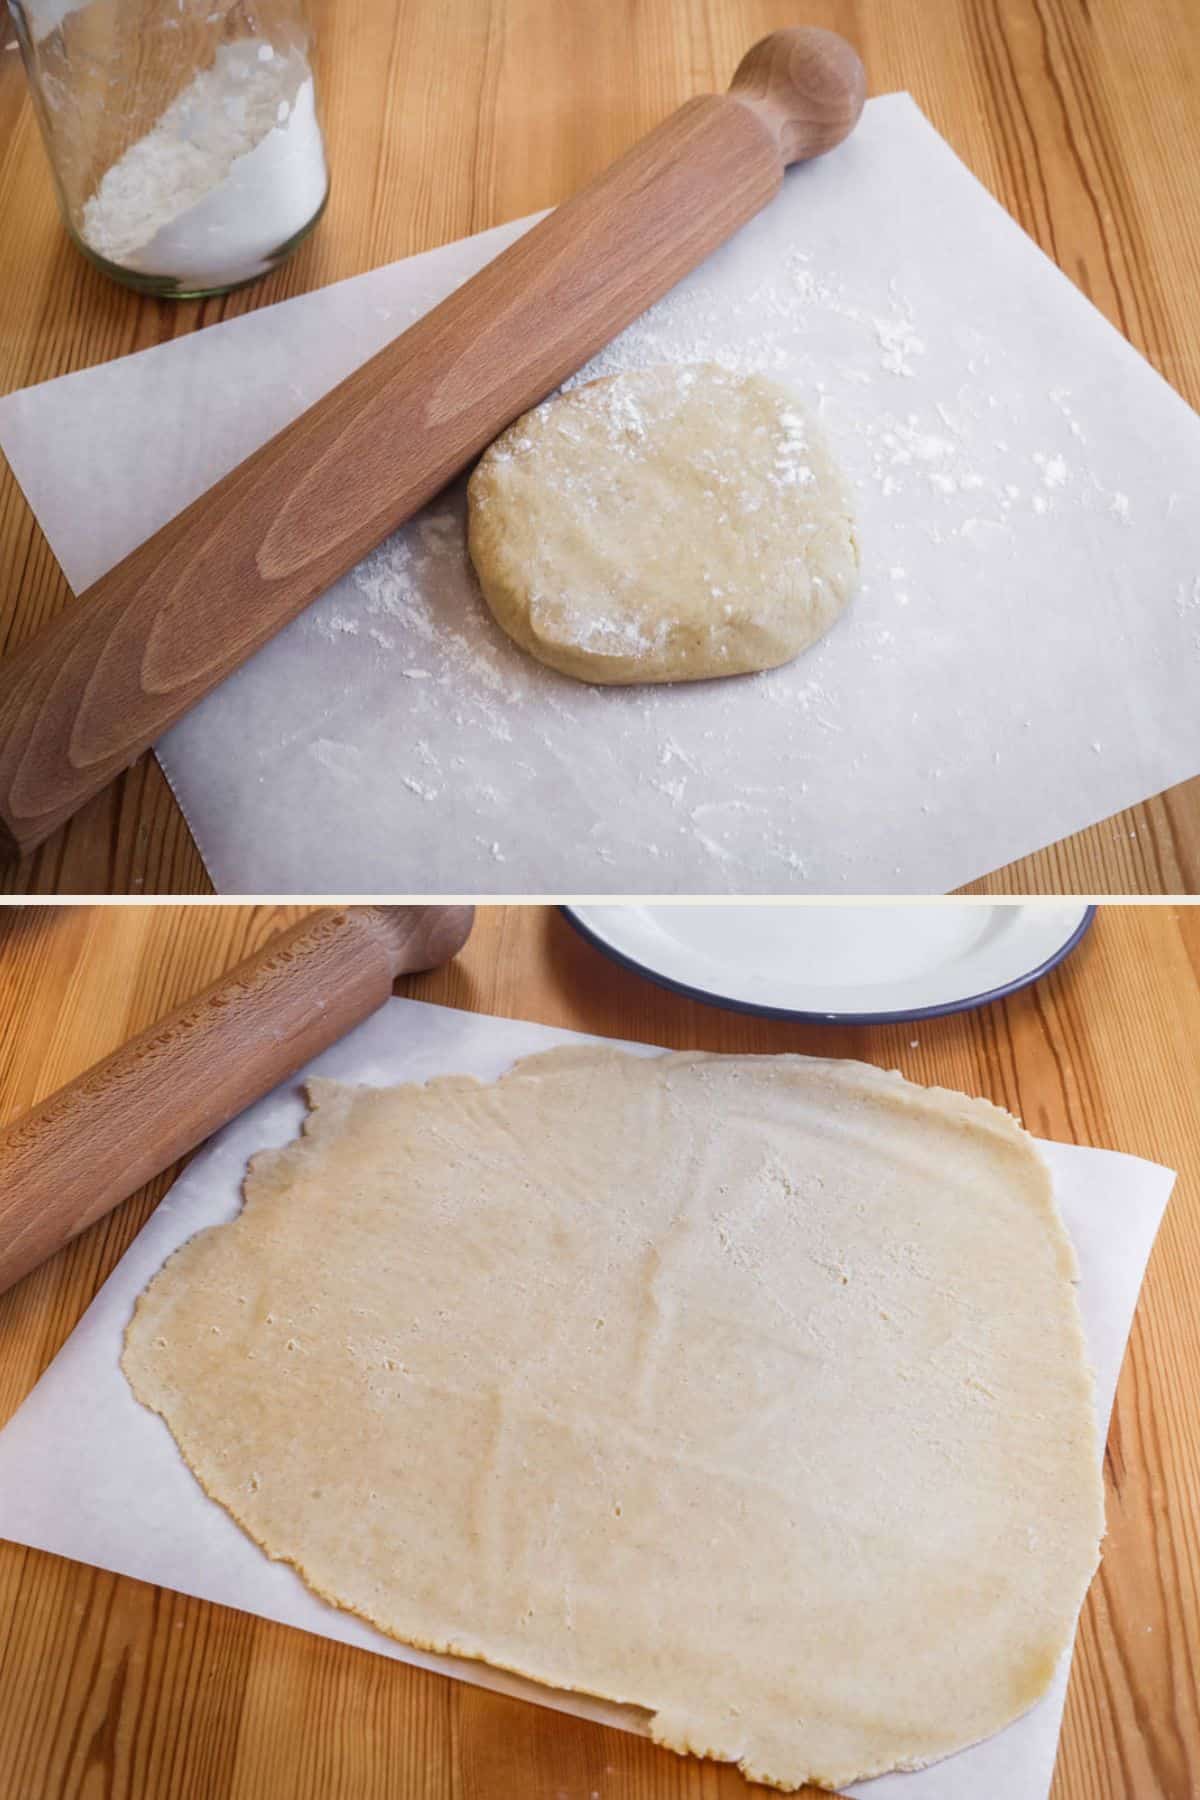
Make a well in the centre and add in 1 whole egg + 1 egg white. Bring the dough together to form a shaggy dough, then turn out onto a clean work surface to form a smooth dough ball. Divide into two-thirds and one-third portions. Form into discs, wrap and chill for 30 minutes.
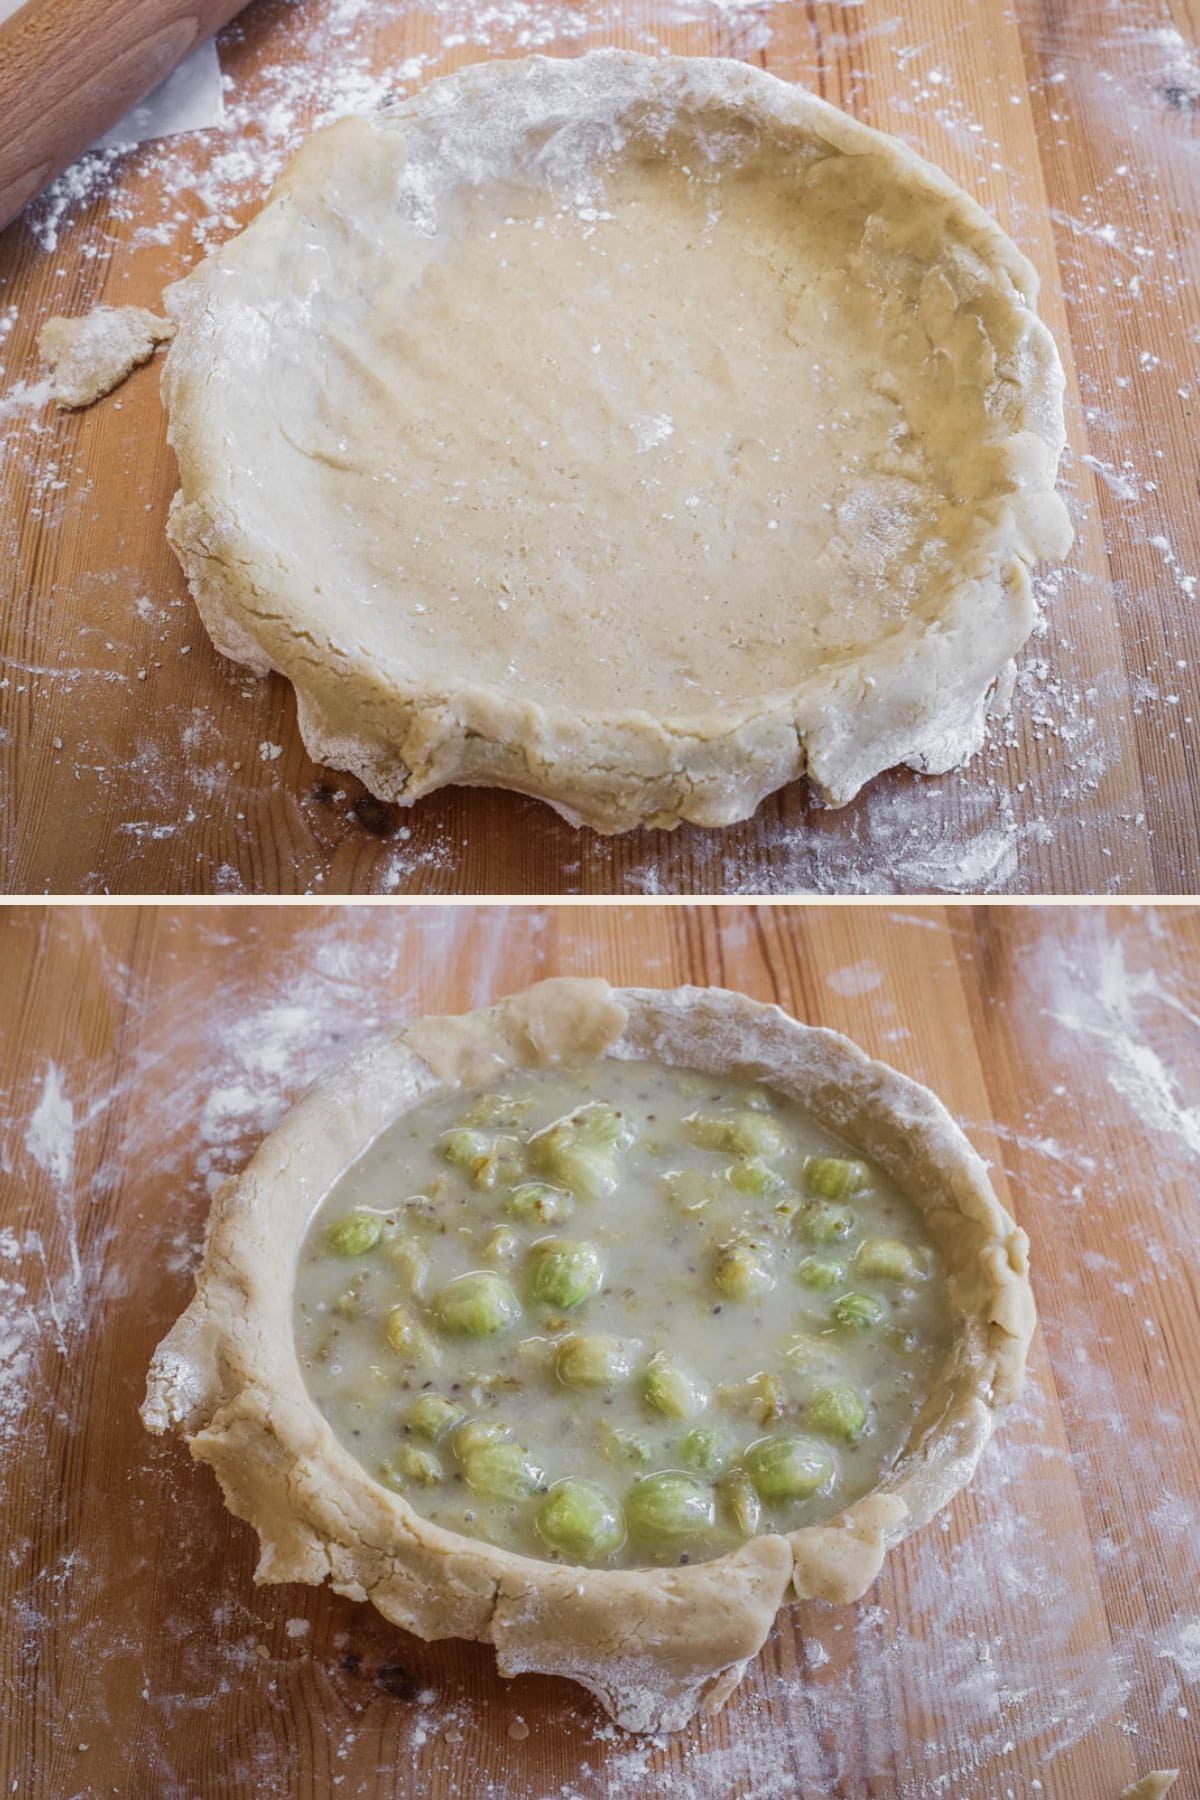
Roll each disc between baking parchment to 3-4mm thickness. Line a 20cm pie dish with the larger round, patching any cracks.
Remove the gooseberries from the fridge and stir in the tapioca starch until fully absorbed. Spoon the gooseberry filling into the pastry case in an even layer.
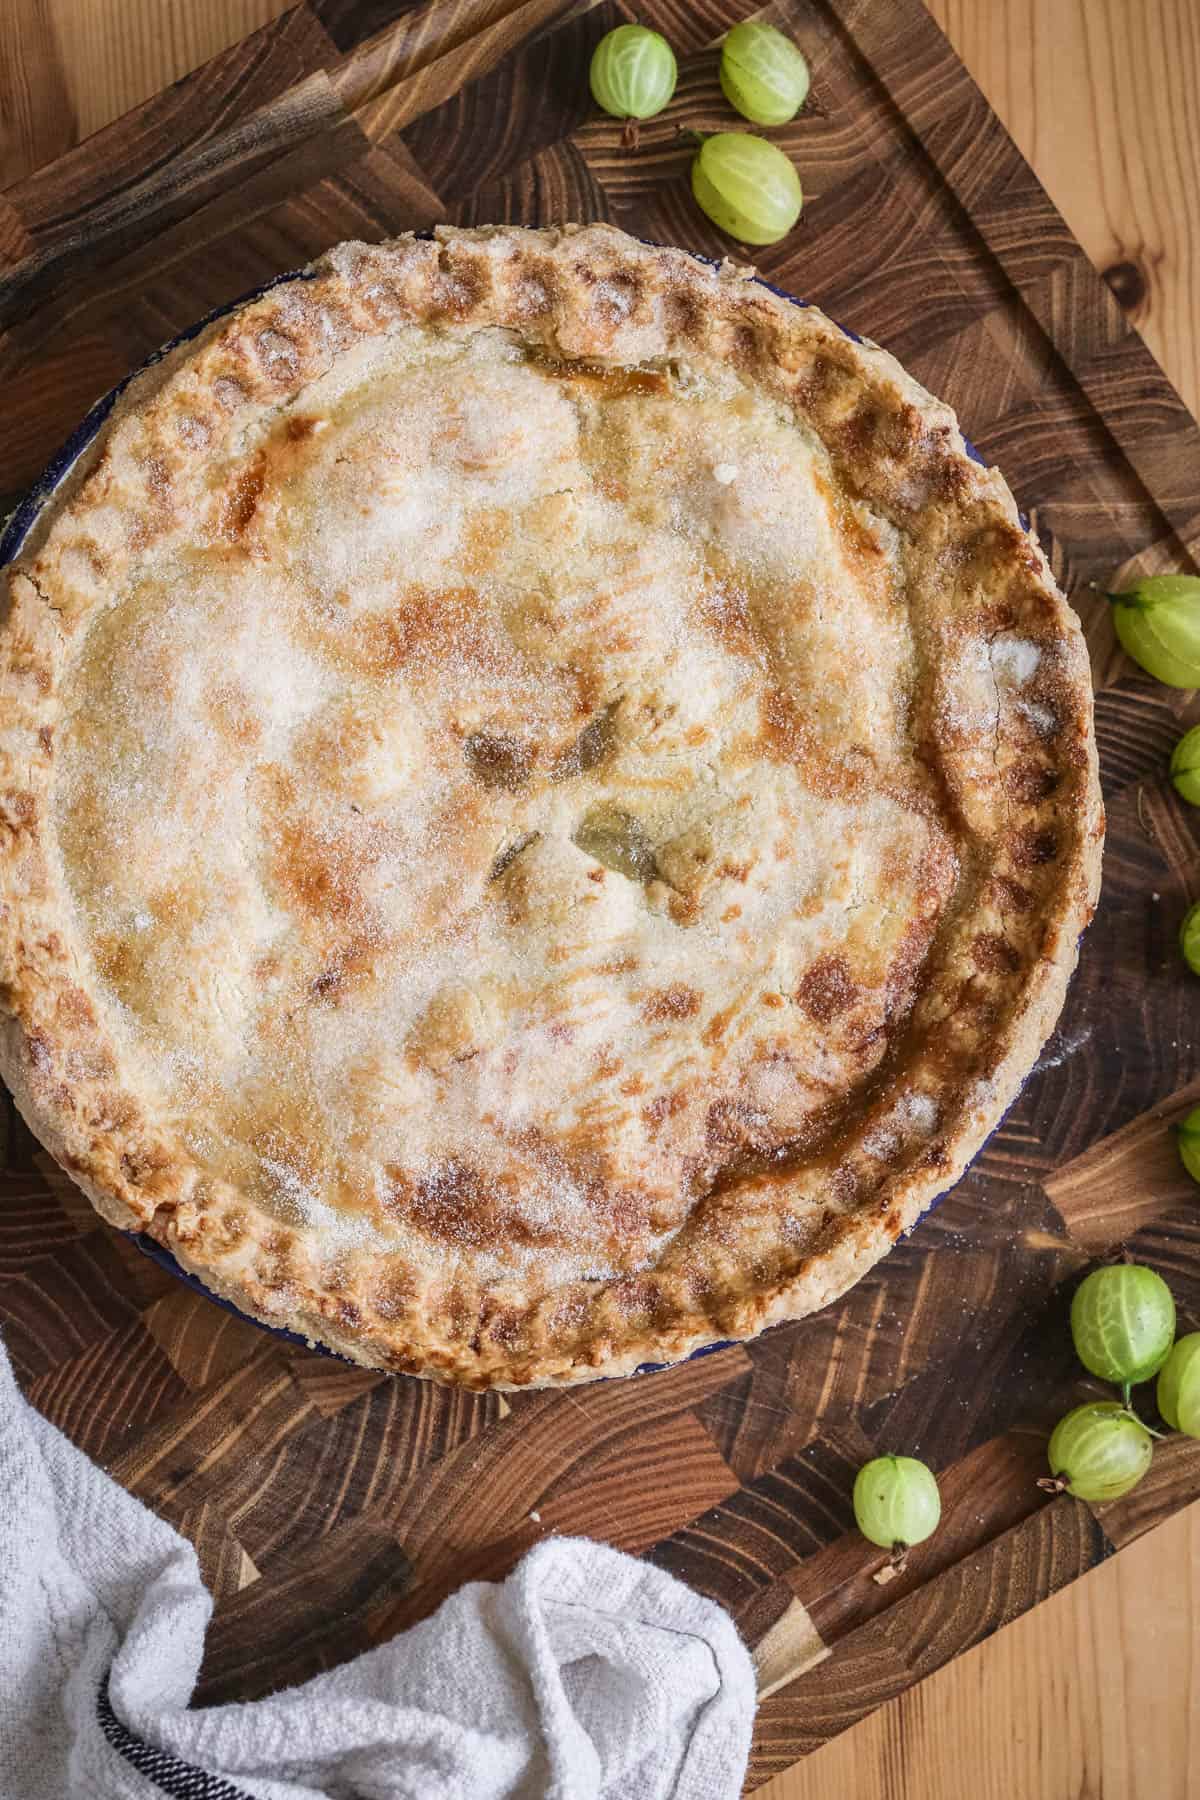
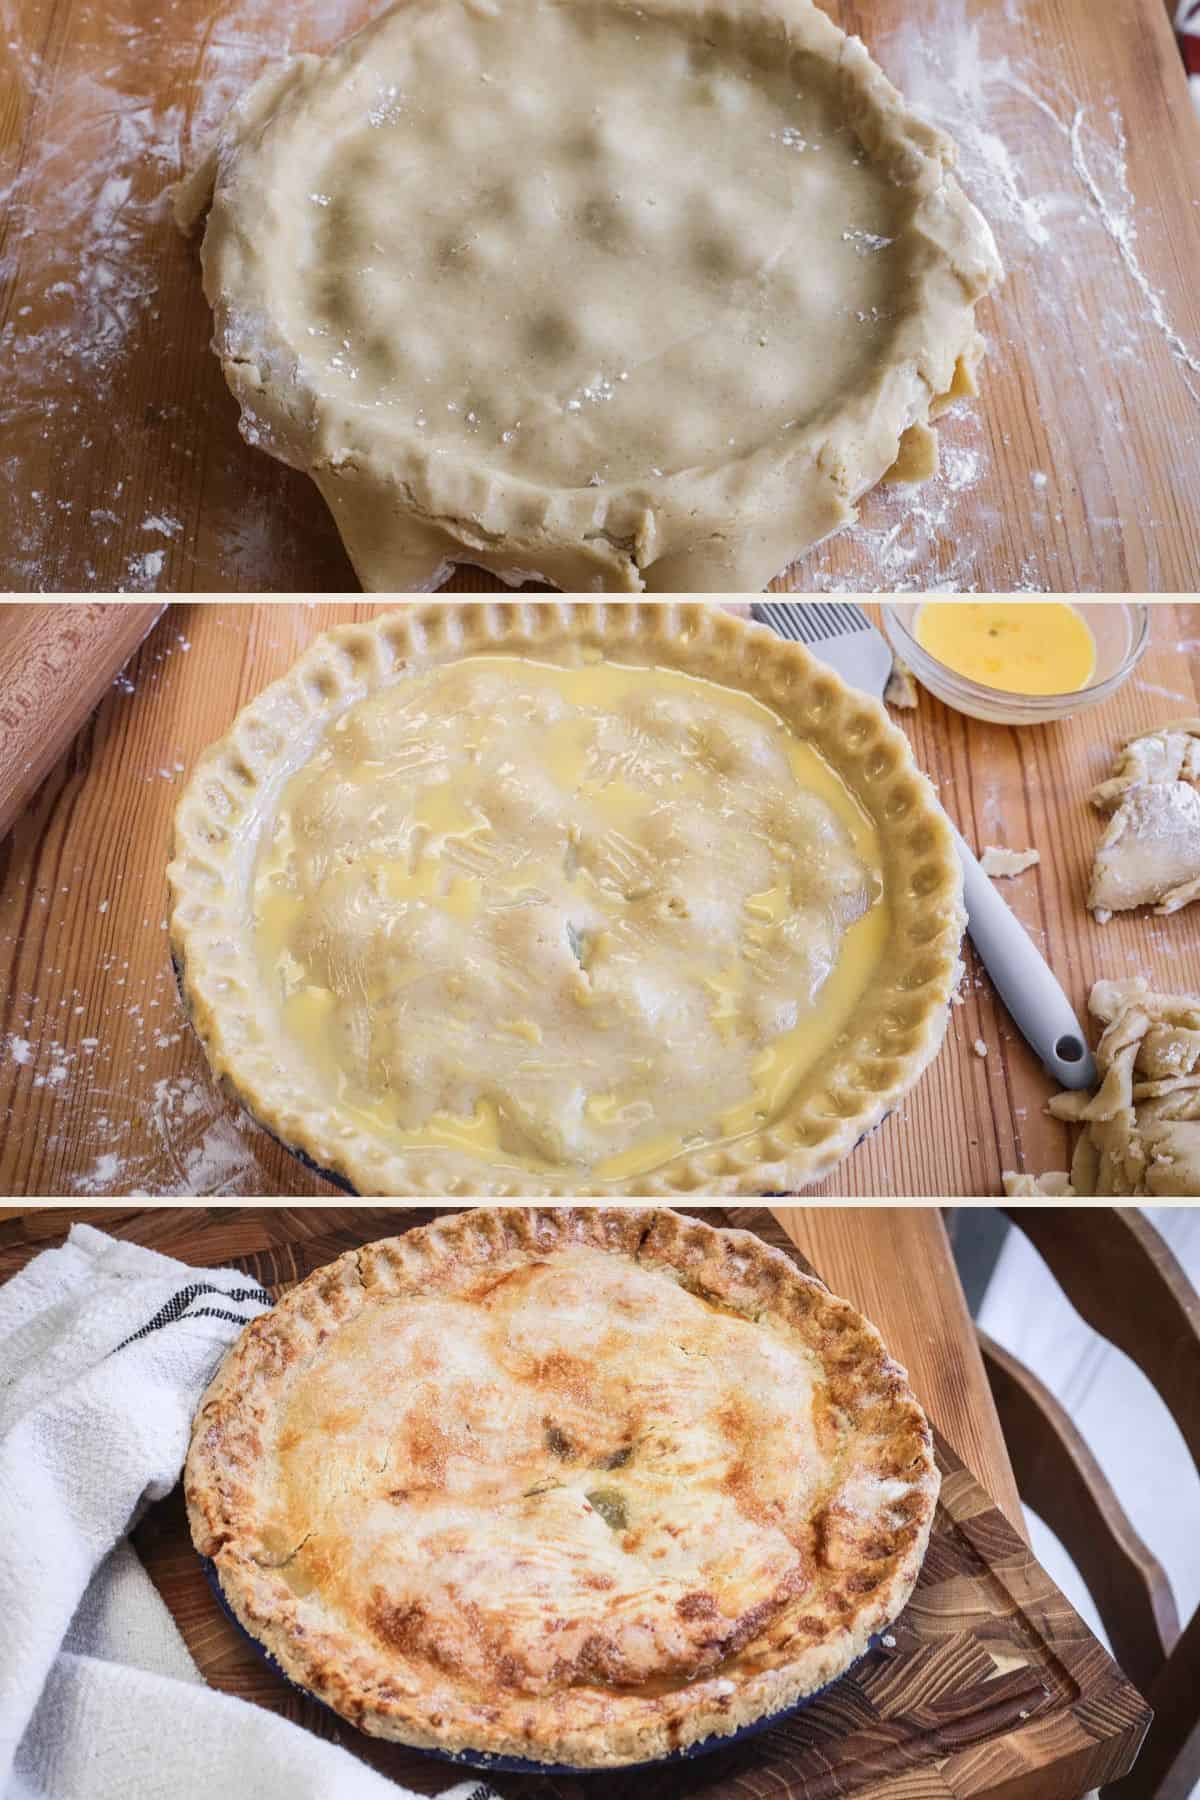
Damp the edges of the pastry with water, drape over the second pastry disc then press the edges to seal, trim excess and crimp. Cut four slits in the centre, brush with egg wash and sprinkle with caster sugar. Bake the pie for 45 minutes and allow to cool in the tin before slicing.
Tips & Troubleshooting
You can view the separate post for the full tips and troubleshooting on the gluten-free shortcrust pastry recipe.
Keep the pastry cold. You can roll out the first disc of pastry, fit it to the pie tin then place in the fridge whilst you are rolling out the second.
Assemble everything ready for finishing the pie prior to rolling out the pastry, including measuring out the caster sugar sprinkling and making the egg wash so the unbaked pie isn’t resting in a warm kitchen at any stage.
The pie can be served warm or at room temperature.
You can serve this pie warm but you should allow it to rest out of the oven for at least 30 minutes so the filling has time to settle and further set.
Fully cooled pie will give the cleanest slices.
Make Ahead
You can prepare both the pastry dough and the gooseberry filling (without the stirred in tapioca starch) up to two days before. Store in the fridge until needed.
The finished pie can be fully made and kept at room temperature for several hours. However, if you are making it to serve on another day then cover and refrigerate for up to 3-4 days.
Serving after refrigeration. You can serve the pie cold or bring it out to come to room temperature.
Re-heat. You can re-heat individual slices in the microwave for 20-30 seconds, or warm the whole pie in an oven, pre-heated to 180°C / 160°C fan assisted / gas mark 4 / 350°F, for 10-15 minutes.
Freezing. Allow the pie to fully cool then double wrap in cling film (plastic wrap) and aluminium foil. You can freeze the pie for up to two months. Thaw overnight in the refrigerator then serve or re-heat as above.
FAQs
Gooseberries are in season from late May to July in the UK.
If you want to make this recipe outside of their season then you can use frozen gooseberries from a reputable online supplier like British Frozen Fruits. You don’t need to thaw them before use and can top and tail them whilst still frozen.
Many recipes choose not to cook the gooseberries before putting them in the pie but I prefer the more jammy texture of the collapsed gooseberries. Adding some whole gooseberries to the pie filling as well is the best of both worlds.
This pie was tested in the enamel Falcon 20cm (8 inches) Round Pie Dish which is a couple of inches deep.
The pie is ready when the pastry is beautifully golden brown and the filling is bubbling up through the slits in the centre of the pie.
The gooseberry filling is runny if the pie is cut straight out of the oven as the cooling time further sets the filling. However, if the filling is still runny after cooling then you might choose next time to add 1-2 teaspoons of tapioca flour to the filling prior to baking. This might have happened if you are using frozen gooseberries and there was too much water attached to the berries. I recommend using non-icy gooseberries.
If your pie has a soggy bottom then there may have been excess water in the gooseberry filling. If you cut the pie too early and the juices seep out then it can also seem like you have a soggy bottom but that’s just a result of the filling not setting properly during cooling and then soaking the pie crust as you are cutting– the bottom should have been baked properly. To avoid a soggy bottom you can add an extra 1-2 teaspoons of tapioca flour to your gooseberry filling, or even add a scattering of gluten-free breadcrumbs to the base of your pastry case before adding the gooseberry filling so it can soak up some of the juices.
How To Serve Gooseberry Pie
Unless you are using frozen fruit or have frozen your pie then you are probably eating your gooseberry pie in the summer then the best accompaniments are Homemade Vanilla Ice Cream, deeply cold single cream, whipped double cream or clotted cream for something truly indulgent.
And if you are serving the pie in the cooler months then homemade vanilla custard is truly the best combination. Although this Lemon Custard Sauce is actually a very good flavour pairing too.
However, naked pie with no accompaniments at all is my favourite for snacking.
What Else To Do With Gooseberries?
Gooseberry Crumble tumbles the gooseberries with strawberries for a perfect summer fruit dessert.
Gooseberry Preserves. Why not try this Gooseberry Thyme Jam or this Spiced Gooseberry Chutney?
Gooseberry Cake. I make these gorgeous Gluten-Free Gooseberry Custard Friands as well which are a little bit different.
Enter your email below to get this recipe sent to your inbox plus get new recipes, baking tips, and updates.

Gluten-Free Gooseberry Pie
Equipment
- 20cm (8 inch) pie dish
Ingredients
- 500 g gooseberries
- 100 g caster sugar
- 1 teaspoon vanilla extract
- 1 tablespoon tapioca flour - tapioca starch
Pastry
- 120 g sweet rice flour - glutinous rice flour
- 110 g sorghum flour
- 60 g tapioca flour - tapioca starch
- 1 tablespoon + 2 teaspoons caster sugar
- ½ teaspoon sea salt
- 200 g unsalted butter - cold from the fridge
- 2 eggs
- 1 teaspoon milk
Instructions
Gooseberry Filling
- Prepare the gooseberries by washing, topping and tailing to remove the stems.
- Place about 300g (approx. two thirds) of the gooseberries in a pan with the sugar and vanilla then heat over a medium heat with the lid on until the gooseberries are soft and have collapsed.
- Remove the lid and simmer for a further five minutes until some of the water has evaporated and it’s beautifully syrupy.
- Remove from the heat then mix in the rest of the gooseberries and transfer to a shallow bowl to chill in the refrigerator whilst you prepare the pastry.
Pastry Crust
- In a large mixing bowl, whisk together the sweet rice flour, sorghum flour, tapioca flour, 1 tablespoon sugar and salt.
- Remove the butter from the fridge and peel shards into the flour mixture until you’ve used it all.
- Rub the mixture between fingertips until roughly shorn. It’s okay that the butter is still in largish pieces.
- Make a well in the centre of the dry mixture and pour in one whole egg + one egg white, reserve the second egg yolk for the egg wash (whisk the extra egg yolk with 1 teaspoon milk then cover and chill in the fridge until needed).
- Bring the dough together using a wooden spoon at first, if you like, but switch to using your hands for the final gathering.
- Turn the shaggy pastry out onto a clean work surface and knead for about two minutes until the dough comes together into a smooth ball which is no longer sticky.
- Split the dough into two thirds and one third and roll into two separate balls. Flatten the balls slightly to make two thick round discs. Wrap each one in baking parchment or cling film (plastic wrap) and place in the fridge for 30 minutes to rest and chill before rolling out.
Pie Assembly
- At this point pre-heat the oven to 190°C / 170°C fan / gas mark 5 / 375°F.
- Cut two large pieces of baking parchment, 2½ inches wider than the size you need to roll the pastry out to and dust with a little tapioca flour
- Place the larger of the chilled pastry discs between the parchment sheets, dusting the top of the pastry with a little tapioca flour.
- Using a long rolling pin, roll out the pastry into a round until it is about 3-4mm thick and a couple of inches larger than your pie dish.
- Peel away the baking parchment and use the rolling pin to lift the pastry and drape it over the pie dish.
- Fit the pastry into the pie dish, patching up any cracking with excess pastry. Place the pie dish in the fridge whilst you roll out the second pastry disc in exactly the same way.
- Bring your gooseberry filling out of the fridge after you have rolled out the second disc. Stir the tapioca starch into the gooseberry filling until totally absorbed.
- Spoon the gooseberry filling into the pie dish in an even layer.
- Dampen the edges of the pastry with a little water which will help seal the pastry lid on top.
- Drape the second disc of pastry carefully over the top of the pie. Press the edges of the pastry together then cut away the excess pastry to the edges of the pie dish. Crimp the edges together using your hands or the back of a fork.
- Make four slits in the centre of the pie lid using a sharp knife.
- Brush the egg wash all over the top of the pie, making sure it doesn’t gather to much in the crevices. The sprinkle over the 2 teaspoons caster sugar.
- Bake the pie in the middle shelf of the oven for 45 minutes until the pie is beautifully golden.
- Remove from the oven and allow the pie to cool in the tin.
Notes
- Eggs. The eggs used in this recipe are medium size, 60g each with shell and 50g without shell. If you can't get hold of medium eggs I suggest you weigh the amount.
- You get for a full breakdown of how to make the gluten-free pastry dough which gives tips and troubleshooting and flour substitution ideas if you need them on the separate recipe post.
- You can make the gluten-free pastry dough and the gooseberry filling (without the tapioca flour stirred in yet) up to two days before assembling and baking.
- The pie can be served warm or at room temperature.
- You can serve this pie warm but you should allow it to rest out of the oven for at least 30 minutes so the filling has time to settle and further set.
- Once completely cool, cover and store the pie in the fridge for up to four days. Serve cold, bring to room temperature, or gently re-heat before serving.
