Gluten-Free Lemon Curd Cheesecake (No Bake)
This post contains affiliate links. Please read my disclosures.

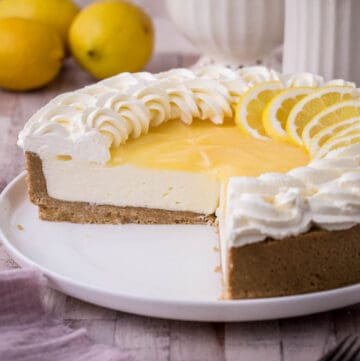
You'll adore this easy No-Bake Gluten-Free Lemon Curd Cheesecake Recipe. It is so quick and simple to make (just factor in the chilling time) and doesn’t need any setting agents. The creamy cheesecake filling has just a few ingredients: cream cheese, sour cream, double cream, tangy lemon curd and a touch of sugar. And the homemade gluten-free digestive biscuit crust takes this lemon lover cheesecake to heavenly territory.

A No-Bake Cheesecake is a totally different beast to a New York Baked Cheesecake. The filling is much softer, creamier and doesn’t have that stick-to-the-roof-of-your-mouth feeling. Not that I don’t adore a baked traditional cheesecake too but the no-bake version has a much lighter texture and brings a real feel of retro nostalgia.
This Gluten-Free Lemon Cheesecake is as easy as they come and produces a decadent dessert that is little more than an assembly job so perfect if you find a traditional baked cheesecake a little intimidating.
No special equipment is needed to make this no-bake recipe. I recommend using a food processor to make the crust but you could even bash the biscuits in a food bag using a rolling pin to create the crumbs. And if you don't have a springform pan then you could make the cheesecake in a pretty ceramic pie dish. You just might not be able to remove the whole dessert out of the dish but you’ll be able to easily cut it into slices still.
I'll take you through all the simple steps to make this easy no bake lemony cheesecake including the best gluten-free biscuits to use for the crust, how to create the perfect crust and the best way to freeze and store.
Let’s get no-baking!

Why You’ll Love This Gluten-Free No Bake Cheesecake
- It’s so quick and easy gluten-free dessert to make that even if you are a total beginner you will ace it.
- A No Bake Cheesecake is a perfect summer dessert when the warm weather hits and you don’t want to turn on your oven.
- Perfect thickness of biscuit base which isn't too firm but doesn't crumble and tastes lovely and buttery due to the homemade gluten-free biscuits.
- Gorgeous tangy lemon flavour, all derived from a thick velvety lemon curd so there's no fresh lemon juice watering down the filling.
- Easy filling made from cream cheese, sour cream, whipped cream, lemon curd and a little icing sugar. No gelatin needed for setting here.
- This is a generous dessert and is made in a large baking dish so excellent if you have guests round.
- The creamy lemon cheesecake filling is all you need for a simple no frills dessert and still tastes gorgeous. However, the extra whipped cream and lemon curd topping add just a touch more decadence and a real lemon punch.
Watch the Video
Sometimes it helps to see a visual of what I'm talking about. So watch the video to see what it looks like to make your Gluten-Free Lemon Curd Cheesecake.
Ingredients and Notes

Gluten-Free Digestive Biscuits. You can use your favourite brand of gluten-free biscuits or graham crackers to create the cheesecake crust but I really recommend Homemade Gluten-Free Digestive Biscuits for the best flavour.
Butter. Unsalted is the best choice here to help make the crust. You need it melted but then make sure it’s cooled before you add it to your biscuit crumbs.
Salt. I like to use kosher salt in my baking as it has a round gentle flavour. Using salt in your baked goods lifts and sharpens all the other flavours.
Cream Cheese. I do like a branded cream cheese in my cheesecake, cheaper supermarket versions can be a little watery. Philadelphia cream cheese is my favourite. And do choose a full fat cream cheese this is not really the occasion for low-fat as it does affect the flavour and texture.
Sour Cream. It may seem overkill to add in another cream – as you are also using double cream but it adds more creaminess so the filling is extra luxurious and sour cream adds a lovely tang to complement the lemon flavour.
Icing Sugar (powdered sugar / confectioners' sugar). You just need a little to sweeten the cheesecake.
Lemon Curd. You can use shop bought but for the best results then there’s no beating making your own lemon curd. It’s very quick and easy to make – but it will have to set overnight before you use it. It is mixed into the cheesecake filling and the extra layer of lemon curd on top really gives it a tangy kick.
Double Cream. By whipping the double cream into the filling it helps set the cheesecake and give the best texture without the need for any setting agents. You can substitute heavy cream.
Lemon. You just need it for the fresh lemon slices decorating the top so it is optional.

How To Make A Gluten-Free No-Bake Lemon Curd Cheesecake
For full recipe instructions go to the recipe card at the end of this post.
Biscuit Base:
Process biscuits in a food processor until it reaches a fine crumb.

Add melted butter and salt, mix until it resembles wet sand.

Press crumbs into a 23cm (9 inch) springform cake tin and up the sides of the pan, creating a 3cm (1 inch) deep crust.

Freeze for 30 minutes or refrigerate for 1 hour to set.
Lemon Curd Cheesecake Filling:
Mix together the cream cheese, sour cream, lemon curd, and icing sugar using an electric hand mixer until smooth.

Pour in double cream, whip the cheesecake mixture again until thickened.

Spoon the cream cheese mixture into the chilled biscuit base, smoothing the surface using an offset spatula.

Refrigerate overnight (at least 8 hours).
Remove springform pan sides when fully set.
Topping:
Spoon extra lemon curd over the centre of the cheesecake.

Whip double cream until thickened.
Pipe cream around the edge, creating a decorative border.
Garnish with lemon slices / mint leaves or extra lemon zest sprinkled over the top of the whipped cream if you like.
Expert Tips
Make sure to cool the butter after melting, otherwise it can create a greasy cheesecake base.
Adding the butter to the crumbs. I found that when I use Homemade Biscuits the butter absorbs into the crumbs very quickly so make sure not to over mix otherwise it all breaks down too much. However, commercial biscuits are more stable and may take a minute to break down and absorb the butter properly and create the right ‘wet sand’ texture.
You do not need to grease your springform tin.
Take your time shaping the cheesecake crust. To shape a good even crust I like to use both a small silicone spatula and a glass with straight base and edges. Use the spatula to spread out the crumbs in an even layer at the bottom of the tin then switch to the glass to really flatten the base and push the crumbs up the side of the tin. I will sometimes spend at least 10 minutes shaping the sides, spinning the glass around the inside of the tin and using my fingertip to push down and compact the edges. The more tightly packed the crust the less likely it is to fall apart when you cut into the finished cheesecake.
The pie crust should be about 3cm (1 inch) deep.
Adding the double cream. When you add the double cream to the filling ingredients ensure that you don’t overwhip it. I often use an electric hand whisk until it has thickened then finish the whipping off by hand so I can guage exactly when the filling is at the right consistency. You want it firm but still creamy.
Creamy topping. It’s up to you how much cream you use for your creamy topping. The double circle of piping which I use in the photographs here used 300ml double cream. You don’t have to be as extravagant.
Whipping the double cream for the topping. Again, use an electric hand whisk by all means but watch out that you don’t overwhip. It should be in soft pillowy peaks, not stiffly whipped. Underwhip the cream slightly if you are piping it as it tends to firm up further as you start piping.
Use a sharp knife to cut your set cheesecake. And wipe the knife clean between cuts to keep your cuts beautifully smooth and clean.

FAQs
A springform tin is the best one to use for cheesecake. It consists of a circular base and a removable side that can be opened and closed using a latch on the side which means you can remove the cheesecake from the tin without damaging the crust. If you choose one with a non-stick surface it can also help for easy release. This recipe was tested with a 23cm springform tin (23cm (9 inch) round x 7cm (2.5 inches) deep).
Use your favourite gluten-free biscuit for the pie crust. I prefer to use my Homemade Digestive Biscuits but if I’m short on time then shop bought gluten-free oat biscuits like Nairns are very delicious too. Although these Homemade Ginger Biscuits are really delicious here and pair beautifully with the lemon flavour!!
No you don’t. It’s certainly easier that way but if you don’t have one then break up the biscuits as much as possible by hand then place in a plastic ziplock food bag. Use a rolling pin to bash the biscuits in the bag and keep going until they reach fine crumbs. You can add the cooled melted butter into the bag and mix it together in the bag too.
It is possible to use low fat but it’s not my favourite swap as the taste and really creamy texture will be compromised.
I recommend allowing at least 8 hours (overnight is best) for your cheesecake to properly set. There’s nothing worse than cutting into a cheesecake and it turns out to be too sloppy.
Yes, this Gluten-Free Lemon Cheesecake keeps well for up to 5 days when you follow the storage instructions below.
I recommend storing cheesecake in the cake tin you made it in which will help protect it. Then wrap it up well in plastic wrap and keep in the fridge. It can then last for up to 5 days.
Absolutely. This cheesecake freezes very well. I suggest freezing without the topping though as it’s easier to store. If you can spare the tin I recommend freezing in the cake tin to keep it nice and secure. Double wrap in plastic wrap and aluminium foil. You can freeze for up to 2 months. Thaw overnight in the fridge.

Flavour Variations
Lemon Berry Cheesecake. You can skip the lemon curd topping and add fresh berries to the top instead. It's a lovely switch up when fresh strawberries and raspberries are in season.
Blueberry Lemon Cheesecake. Again, remove the extra lemon curd and spoon a fresh blueberry compote over the top of the cheesecake. Blueberries and lemon are such a classic flavour combination and the compote is a lovely addition to this creamy dessert.
More Gluten-Free Cheesecake Recipes You’ll Love!

Enter your email below to get this recipe sent to your inbox plus get new recipes, baking tips, and updates.
Gluten-Free Lemon Curd Cheesecake (No Bake)
Ingredients
Biscuit Base
- 440 g gluten-free digestive biscuits*
- 150 g unsalted butter - melted and cooled
- ½ teaspoon salt
Lemon Curd Cheesecake Filling
- 360 g cream cheese
- 90 g sour cream
- 45 g icing sugar
- 190 g lemon curd*
- 270 g double cream
Topping
- 170 g lemon curd
- 330 g double cream
- 1 fresh lemon - sliced
Instructions
Biscuit Base
- Drop the biscuits into a food processor and process until they reach fine crumbs.
- With the mixer still running add the cooled melted butter and salt and mix until the mixture resembles wet sand.
- Tip the biscuit crumbs into an 23cm (9 inch) round x 7cm (2.5 inches) deep springform cake tin.
- Use a silicone spatula or the base of a glass to press the crumbs into an even layer at the base of the cake tin and up the sides. The pie crust should be about 3cm (1 inch) deep. Place in the freezer for 30 minutes to set (or in the fridge for 1 hour).
- Once the biscuit base has set then remove it.
- Ensure that the base is firm, and the sides are well-formed and then pour in the lemon curd cheesecake filling.
Lemon Curd Cheesecake Filling
- Place the cream cheese, sour cream, lemon curd and icing sugar in a large bowl. Mix together until the mixture is very smooth.
- Pour in the double cream and mix again using an electric hand beaters until the filling has thickened. It should have firmed up but still be ultra creamy and floppy so it can easily drop off a spoon.
- Spoon the filling into the cooled biscuit base. Use a silicone spatula or the back of a spoon to smooth the surface of the cheesecake filling, ensuring an even(ish) layer.
- Cover the tin with plastic wrap then place the assembled cheesecake in the refrigerator to allow it to set overnight (at least 8 hours).
- Just before you are ready to serve, carefully remove the sides of the springform pan and lift out the cheesecake onto a serving dish and add the topping.
Topping
- Spoon the 170g lemon curd over the top of the cheesecake in the centre and smooth into an even layer, taking it to the edges with a silicone spatula.
- Mix the double cream with an electric hand whisk in a large mixing bowl until thickened and pillowy.
- Pour the cream into a piping bag then pipe around the edge of the cheesecake, creating a decorative border.
- Garnish with the additional lemon slices for a finishing touch.
- Serve the Lemon Curd Cheesecake immediately or chill until ready to serve.

I made this cheesecake for some friends of mine, loved it. I made my own lemon curd following the recipe and tastes better than that in the jars.....yummy
I'm so happy you enjoyed the cheesecake!! Thank you for leaving your feedback.
Thank you so much for this recipe.
We loved this recipe but had one small issue, we won't be using salt in the base next time.
I used 'normal' store bought digestives as we don't need gluten-free and I used store bought lemon curd. Next time I will definitely be making our own lemon curd though.
For the filling I substituted half Mascarpone and half Ricotta for the cream cheese.
This has gone into my 'best recipes' folder.
I'm so happy you enjoyed the cheesecake! Thank you for leaving your feedback.