Gluten-Free Lasagne
This post contains affiliate links. Please read my disclosures.
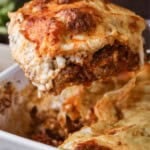
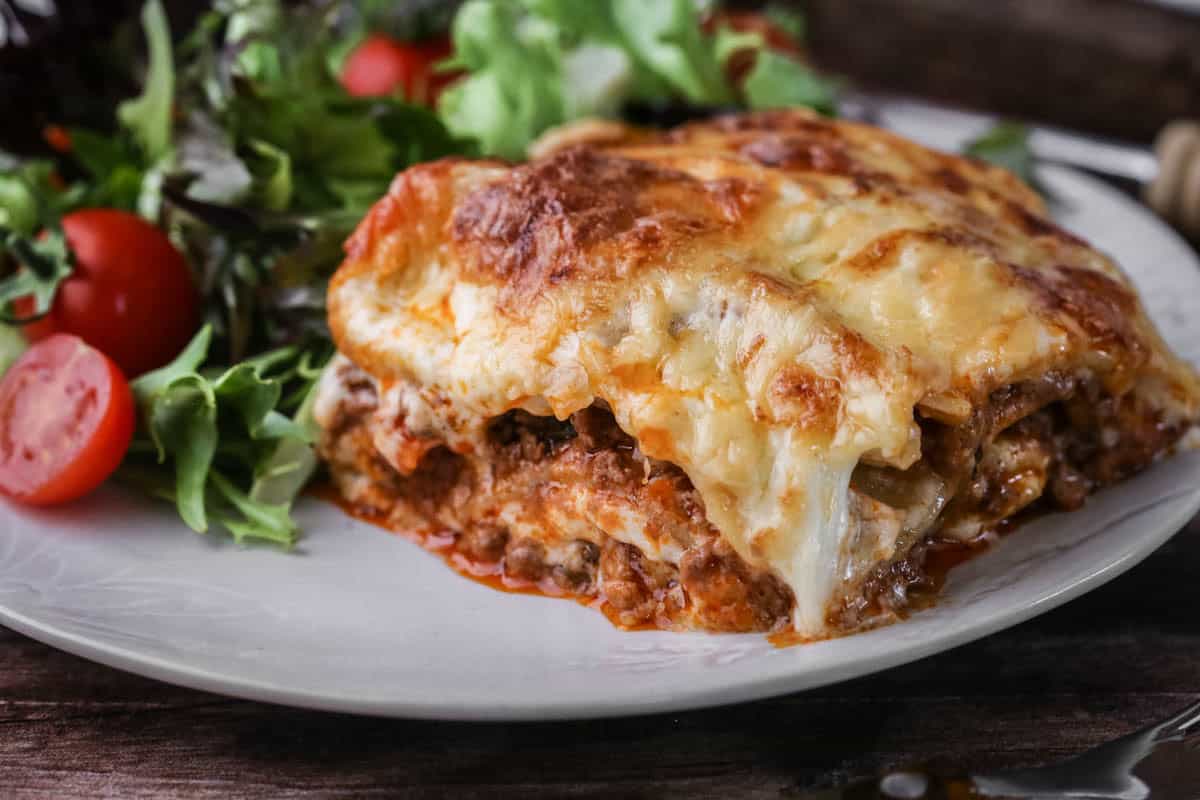
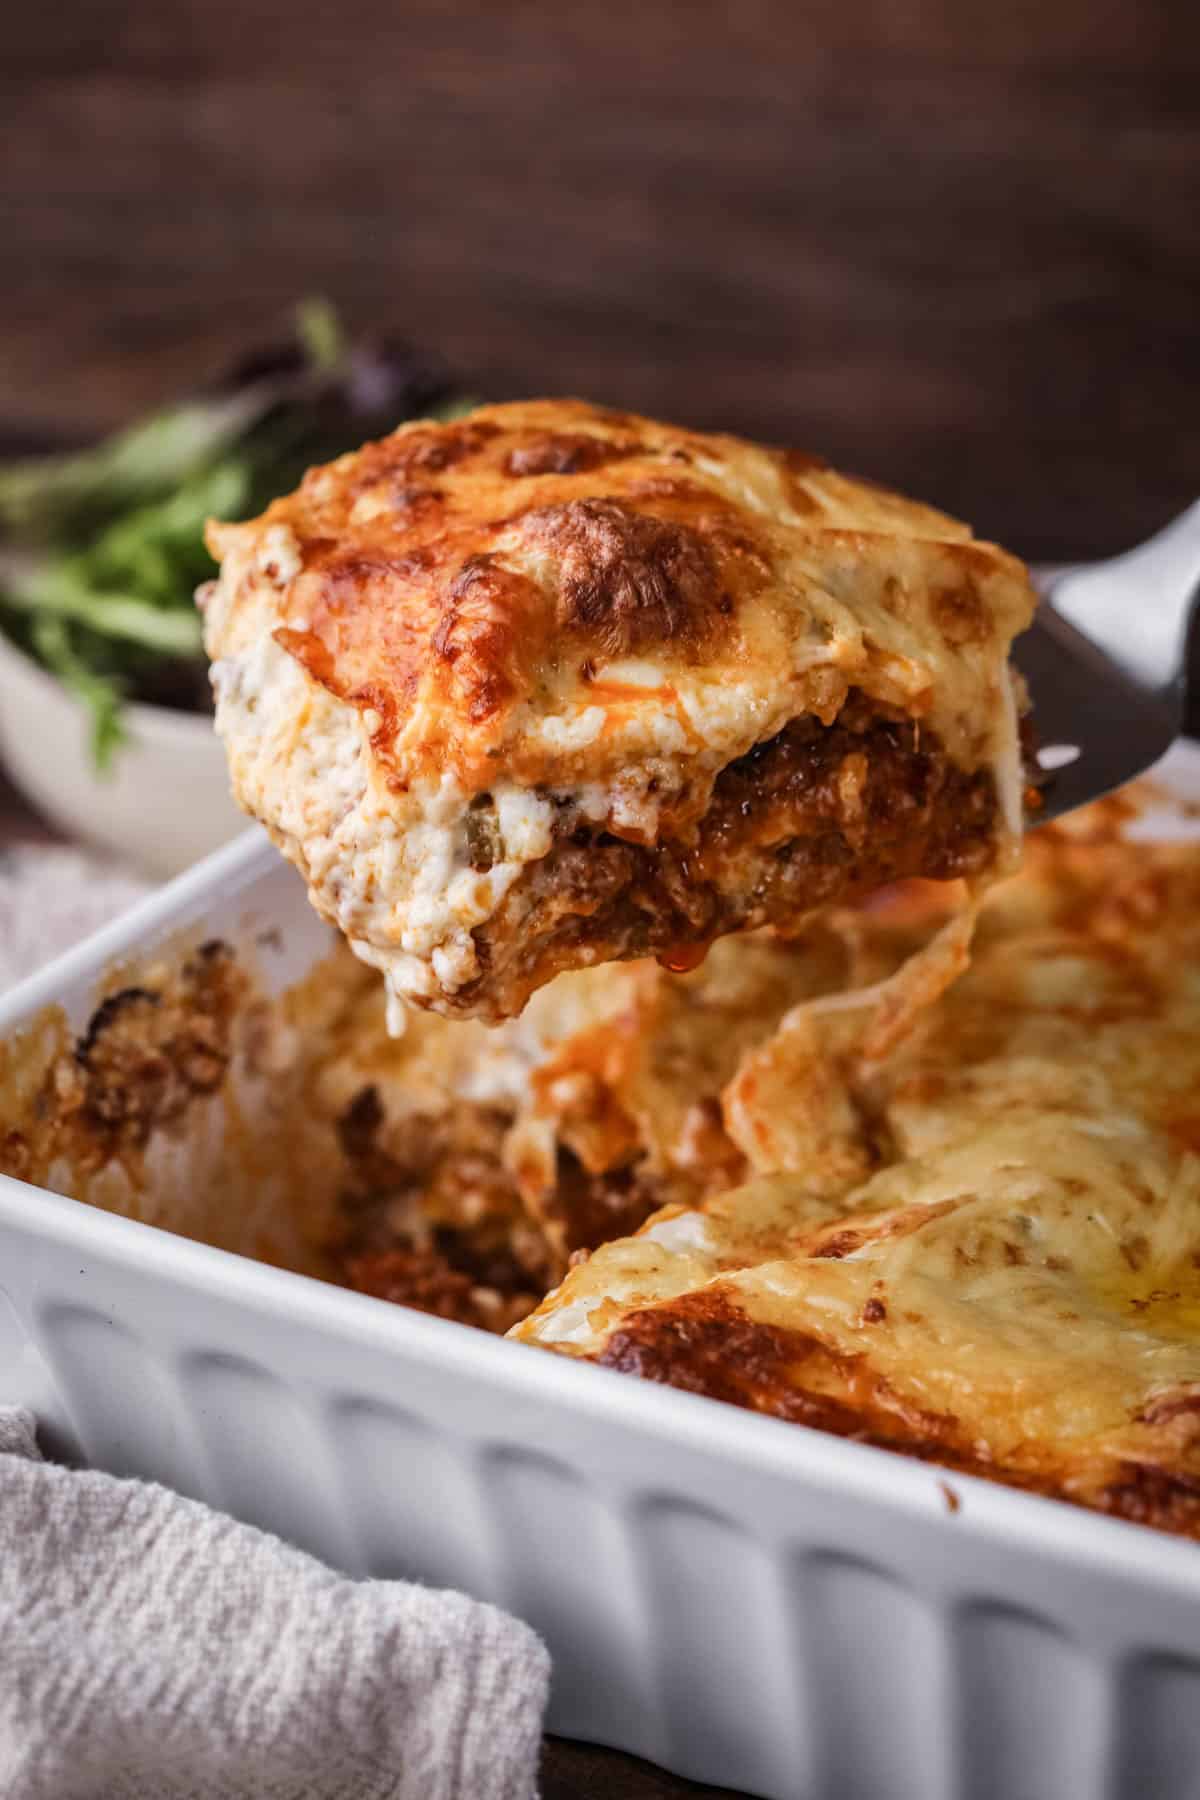
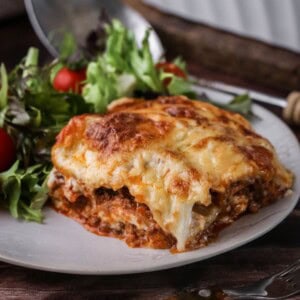
Gluten-Free Lasagne is an unbeatable comfort dinner. Rich beef and pork ragù is layered between gluten-free pasta and a rich béchamel sauce. Topped with mountains of grated gruyere and mozzarella then baked until golden. Here are all the tips and step by step advice to make your favourite lasagne perfectly gluten-free.

If you’ve experienced bad gluten-free lasagne, don’t worry you are in safe hands here. Let me assure you that we have pasta layers that are soft and tender (indistinguishable from regular pasta), a rich full bodied béchamel (as we use the correct gluten-free flour) and the same cosy delicious family dinner you’ll recognize from your childhood.
This recipe was updated in March 2026 to reflect my mum’s correct feedback who found my previous version a little dry (she was right – it was). Now it is much saucier and doesn’t include chicken livers (which I can never be bothered to buy these days) but uses a little pork mince alongside the beef mince instead for that deep meaty flavour. Plus I only pre-cook the top layer of lasagne sheets (instead of all of them) and use a deeper lasagne dish for chunkier layers.
Not to be the food blogger that chats about how this is their [insert female relative’s name here] famous recipe but I’m about to do exactly that so use the jump to recipe button at the top of the page if you want to avoid the cliche. Or hang on for that short story on how my mum fixed my recipe which reveals a little about the recipe provenance and then stick around for the superb tips I will provide throughout the post.
My mum is not a great cook (my dad was a chef so obviously I got his cooking genes there but that’s another story) but there is one meal she can cook and boy does she cook it well. And that is lasagne. It truly is the only thing she can cook. She won’t mind me telling you that she can't cook frozen pizza – don’t worry, she takes pride in her lack of cooking ability. But she also takes huge pride in her lasagne. When I first published my gluten-free lasagne recipe a few years ago I always felt it didn’t quite match up to hers. So I did something Mum was thrilled with, I asked her for cooking advice.
So this recipe you see before you now is the lasagne recipe I’ve been successfully making for the past year which is an amalgamation of my original recipe and my mum’s best tips. It produces a deep four-pasta-layer true British homestyle lasagne. Very saucey, very cheesy and excellent if you serve alongside garlic bread as that is what will mop up your extra sauce (that’s what I was lacking before!).
Lasagne or lasagna?
Let’s begin with the spelling. My spell check does not like fact that I spell lasagne with an ‘e’ at the end. However, I’m not being difficult.
The Italian word ‘lasagna’ really refers to a singular sheet of lasagna pasta. Lasagne is the plural and since the dish in question uses many sheets of pasta, Lasagne alla Bolognese, is the full Italian name of the dish in question.
In the UK we shorten the dish to ‘Lasagne.’ However in the US their version of the dish is spelt Lasagna.
Why You’ll Love This Gluten-Free Lasagne
- Rich and tomatoey beef and pork ragù.
- A really good gluten-free béchamel which is smooth, creamy and richly flavoured.
- Mozzarella and nutty gruyère topping! This ultra gooey cheesy crown gives excellent cheese pull.
- Deep lasagne with four pasta layers.
- Blanching the top layer of dried pasta sheets. You don’t need to blanch them all but doing the top layer just ensures the top layer doesn’t dry out or crisp up.
- Perfect for cosy family dinners or weekend meal prep.
Pre-boiling Lasagne Sheets
You don’t actually have to pre-boil the lasagne sheets. However, I will say that I usually blanch the top 3-4 pasta sheets which make up the final layer. This is not absolutely essential if your béchamel is thick enough to protect your pasta sheets but I have found this extra step makes the recipe totally foolproof so you are not getting any crisp or dry pasta on top which rather ruins the whole affair. This blanching of the top 3-4 sheets (see it depends on the exact dimensions of your dish) takes about 5 minutes and is no bother at all, so well worth it
How To Blanch Lasagne Sheets
Choose a saucepan which is wide enough to fit a sheet of lasagna then fill up to a third with water.
Whilst you are bringing the water up to boil spread a large sheet of baking parchment on your work surface ready for the blanched pasta to rest on.
Once the water is boiling place in one lasagna sheet with a pair of tongs. Boil the pasta for 1 minute then remove with the tongs and place on the baking parchment to rest whilst you blanch the remaining sheets.
Blanching the pasta sheets one at a time ensures they don’t stick together.
Ingredients Needed
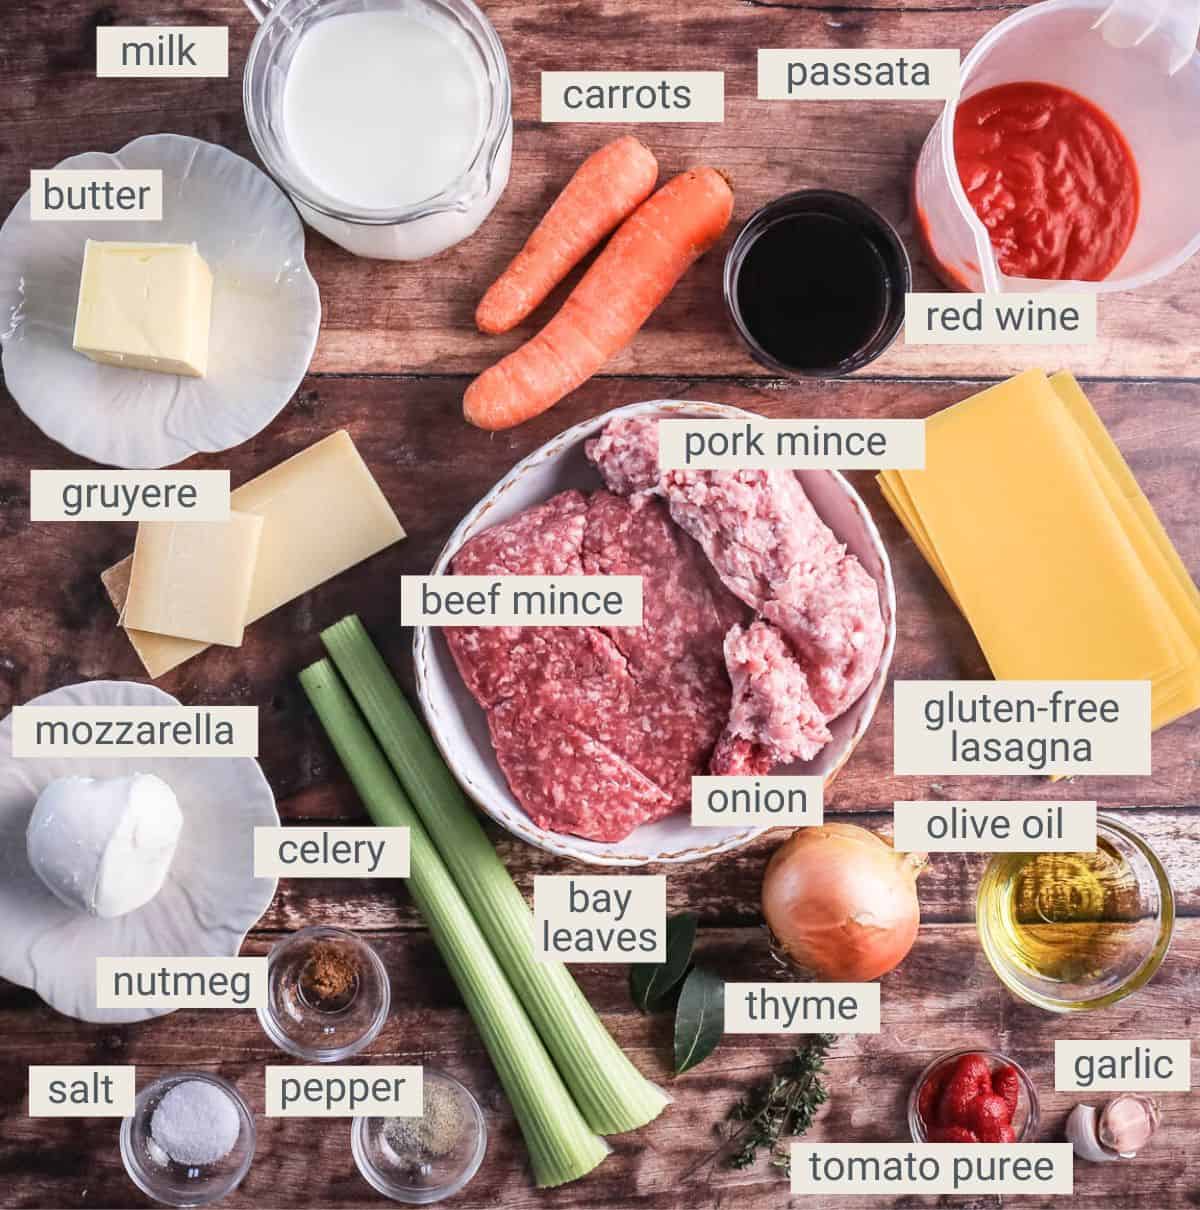
Olive oil. I use a mild light olive oil but you can use any you have. Or you can use vegetable oil if you like.
Soffrito. This is a triumvirate of white onion, celery and carrots which are finely diced and cooked in the olive oil until soft and fragrant. They are a great flavour base for our lasagne.
Meat. I like to use a majority mix of good quality beef mince. I always purchase all my meat from Field & Flower in the UK as they guarantee grass-fed beef and the mince is between 10-15% fat. I also use pork mince for a deeper well-rounded meaty flavour and gives a little more juiciness to the ragù.
Garlic cloves. You can use fresh garlic or lazy garlic if you are a time poor mum of 4 (just me?) or you can’t find your garlic crusher which I never can (probably because I’m always using lazy garlic so the garlic crusher is perpetually hidden at the bottom of the drawer).
Red wine. I don’t drink red wine so we don’t really keep it in so there was a time when I just eschewed red wine for stock every time I made lasagne. Then one dinnertime I tasked Luke with making the ragù and he dredged up a bottle of wine from somewhere. It made such a difference in flavour that I now always buy in a little bottle (or can as that’s how they come these days) especially for making ragù. Only skip if you need to avoid alcohol and then you can sub for beef stock.
Passata. I prefer the smoothness of a jar of passata than a tin of tomatoes which can be a little thin or watery. If you only have a tin of tomatoes in then you can substitute by blending it with an immersion blender straight into the freshly opened can.
Tomato puree. This is pretty straightforward. I use it from the tubes.
Herbs and seasoning. Salt and pepper is a must. Bay leaves and thyme leaves should be fresh if you can. If you know me then I will only be forced to use dried herbs under utter duress as they don’t taste very good imho.
Gluten-free lasagna sheets. I do find supermarket dried pasta is far superior than it used to be. Most brands are okay. I use Sainsburys’ Free From own brand which is a mix of rice, maize and quinoa flours. I like this blend of those three flours as the addition of quinoa especially means the pasta is cooks up tender rather than gummy or leathery.
Cheese. I am well aware that using cheddar in lieu of parmesan is sacrilegious in a lasagne recipe. What can I say, I’m uncouth and uncultured and this is what we grew up with as my mum hates parmesan. I love parmesan but I am rather used to the alternative. Although I’m going to throw a spanner in the works as actually I will use gruyère if I can as I love the nuttiness. My mum also melts an extra 100g of cheddar or gruyère into the finished béchamel. So I do recommend this if you like things really cheesy although I haven’t chosen to do that here as I think it's already a beautifully rich dish. I add torn mozzarella to the top of the lasagne too as I can’t resist that cheese pull and chewy topping.
Unsalted butter. Use this for the béchamel. Unsalted means you can control the salt content. You can use a plant-based alternative if you are making a dairy-free lasagne.
Cassava flour. This is my preferred choice for a gluten-free roux based sauce. It gives a gorgeously smooth and creamy result. Sweet rice flour can be used instead (not regular rice flour) but it can be a little gummy in excess.
Whole milk. Always choose whole milk over semi-skimmed. You need the richness to give the sauce body and flavour. If you are making a dairy-free version then I like oat milk or almond milk the best.
Ground white pepper. We use white pepper for the colour really so it blends suitably into the colour of the sauce.
Freshly ground nutmeg. If you have a whole nutmeg and can grate it straight into your sauce then that gives the best flavour. Ready-ground nutmeg is just fine though.
Salt. I always use kosher salt as that is simply what I keep in my kitchen (except for finishing sea salt). It gives a gentle flavour which isn’t as harsh as table salt. If you are using table salt then use less to taste.
How To Make Gluten-Free Lasagne
For full recipe instructions go to the recipe card at the end of this post.
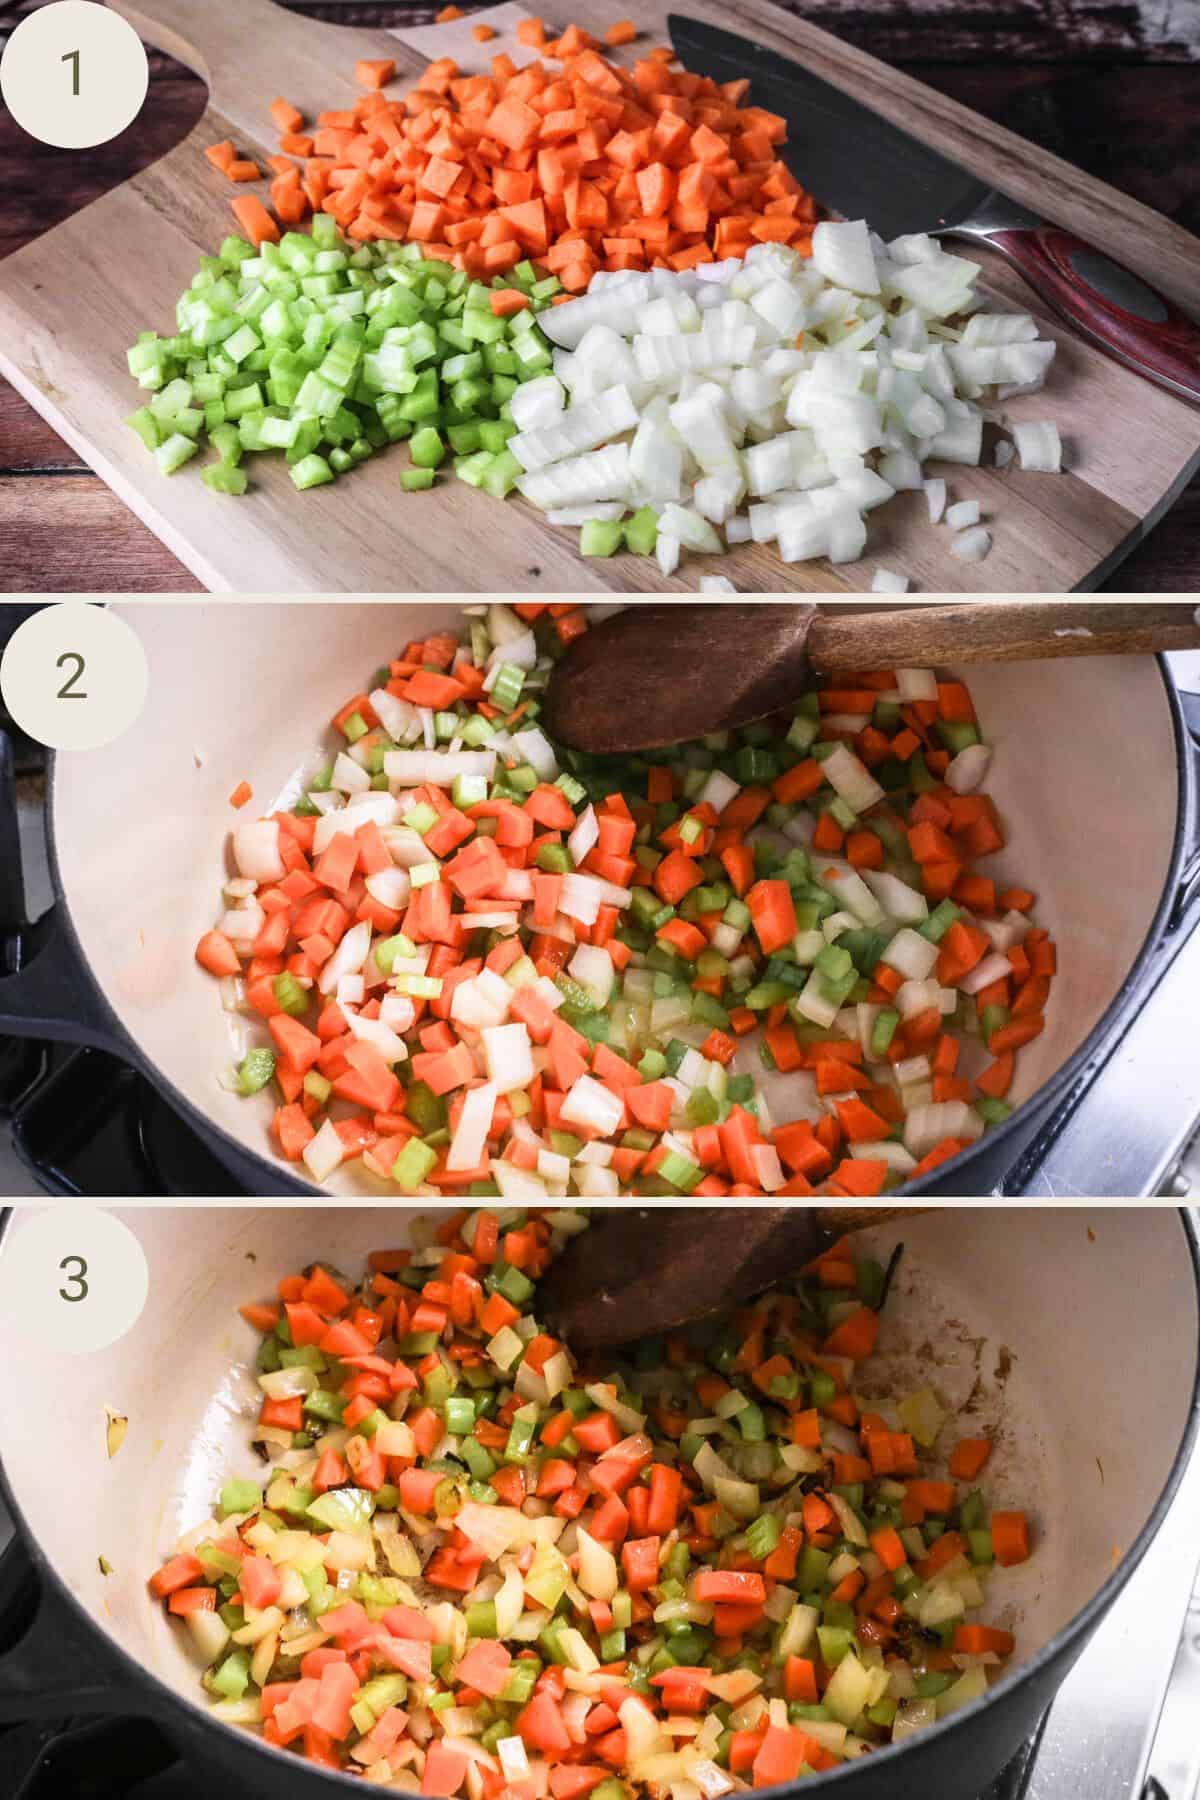
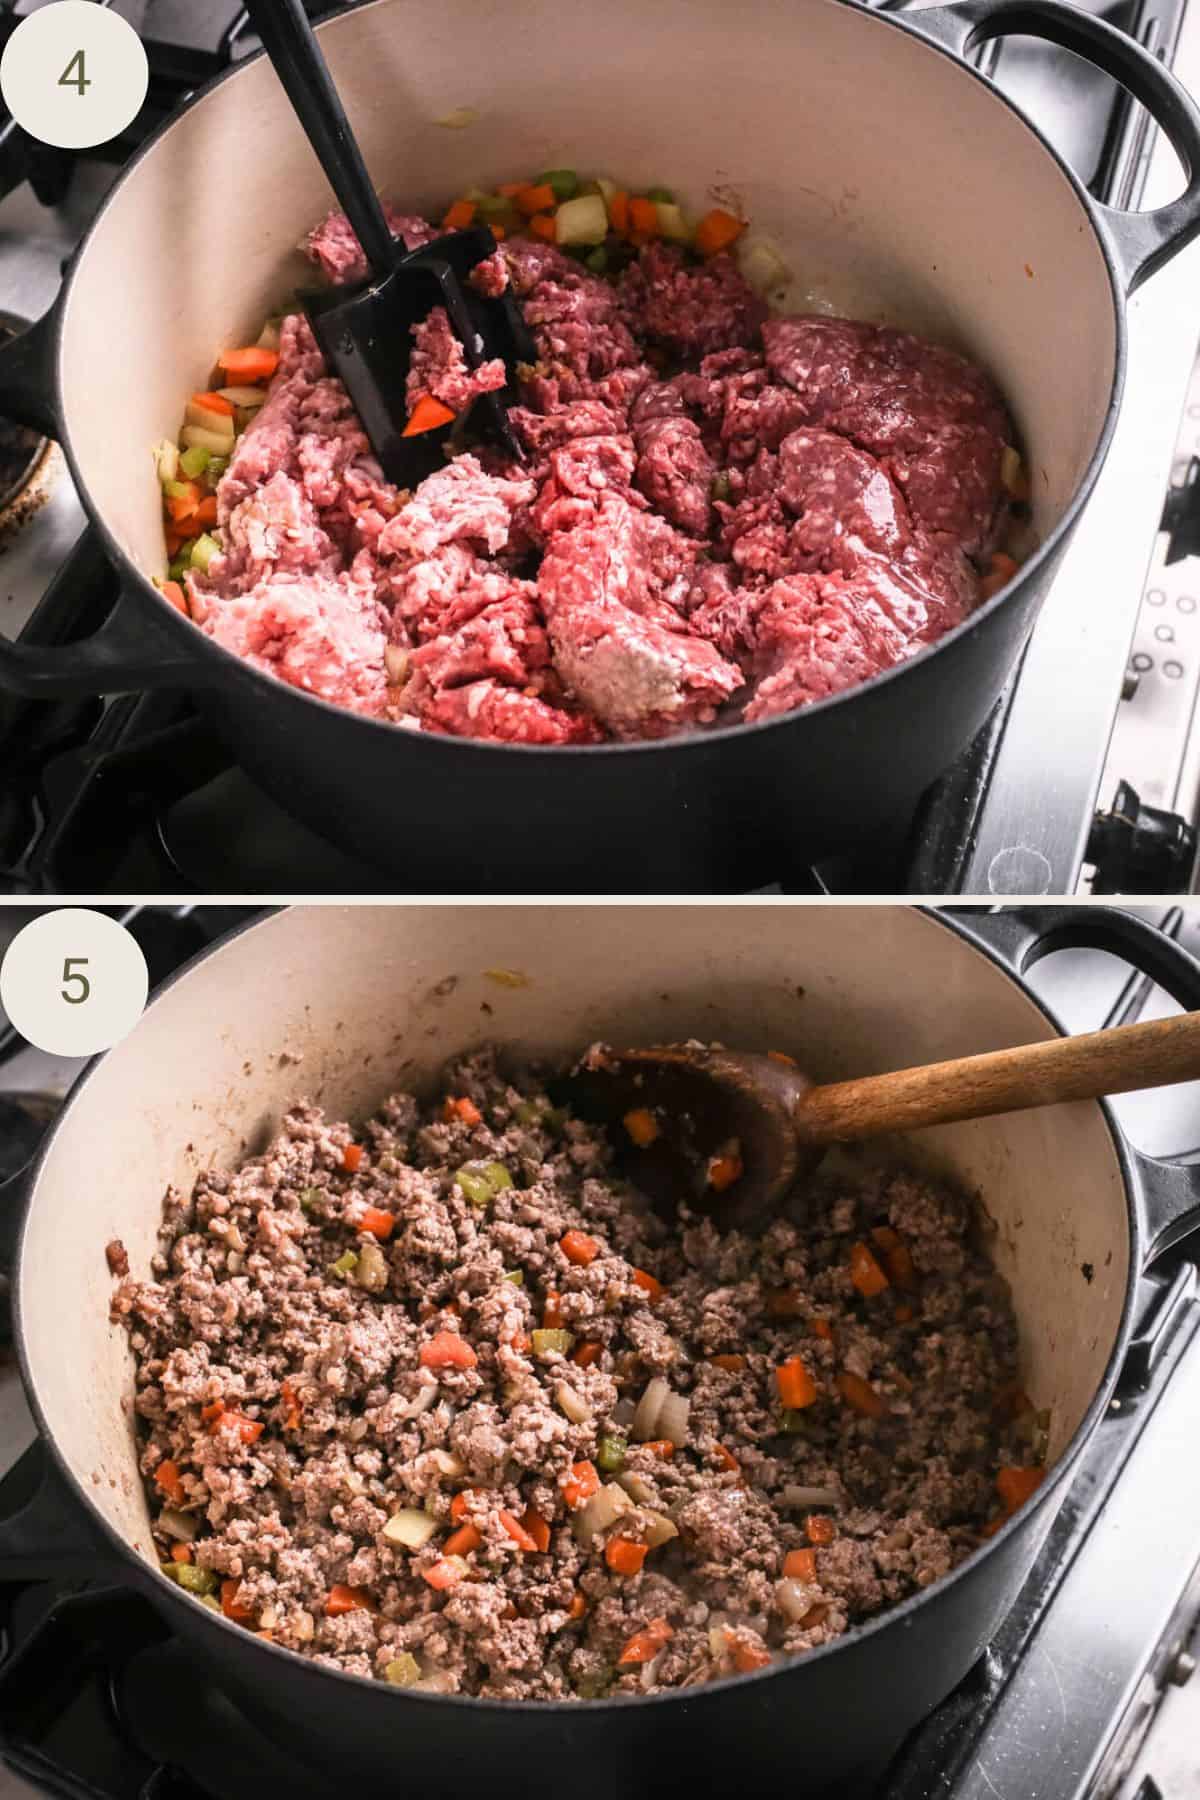
Sauté onions, carrots and celery in a wide bottomed saucepan until the onions are translucent.
Add the beef and pork mince with garlic and and stir in until the beef has crumbled and browned.
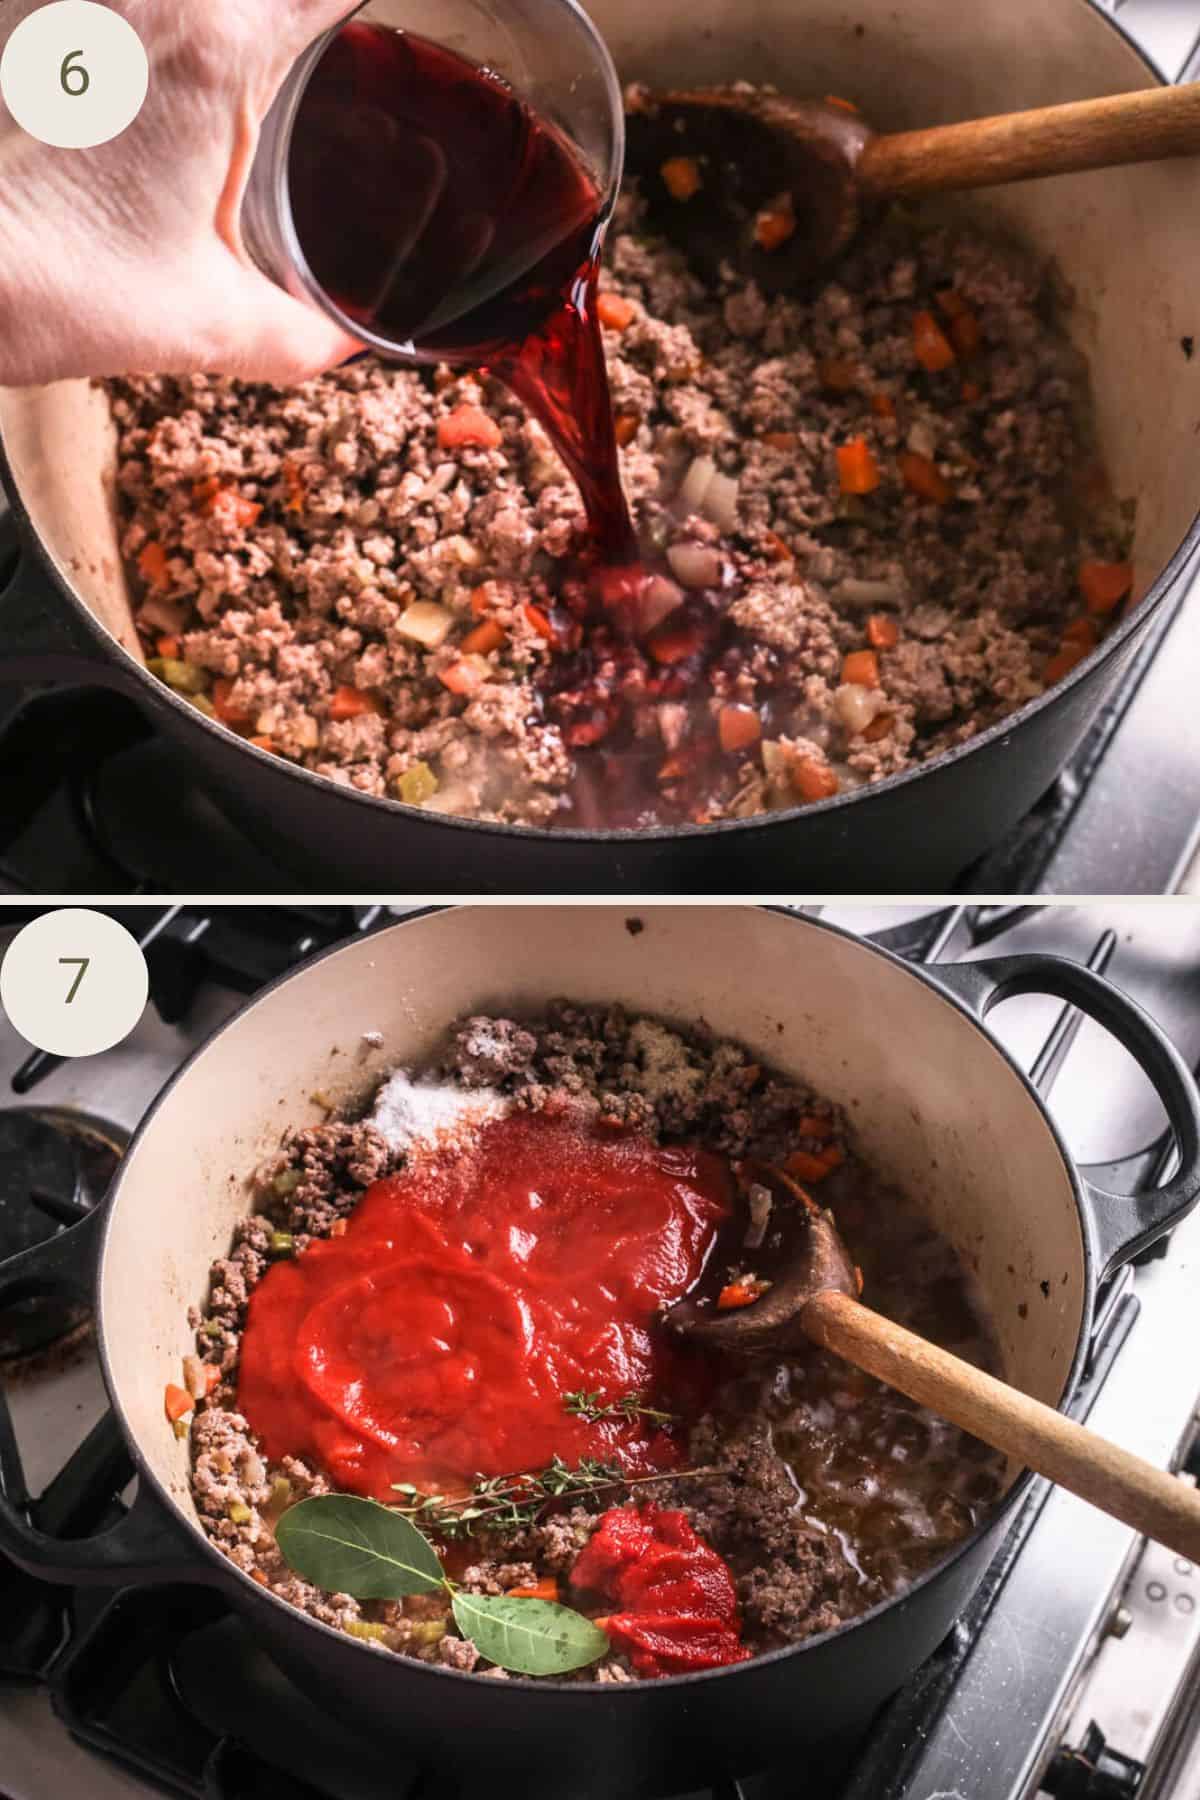
Pour in a glass of red wine, let bubble for a couple of minutes then stir in the tomato puree, thyme, bay leaves, passata and seasoning.
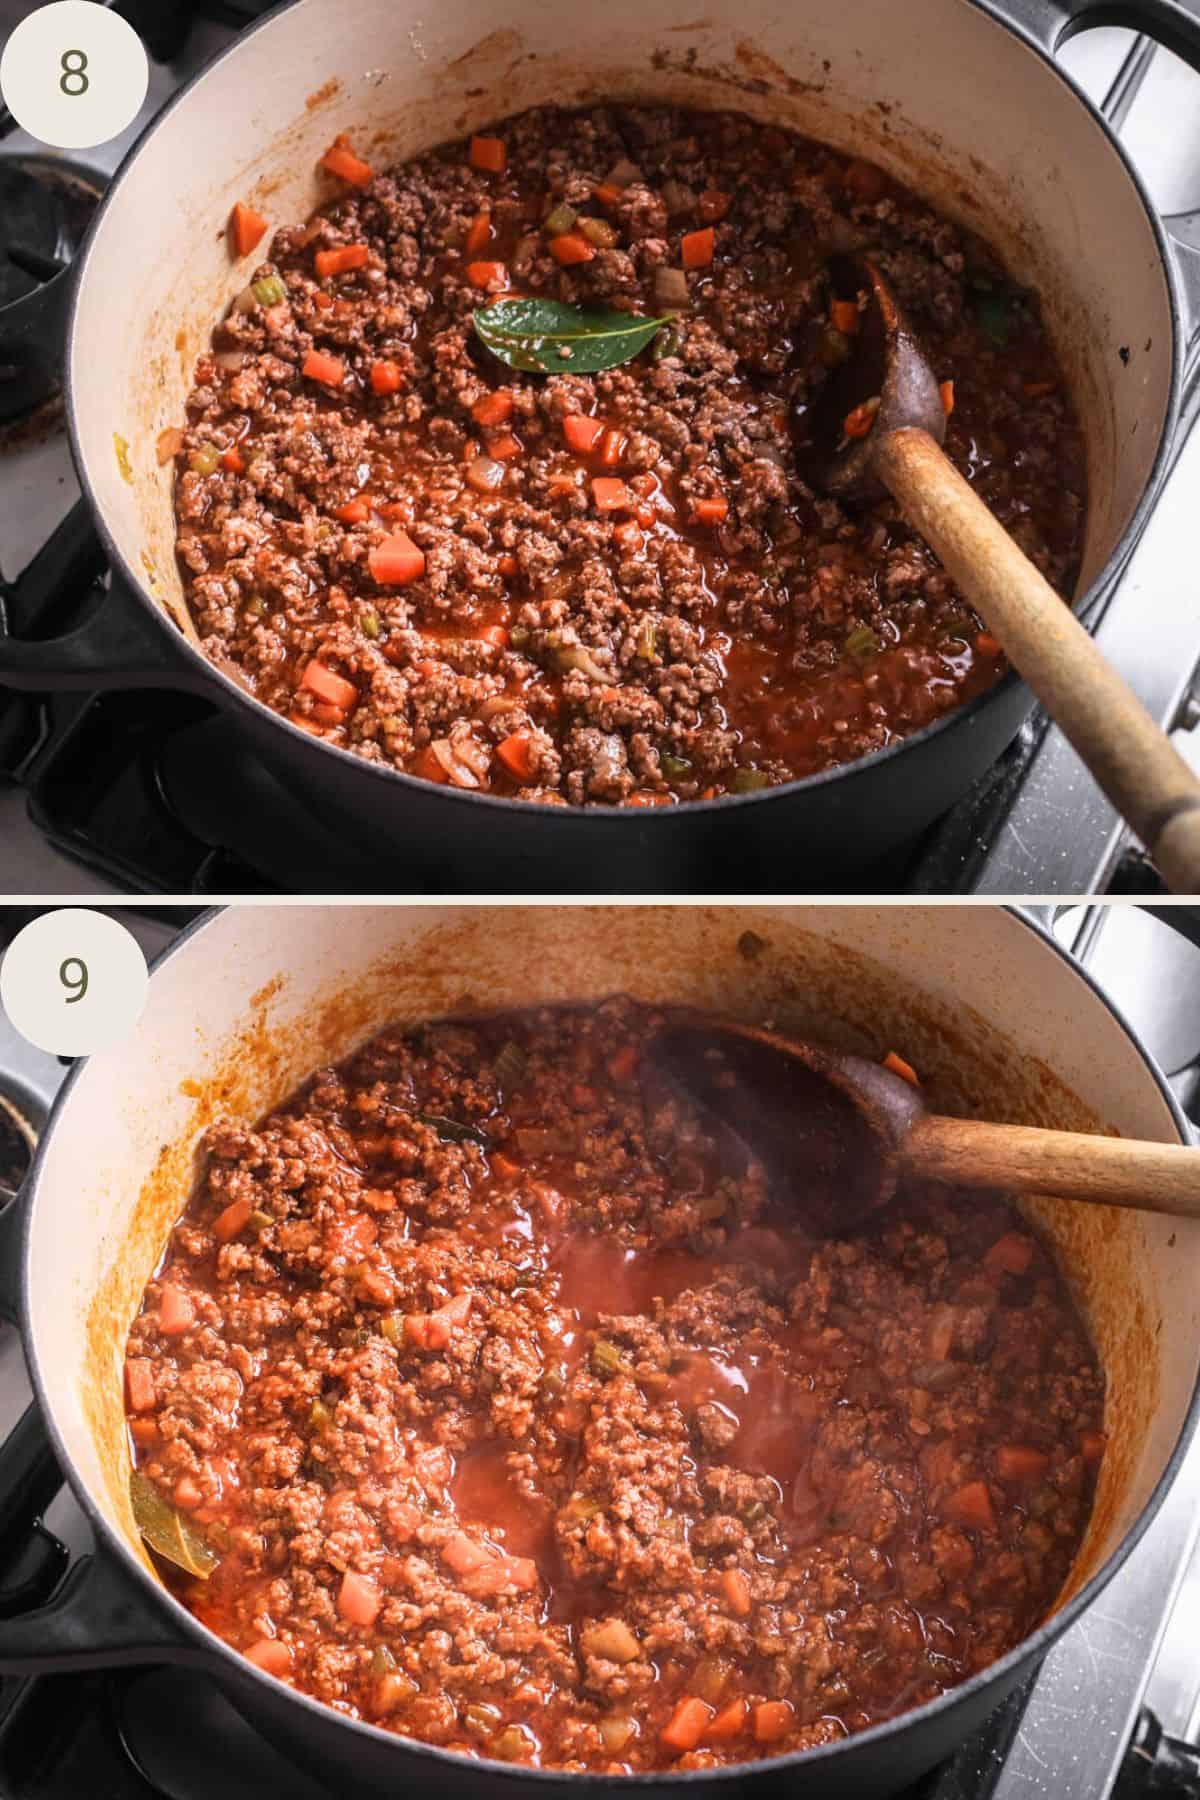
Place a lid on the ragù and simmer for 30 minutes.
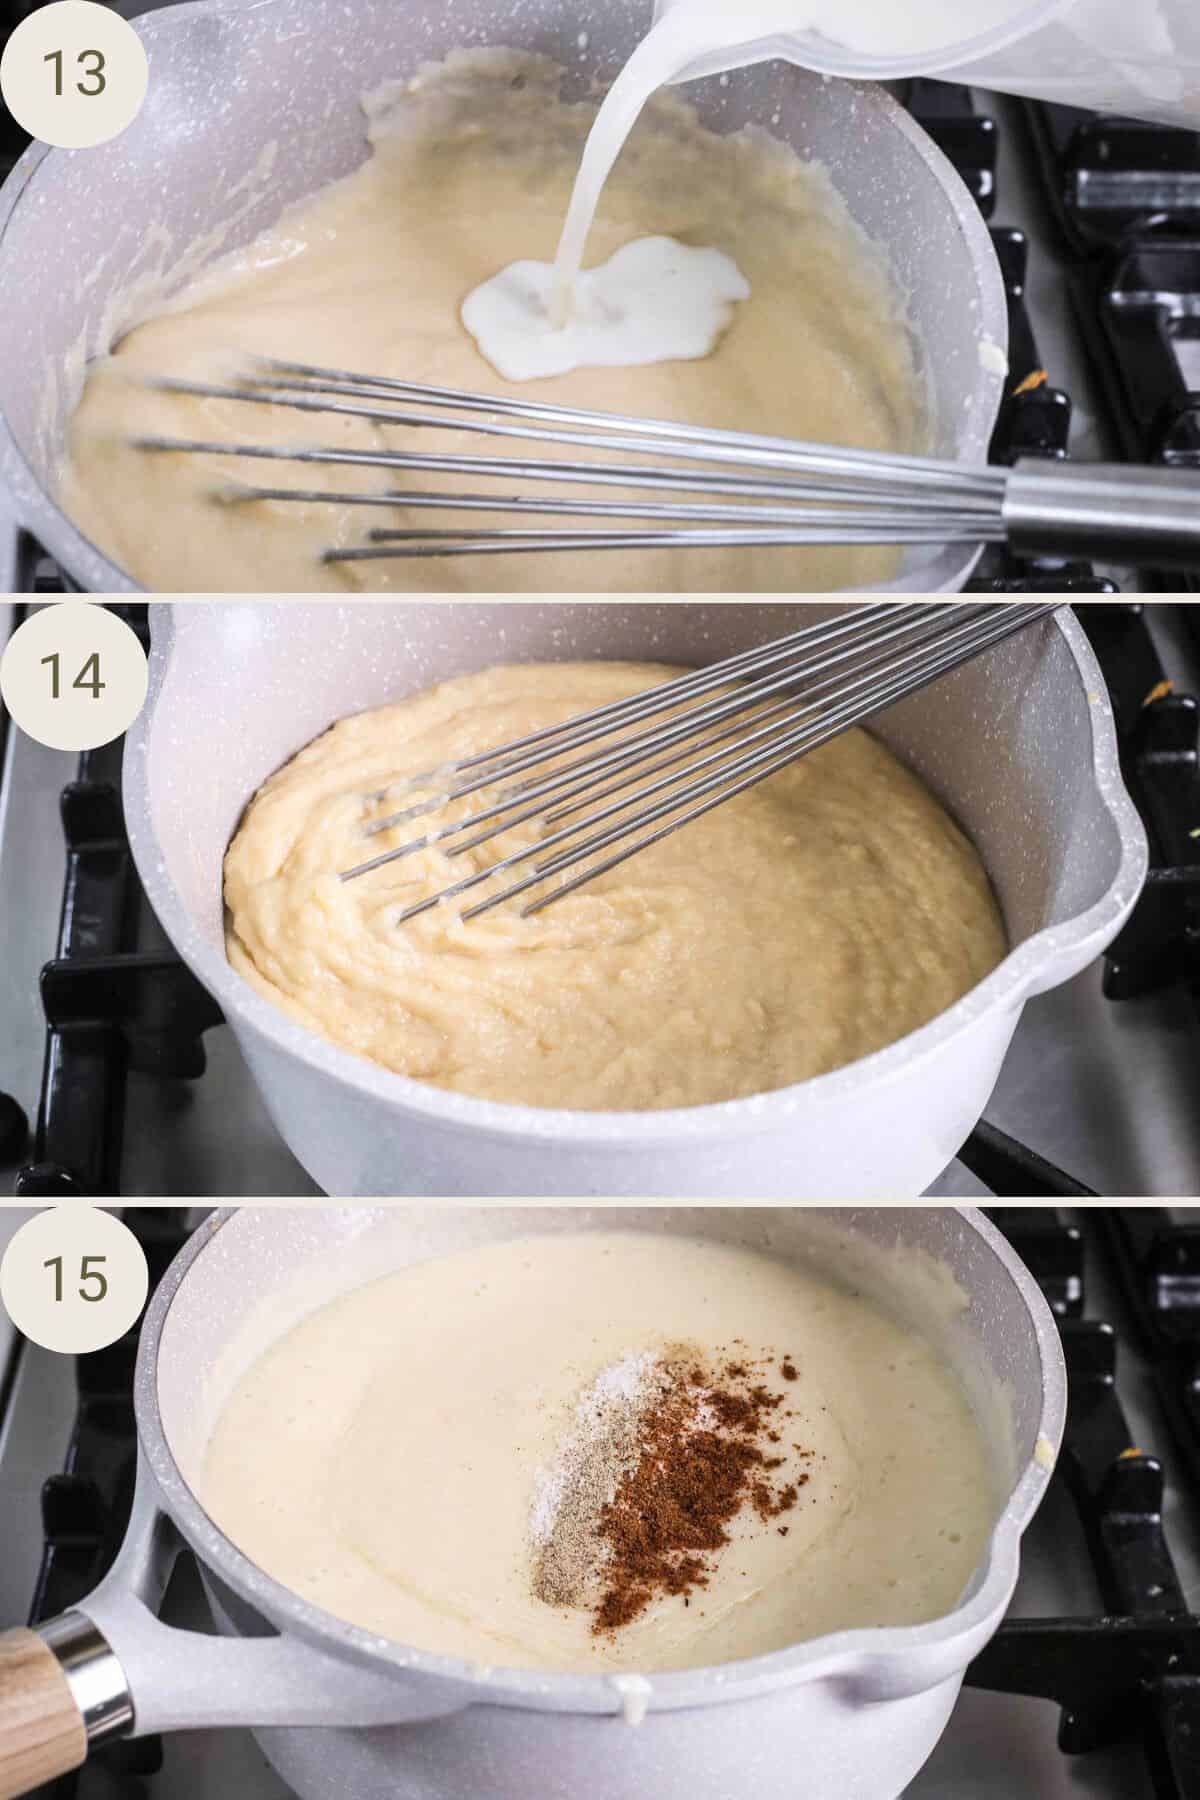
To make the béchamel melt the butter and whisk in the cassava flour. Cook for 2-3 minutes to remove the raw flour flavour.
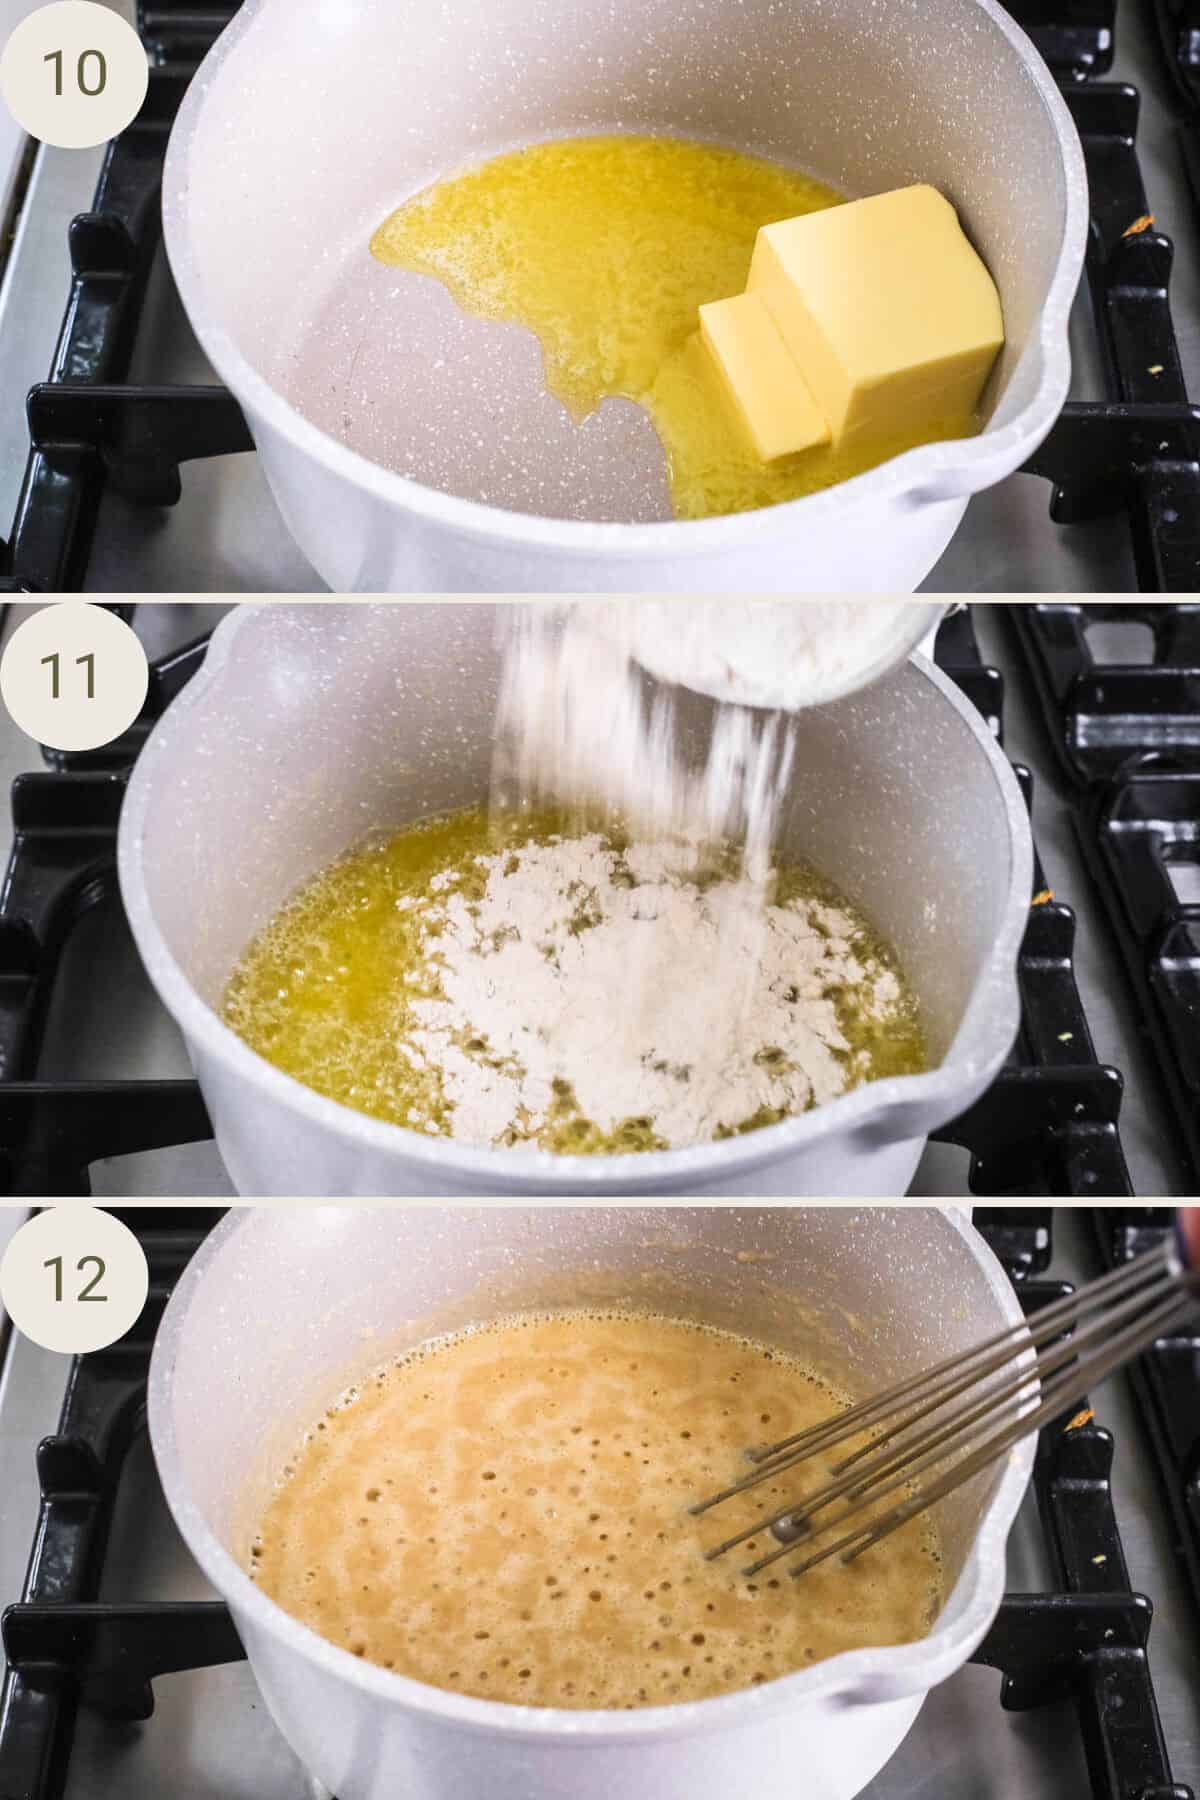
Gradually add the milk, whisking the mixture continuously. Simmer the sauce until thick and season with salt, pepper and nutmeg.
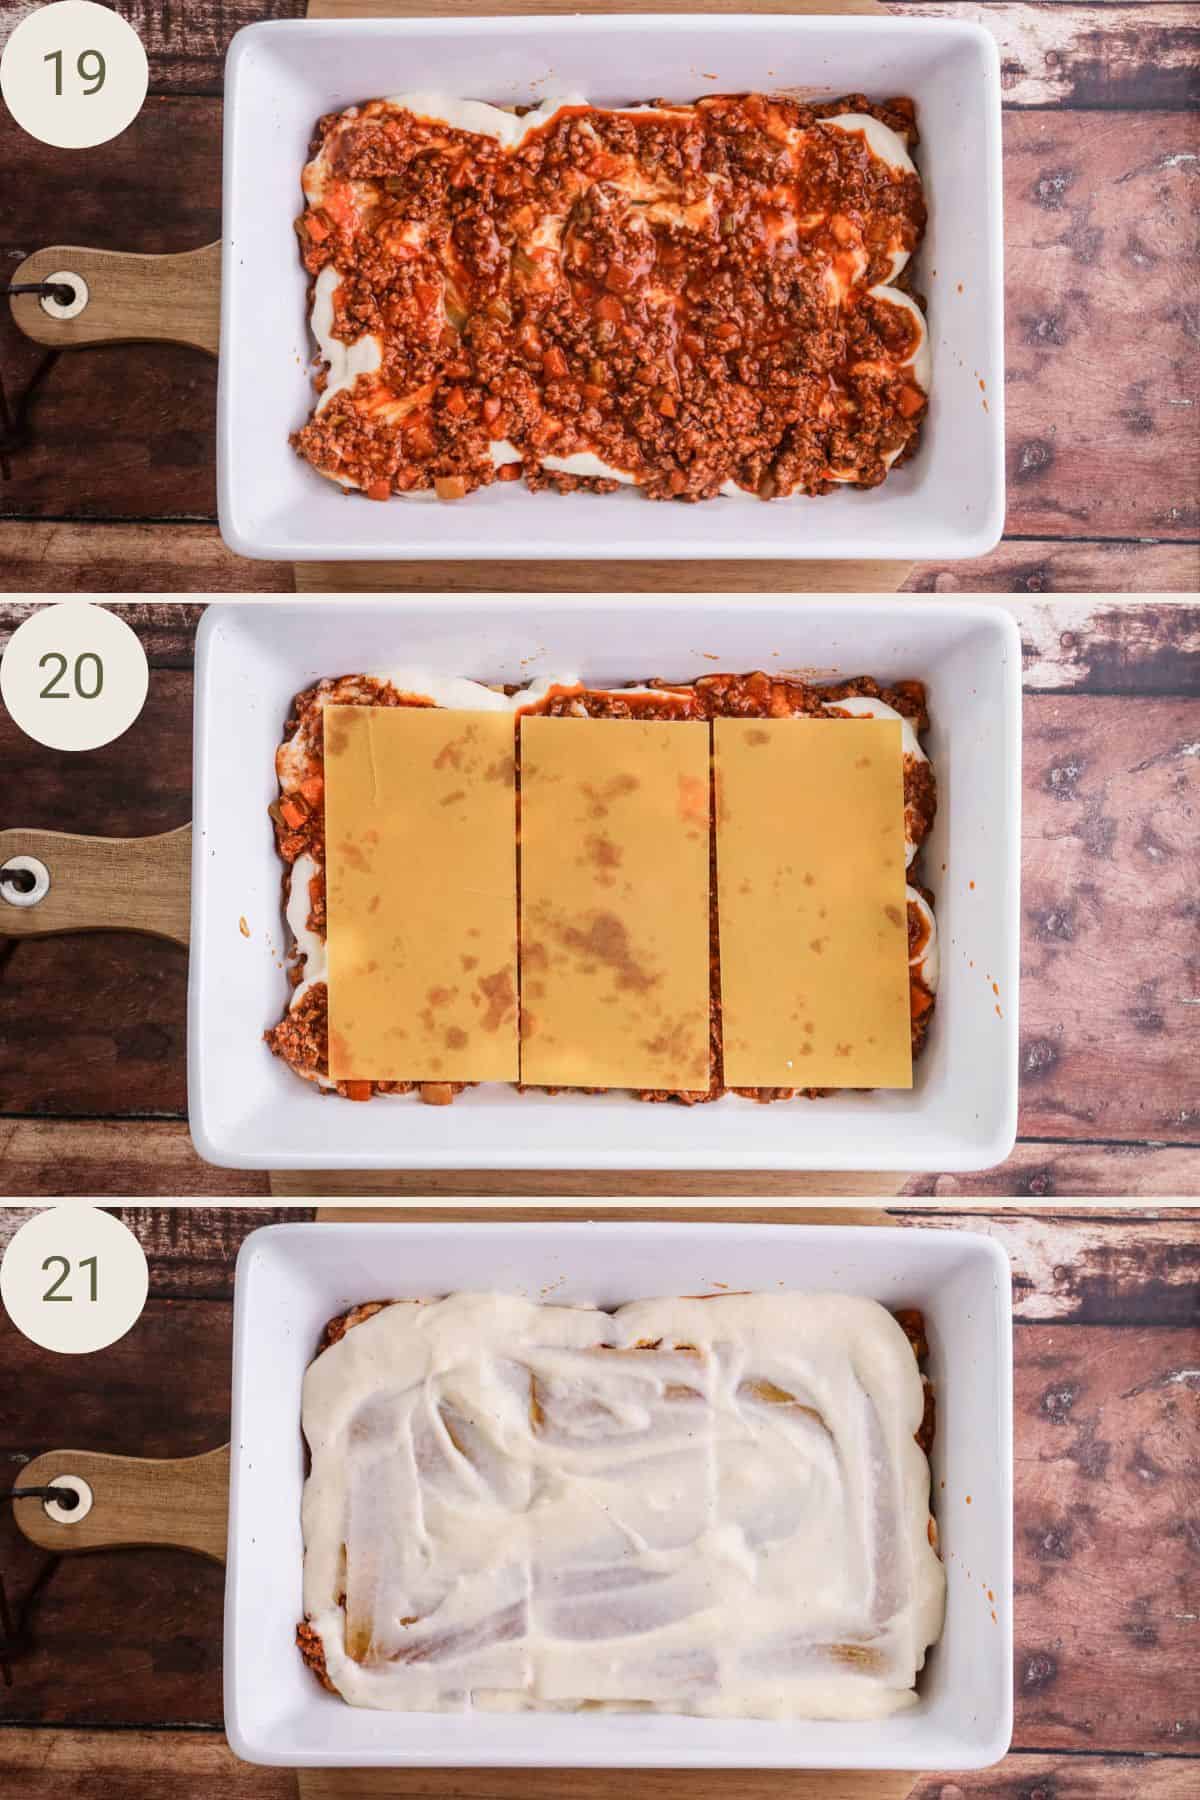
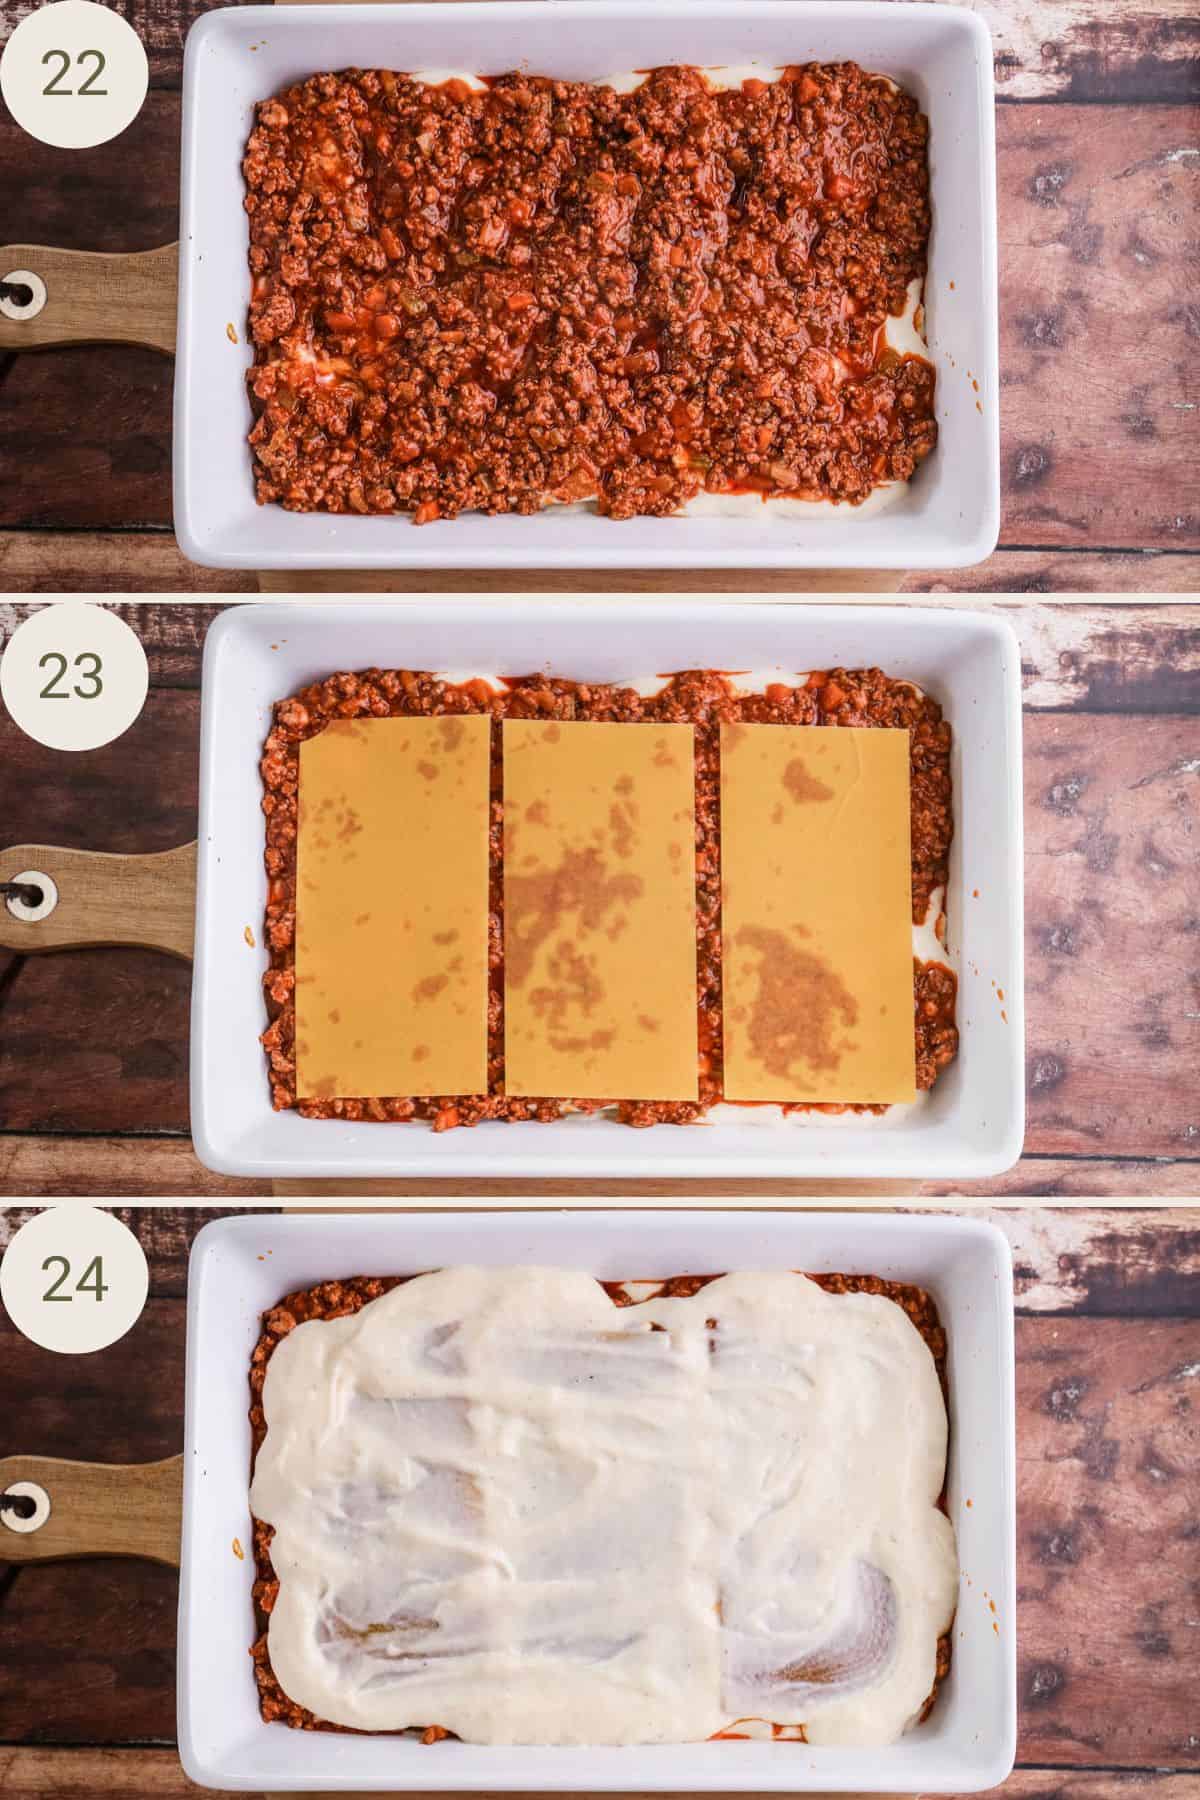
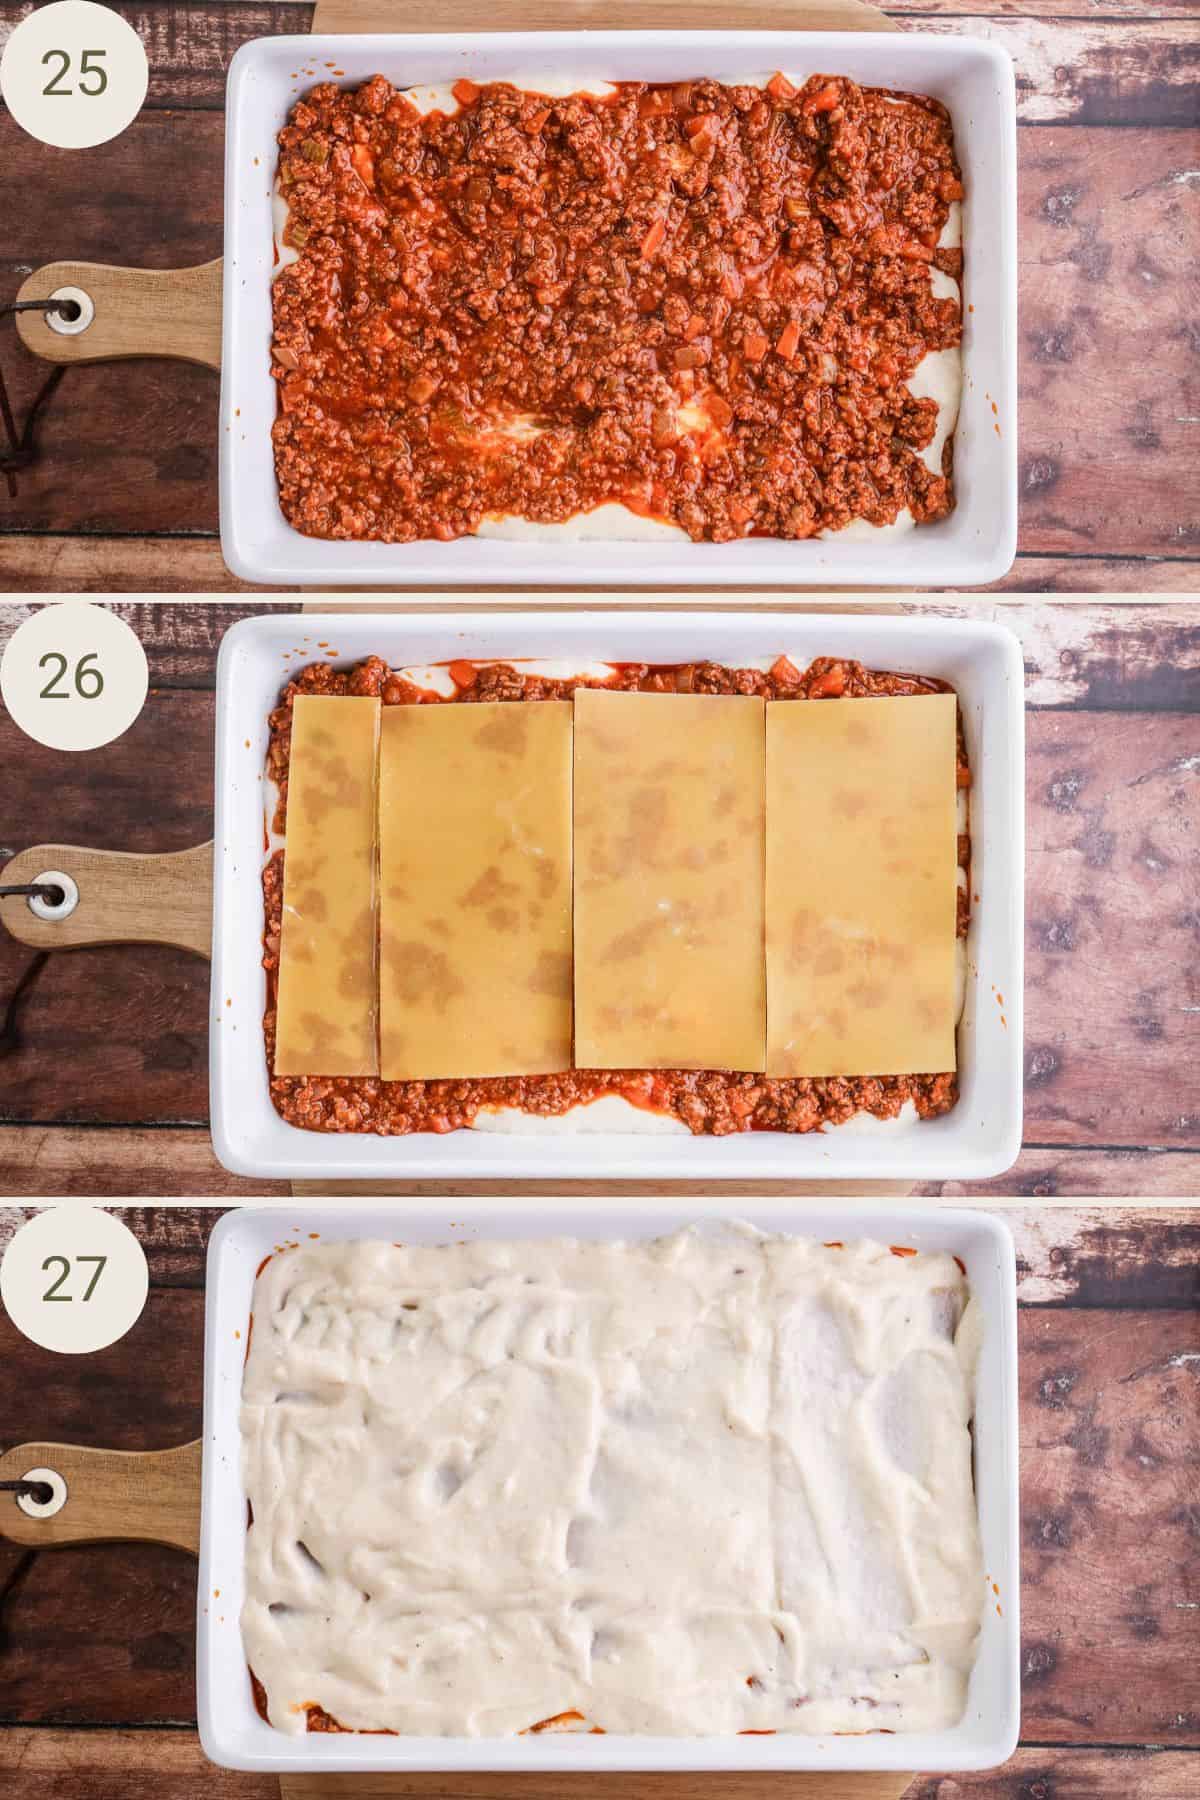
Assemble the lasagne by layering your ingredients. Start with the ragù, then the pasta sheets, then the béchamel. You’ll have about 4 layers. Make sure to use blanched pasta sheets on the top layer.
Layer 1

Layer 2
Layer 3
Layer 4
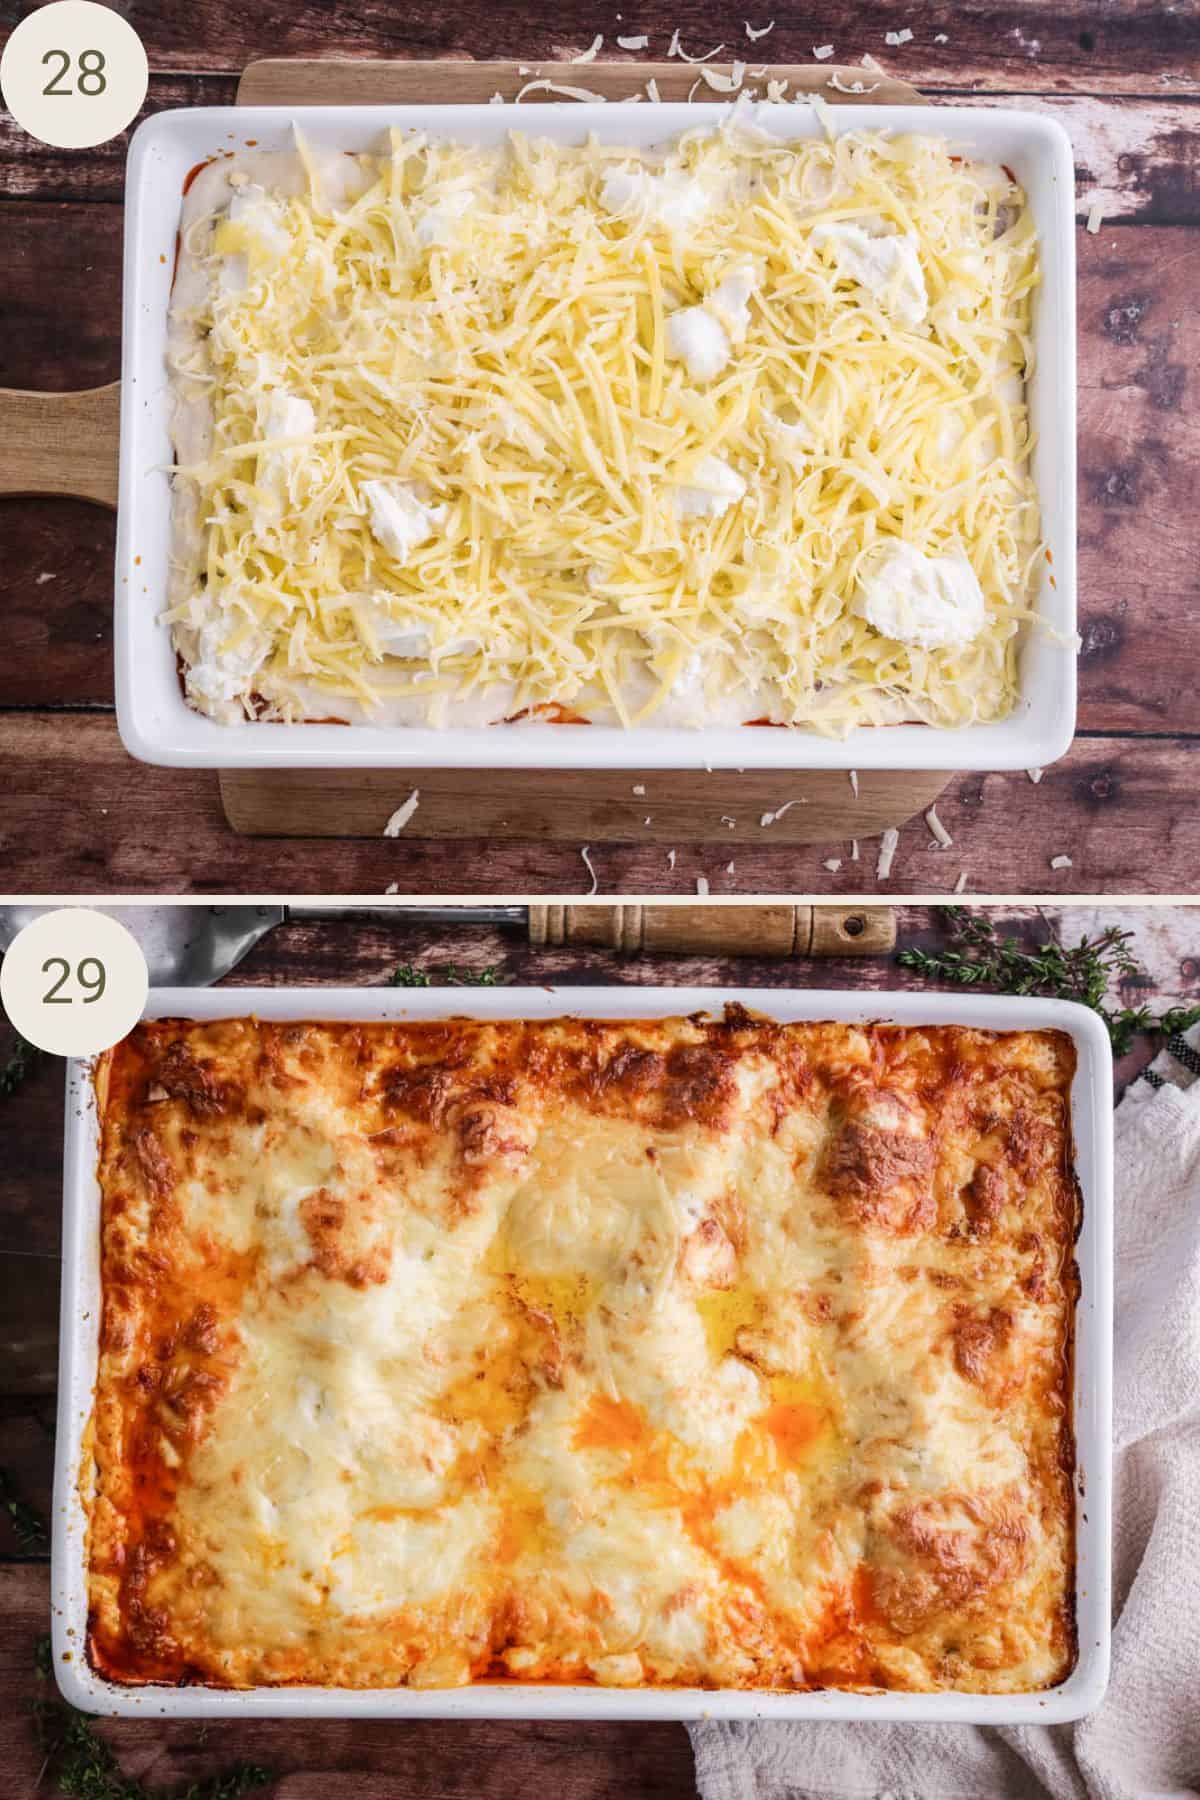
Sprinkle over some torn mozzarella and grated gruyere over the final layer of béchamel. Bake in the oven for 50-55 minutes.
Tips and Troubleshooting
Blanching the pasta sheets. I do find this necessary when dealing with gluten-free pasta which can dry out much more easily. However, you only need to blanch the top layer of pasta sheets. This will help to ensure the pasta on top doesn’t fly out of the topping and become inedibily crisp which it can do if your béchamel isn’t thick enough.
The béchamel sauce needs to be thick in order to properly cover the pasta sheets. For tips on how to get a good thick sauce then follow my dedicated béchamel sauce recipe.
Make sure you top your lasagne generously with the béchamel sauce to protect the pasta. The pasta sheets need to be well covered with sauce and then cheese to stop the pasta from drying out.
Test your pasta sheets are properly cooked by using a metal skewer or thin knife and poke into the middle of the baked dish. If the inserted instruments pushes down easily then you can tell the pasta is properly cooked. If it’s a little tough to push down then you might need to give the lasagne an extra 5-10 minutes. Place some aluminium foil over the top if you feel the top is overbrowning.
Rest the lasagne for 15 minutes before serving – it will hold its shape better and you won’t scorch your tongue on the cheese.
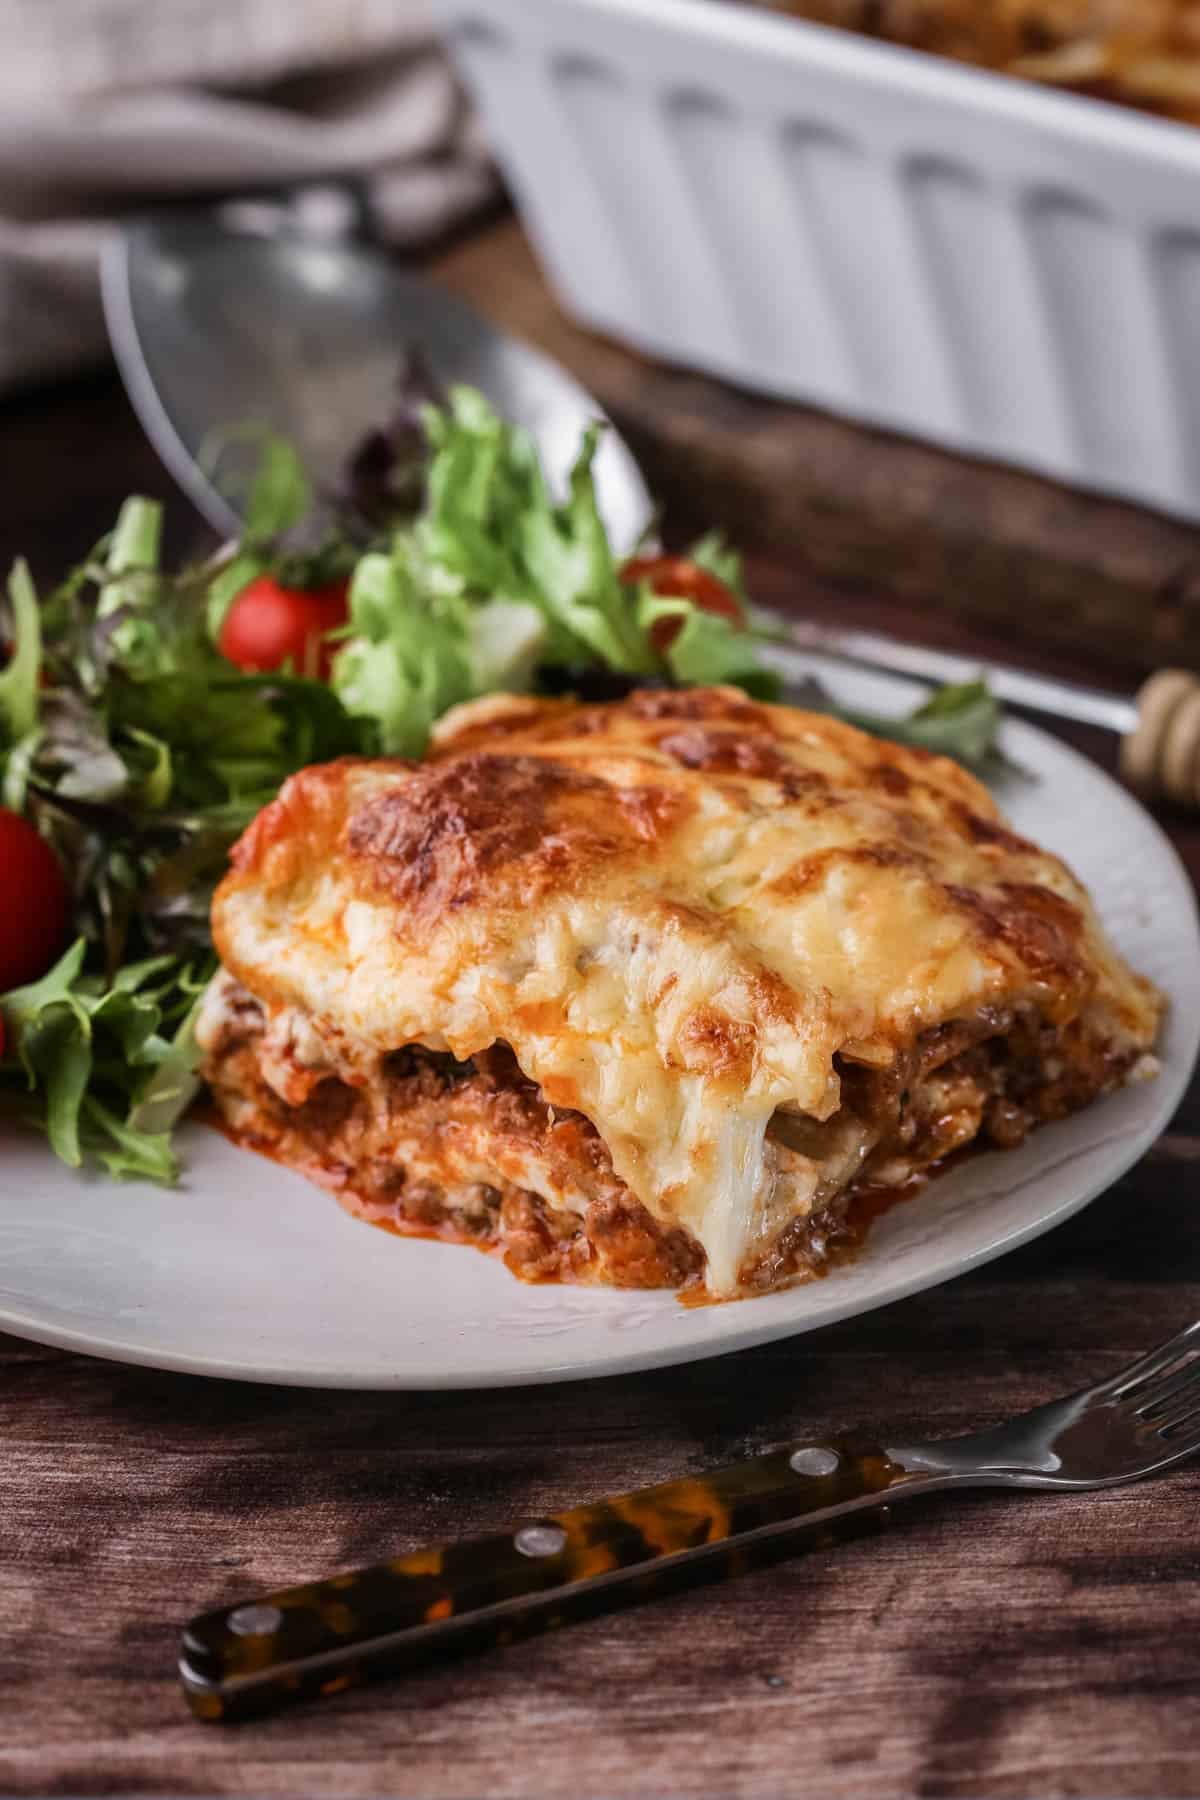
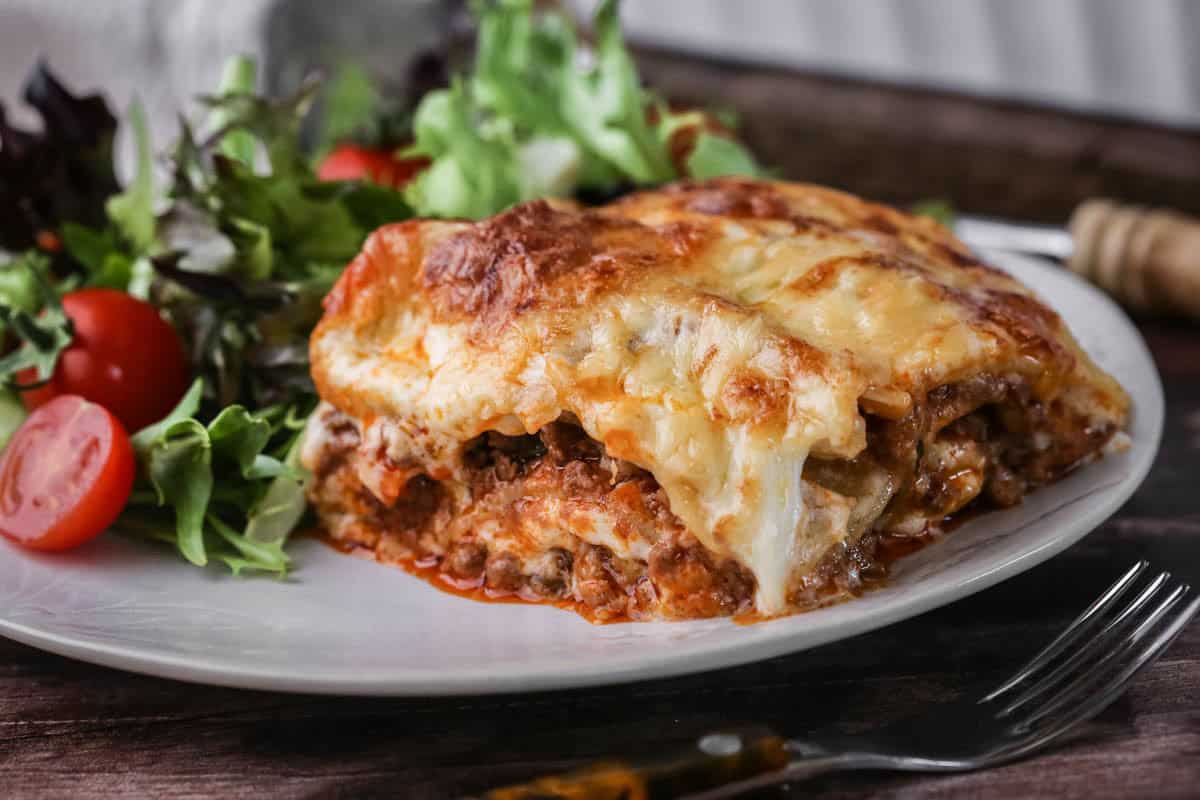
Serve with a simple salad and garlic bread.
Recommended Equipment: Deep 33 x 23 cm Lasagne Dish, Meat Chopper, Le Creuset Large Casserole Dish
Instant Pot Ragù
By making the ragù in the Instant Pot you can get a deeper flavour quicker. I suggest below that you could make the ragù ahead so the flavours can really develop as it rests. However, if you make your ragù in the Instant Pot there is no need for that at all.
Follow the instructions for making the ragù as written in the method below just switch up the wide bottomed saucepan for the Instant Pot.
Instead of simmering the ragù for 30 minutes after you have added the passata you will need to seal the lid of the Instant Pot and cook on high pressure for 25 minutes. Naturally release for 10 minutes before switching to quick release and removing the lid. Then assemble the lasagne as instructed.
Making Ahead
Lasagne is great for making ahead and is one of those dishes that tastes even better the next day after the flavours have had a bit of time to rest and deepen.
However, my preferred way to make ahead is to prepare the ragù and the béchamel sauce separately up to 3 days before and then assemble and bake the lasagne on the day of serving. This is because I do find that the lasagne gets a little drier on the re-heat.
Store the components of the dish in the refrigerator in airtight containers. You don’t need to re-heat the ragù or the béchamel sauce when you are assembling. But you may want to add an extra 5 minutes to the cooking time.
The whole cooked lasagne or the leftovers can be kept in the refrigerator, covered, for up to 3 days.
Freezing
Lasagne is the perfect freezer meal as it’s all there in the dish but I do recommend freezing before baking in the oven. Assemble as per the recipe below in a deep foil dish (this is a 4 layer lasagne so needs the depth).
Wrap the lasagne, including the dish, up in a double layer of cling film and aluminium foil to freeze for up to two months. Remove from the freezer to defrost overnight. Cover with foil and bake for 50-55 minutes at 180°C/ 160°C fan / gas mark 4.
Re-heating
If you are re-heating the whole dish of lasagne then place in the oven with foil over the top to stop the cheese from over-browning for 40 minutes at 200°C / 180°C fan assisted / gas mark 6 / 400°F.
However, if you are re-heating individual leftover slices then you can choose to warm in either the air fryer or the microwave. I recommend the air fryer if you have one as the top goes lovely and crispy again rather than chewy, which happens in the microwave.
Air fryer. I use the 20cm Falcon Enamel Pie Dish which is a good size for a decent slice of lasagne. Arrange the slice of lasagne in the pie dish and place in the basket of the air fryer, on top of the crisper plate. Set the air fryer to 200°C and heat for 6 minutes until the lasagne is piping hot.
Microwave. Place an individual slice of lasagne on a microwave-safe container and cover loosely with a lid or cling film to retain the moisture. Heat for 6-7 minutes until piping hot.
FAQs
For most brands of gluten-free pasta pre-cooking is not necessary. I do agree that it’s not all-important. However, I do advocate blanching the pasta sheets needed for the top layer of the lasagne. This is a five minute job and just helps protect the pasta so it doesn’t dry out and crisp up too much if your béchamel and cheese aren’t thick enough.
Just a few easy swaps will turn this recipe into a dairy-free version. Choose a dairy-free cheese for topping the lasagne. Violife is usually what I would use and just skip the mozzarella. Then the other swaps are in the béchamel sauce. Use a plant-based butter like Flora Unsalted Block Butter Alternative and use oat milk or almond milk instead of the whole milk.
You can turn this lasagne into a vegetarian lasagne by swapping the beef and pork mince for my Perfect Roasted Vegetables. I prefer this than using mushrooms, lentils or spinach (all of which I can’t bear I’m afraid. Not true about spinach as I’m allergic). But the roasted vegetables are utterly delectable. You won’t need the extra sofrito base in this original recipe, so you just need to heat the olive oil, then add the rest of the ingredients including your ready-roasted vegetables and simmer everything for 30 minutes.
What To Serve with Gluten-Free Lasagne?
You need something light and fresh to accompany the rich lasagne. I like a lovely green salad with a zesty lemon vinaigrette.
Is garlic bread a must for you too? I know it’s carb overload but who cares – it’s too good to miss.
Another firm favourite is my Garlic Herb Focaccia from my Simple Gluten-Free Breads ebook.
More Gluten-Free Family Favourite Dinners You’ll Love
This Tuna Pasta Bake is an easy family recipe which is perfect for midweek meals. I’ll show you how to make perfect al dente gluten-free pasta smothered in a flavourful cheesy tuna tomato sauce and how to choose the best gluten-free pasta for the job.
Gluten-Free Shepherd’s Pie is a deeply flavourful homely recipe that is a favourite with the whole family. Delicious lamb mince cooked in a rich gravy with plenty of vegetables and a crisp buttery potato topping for the ultimate comfort food.
This Gluten-Free Toad in the Hole recipe is total British classic beloved by the whole family. Easy to make with a quick batter and no resting time. This recipe is made without cornflour and instead this simple batter uses easy to find rice flour and tapioca starch for a lovely rise and light crunchy golden brown crust.
Enter your email below to get this recipe sent to your inbox plus get new recipes, baking tips, and updates.
Gluten-Free Lasagne
Ingredients
- 2 tablespoons olive oil
- 1 large white onion - finely diced
- 2 sticks celery - finely diced
- 2 carrots - peeled and finely diced
- 700 g beef mince
- 300 g pork mince
- 2 garlic cloves - crushed
- ¾ teaspoon kosher salt
- ½ teaspoon ground white pepper
- 125 ml red wine
- 2 tablespoons tomato puree - 30g
- 2 sprigs fresh thyme
- 2 fresh bay leaves
- 400 g passata
- 250 g 12-13 gluten-free lasagna sheets
- 150 g gruyère cheese - grated
- 125 g mozzarella - torn
Béchamel sauce
- 100 g unsalted butter
- 50 g cassava flour
- 1000 ml whole milk
- ¾ teaspoon salt
- ⅛ teaspoon ground white pepper
- ⅛ teaspoon freshly ground nutmeg
Instructions
- Heat the olive oil for a couple of minutes in a large wide bottomed saucepan.
- Add in the onion, celery and carrots and fry on a medium heat for about 10 minutes until the onions are translucent.
- Add the beef mince, pork mince and the crushed garlic. Fry together until the mince has browned.
- Pour in the red wine and stir together until the red wine begins to bubble.
- Add the tomato puree, thyme, bay leaves and salt and pepper. Stir in the passata and bring to a gentle boil.
- Turn the heat down and simmer with the lid on for 30 minutes whilst you prepare the bechamel sauce.
- Remove the thyme and the bay leaves prior to assembly.
Béchamel sauce
- Melt the butter on a medium heat in a large saucepan.
- Once the butter has melted, turn the heat to low and add the flour, whisking for 2-3 minutes, making sure to scrape out the corners so no flour gathers there.
- Pour the milk into the roux gradually, whisking all the while so the mixture is smooth. As you pour in more milk you can turn up the heat a little and switch to a balloon whisk which is more effective at smoothing out the lumps.
- Once all of the milk has been added then whisk in the salt, pepper and nutmeg. Continue mixing until the béchamel is thick, smooth and creamy and switch off the heat.
- Press a sheet of cling film or baking parchment to the surface of the béchamel so a skin doesn’t form whilst you are waiting to assemble the lasagne.
- Just before you assemble the lasagne, give the béchamel a good whisk to smooth it out again.
Blanching the Pasta
- You only need to blanch the top layer of pasta sheets – so 3-4 depending on the exact dimensions of your baking dish.
- Fill a saucepan, wide enough to fit a lasagna sheet, with an inch or two of water and a pinch of salt.
- Whilst you are bringing the water up to boil spread a large sheet of baking parchment on your work surface ready for the blanched pasta to rest on.
- Once the water is boiling place in one lasagna sheet with a pair of tongs. Boil the pasta for 1 minute then remove with the tongs and place on the baking parchment to rest whilst you blanch the remaining sheets.
Assembly
- Pre-heat the oven to 180°C/ 160°C fan / gas mark 4.
- Choose a deep 33 x 23 cm Lasagne dish and begin to assemble the lasagne.
- Spread a few large spoonfuls of ragù to evenly cover the bottom of the dish but it won’t be a thick layer as you have to make sure you have enough for four layers.
- Arrange 3 pasta sheets on top of the ragù.
- Spread a few large spoonsfuls of the béchamel sauce over the pasta sheets, making sure to totally cover them right to the edges of the pasta.
- Continue to layer the ragù, then the pasta, followed by the béchamel sauce until they have been used up and the blanched pasta sheets are the ones you use on the final layer. Make sure the final topping of béchamel covers the pasta sheets thickly so no pasta is exposed.
- Sprinkle over the torn mozzarella and grated cheese.
- Bake in the oven for 50-55 minutes. Remove from oven and allow to rest for 15 minutes before cutting and serving.

Hi,
This looks amazing!
Have you ever tried to make your own gf pasta? I’m now corn intolerant as well, so am thinking of making my own, but wouldn’t know how to make it bind together. Rice flour would be my first choice, but how to give it that pasta feel, rather than noodles?
Yes I have - I haven't gotten around to publishing one yet though. Nut flours are the best for pasta due to the high protein content so it binds together really well. My favourite flour to use is Chestnut flour. Almond flour is also very lovely. Rice flour would be a little gritty and you are right, would not bind very well.
Hi there. This looks great!
Just wondering-do you freeze your lasagne before or after cooking it?
Hi Priya, I usually freeze after cooking.
what brand of gf lasagne do you suggest for this ?
It looks like you might be based in the US so we might not have the same brands available to us. However, there is not much choice of gf lasagne sheets in the UK. All the ones available in my local supermarket are rice flour and cornflour based with around 55-60% cornflour. I have found these all work well but I do recommend always blanching the pasta sheets before using.